Nvidia Freestyle does not work and is not supported, how to turn it on? How to enable and configure the NVIDIA Freestyle feature in games Calling issues.
Many gamers complain that when they start GEFORCE EXPERIENCE, an unknown error message appears and the service does not work. The application offers to restart the service, but the error still remains. Most often, the reason for this situation is the configuration of NVIDIA services, the start of which is set to manual mode, or is generally inactive. How to solve this problem, we will consider further.

Step one. We need to go to "System Administration", namely to "Services". To do this, go to the desktop and right-click on the "My Computer" icon to call up the context menu, in which we select "Management".

Step two. We go to "Services and Applications", where we select services, sort them by name, then we find everything related to NVIDIA.

Step three. We see that not all NVIDIA services are currently running.

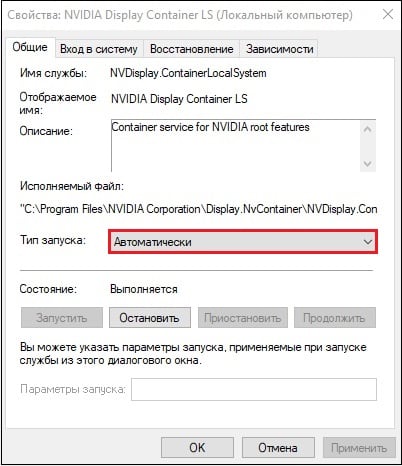
We start the non-working ones, for this we double-click on the inactive service and select "Automatic" in the startup type. Next, click on the "Start" button and after launch, click on "Apply" and "OK". This procedure is repeated for all inactive NVIDIA services.

Close all windows and restart GEFORCE EXPERIENCE.
If the above method did not help you, then the reason may be in damaged drivers, or files of the GEFORCE EXPERIENCE itself. In this case, you need to reinstall them again, removing the previously existing ones.
Experience is an application from NVIDIA. Automatically downloads new driver versions, improves game settings by optimizing the CPU, graphics processor of the video card and monitor resolutions. Downloads the best gaming settings for PC.
What is it for
The application will allow you to flexibly configure the operation of the video card and optimize computer games. But these features will be unavailable if the application stops opening. Let's consider what to do.
Problems with automatic start
Consider the reasons why the OS does not launch Experience. The OS adds the process to startup. If this is not the case, follow these steps.
Experience Windows 10 does not turn on - remove tasks from startup
The mechanism that adds the application to startup has gone astray. It has a special protection system, so services that work with autoload do not see GeForce Experience. They cannot add it.
Check your autoload data. I recommend using CCleaner. Open it, go to "Service".
Next, "Autoload".
Applications that are included after the start of the OS will open. If there is an Experience process in the list, it must be enabled.
If it's not there - reinstall the app
.
How to do it
We go to the address: http:/www.nvidia.ru/Download/index.aspx?lang=ru. Fill out the form:
Next, a download link will appear.
At startup, the installation data will be unpacked. Specify the directory where to save.
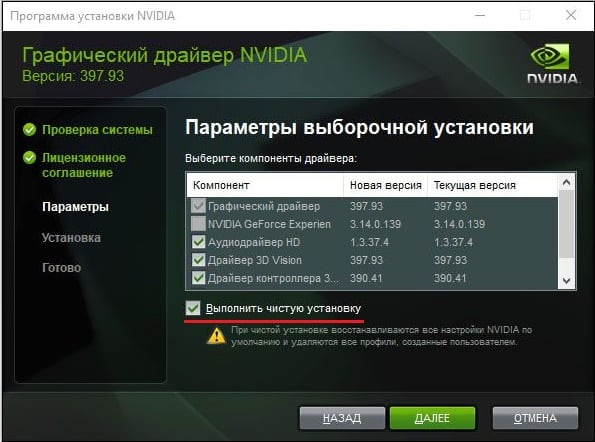
The installer will start automatically. Check "Custom".
The components that will be installed will be displayed. Check that the item is marked as in the screenshot:
Mark the item as in the screenshot. This will remove old versions of the program.
Installation will begin. The OS will update the software and information in the registry.
Use this method if the Experience does not start, a black screen appears.
Experience won't start - check your OS for viruses
There is malicious software blocking the autorun of this application. Check your PC for viruses.
Not enough memory
If a RAM rebooted before the system started, it diagnoses the failure to start other processes. This situation occurs if there are many processes in autoload.
The solution to this problem is optimization. Clean up your PC. Free it from "junk" files, remove unused software. Clean up memory with CCleaner. Go to the "Autorun" section (how to do this was discussed earlier). Disable unused processes and tasks.
Application window not opening, process crash
The application does not start from the system tray. You call the open item, but nothing happens.
The work of the program is provided by the process performed in background. If it fails, restart your PC.
Run the program from the directory where it is installed by default. This is NVIDIA Corporation located in the Program Files (x86) directory. Open the application executable.
Registry errors
The OS recognizes the program as a properly executed task, but it is not, or is missing. What to do? Check your PC for viruses. There is malicious software causing such an error.
Next, diagnose the registry. I recommend using CCleaner. This will help if the application is damaged, but is listed in the registry as an executable task. If that doesn't help, do a full reinstall.
Experience something went wrong won't start
It crashes on startup. A message appears: “Something went wrong. Restart."
This is due to the incorrect operation of the program, the lack of drivers, or the background service did not start.
How to fix
If the program is newly installed, it may not be compatible with the PC.
Right-click on the application's shortcut. Next, set the values as in the screenshot:
Launch the program using the shortcut. If this does not help, consider the follow-up method.
Reinstall the Visual C++ package
Perhaps some system files, without which the application will not work properly, are missing. Do the following.
Go to: https://www.microsoft.com/en-US/download/details.aspx?id=48145. Click "Download".
Select the downloaded file depending on the bitness of the OS. If you do not know how to determine it, press "Win + R" and write "control".
Look at the system type:
Download the required file.
Install.
Service setup
Display Container LS is a service that provides the main services of NVIDIA. Enables launching applications. It is disabled by default. To enable, press "Win + R", then "services.msc".
Set startup type
Press the key combination "Win + R", write "msconfig".
Find services related to NVIDIA. Check the boxes next to them. Restart your PC. Check service engagement.
Recording won't start
The application starts, the video capture settings work, and the Share interface works. When you click on "Record" nothing happens. What to do? Disable the in-game ShadowPlay overlay.
We open the registry. Press "Win + R", then write "regedit".
We pass along the path as in the screenshot. Delete DefaultPathW and TempFilePath.
Next, in the application menu, activate the in-game overlay.
Problems with autorun
To begin with, it is worth considering the reasons why the system refuses to run the program in passive mode, as it should do under normal conditions. Usually, the system forcibly adds the process to startup every time the computer starts. If this does not happen, then you should understand.
Reason 1: Deleting a task from startup
The first thing to check is the buggy mechanism for automatically adding the GeForce Experience startup process to startup. The problem is that this process has a specific protection system, because most programs that work with autoloads do not see GeForce Experience. And, as a result, often they can neither turn it on nor turn it off.
There are two exits here. The first one is still try to check the data for autoload. For example, in CCleaner.
In the program, you need to go to the "Service" section.
Here you need to go to the "Startup" subsection.
After selecting this menu item, lists of all programs that are included immediately after the start of the operating system will open. If the NVIDIA GeForce Experience process is noted here, you should check if it is enabled.
If the process did not turn out, then it can help complete reinstallation of this software.
To do this, you need to download the latest up-to-date drivers from the official NVIDIA website.
Here you will need to fill out a form, indicating the model and series of the video card, as well as operating system.
When you run the downloaded file, the materials for installing drivers and software will be unpacked.
The installer will automatically launch after that. Here you should select "Custom installation".
The user will see a list of components to be installed. You should check if there is a checkmark next to GeForce Experience.
Then you need to check the box next to the "Clean installation" item. This will erase all past versions of the software.
After that, you can start the installation. The system will completely update both the software and the registry entries. This usually helps to remind Windows that it should launch GF Experience every time it starts.
Reason 2: The activity of viruses
Some malware may block GF Experience auto-start either indirectly or specifically. So it is worth checking your computer for viruses and getting rid of them if found.
After that, you need to restart your computer. If something really interfered with the startup of the program, and it was removed, then now there should be no problems.
Reason 3: Lack of RAM
Also, the system may simply be too overloaded right from the start to also run GF Experience. In such a situation, failures in the launch of other processes can also be diagnosed. By the way, most often this problem is observed just on such devices, where many other processes appear in startup.
There is only one solution here - optimization.
First you need to free up as much free space as possible. To do this, it is worth removing all the garbage on the computer, as well as unnecessary files and programs.
Then clean up the memory. You can take, for example, the same CCleaner.
Here, in CCleaner, you should go to the autoload section.
It is necessary to disable as many unnecessary processes and scheduled tasks as possible.
After that, it remains only to restart the computer.
Now everything should work much better and nothing will prevent GeForce Experience from automatically turning on.
Call problems
Also, many users are faced with the fact that they cannot call the GeForce Experience window itself to work with drivers and other important program functions. In this case, certain factors may interfere.
Reason 1: Process failure
This problem is the most common one. The system has failed to execute a background task that keeps the program running.
In most cases, the only solution is to restart the computer. Usually after that the program starts working as it should.
It is worth adding that there are cases when a process failure leads to the fact that the program does not start from the shortcut from the notification panel. In this case, when the user chooses to open the NVIDIA GeForce Experience panel, nothing happens.
In such a situation, it is worth trying to directly launch the program from the folder where it is installed. By default on Windows 10, its address is here:
C:Program Files (x86)NVIDIA CorporationNVIDIA GeForce Experience
Here you should open the application file NVIDIA GeForce Experience.
If the error really was in the launch from the notification panel, everything should work.
Reason 2: Registry issues
It is also often reported that there may be a failure of entries in the registry about the operation of the program. The system recognizes GF Experience as a correctly executed task, while it may not be such, and indeed the program may even be absent.
In such a system, the first step is to check the computer for viruses. Some malware can cause these kinds of problems.
Especially this step can help if the program is really damaged to such an extent that it cannot work on the computer, but it is listed in the registry among the executable tasks.
The next step is to test the result. If the program still does not start, then it is worth doing a clean reinstallation, as demonstrated above.
Reason 3: Program crash
A banal failure of certain components important for the operation of GeForce Experience. If none of the above helps, then in most cases this means exactly this problem.
Only a complete clean reinstallation of the software can help here.
Troubleshooting "Something went wrong..." error
One of the common situations that users experience is an error with vague content: “Something went wrong. Try restarting GeForce Experience." or similar text in English: “Something went wrong. Try restarting GeForce Experience.".
To fix it, you will need to work with Windows services:
Press the key combination Win + R, enter services.msc and click OK.
In the list of opened services, find "NVIDIA Telemetry Container", right-click to open the context menu and select "Properties".
Switch to the “Login” tab and in the section with the same name, activate the “With a system account” item.
Now, while on the "General" tab, set the startup type to "Automatic" and click "Start" if the service was not active. Click "Apply".
Additionally, configuring the "NVIDIA Display Container LS" service can help. Open it in the same way, through "Properties".
Set the startup type to "Automatic" and apply the changes.
Some users may experience an error starting GeForce Experience even after setting up and enabling services. Therefore, you will need to enable another one - it is called "Windows Management Instrumentation".
Open the "Properties" of the service in the way already described earlier, set the startup type to "Automatic", set the status to "Run", save the settings.
To be sure, restart your computer and try launching GeForce Experience.
Run in compatibility mode
GForce Experience may cause "Something went wrong" error due to incompatibility. To fix this, you need to call the properties of the program shortcut and check the boxes "Run in compatibility mode" (and specify the operating system) and "Run as Administrator". Installing compatibility
Then click "OK" and then run the program through the shortcut.
Error code 0x0001 or 0x0003
When opening GeForce Experience, an error code 0x0001 or 0x0003 may appear.
Troubleshooting is also quite simple.
Installing beta drivers
To fix the error, you should try updating the drivers (the method was described above) or installing their beta version. Please note that this version of the drivers may be unstable, but it may contain fixes for some bugs that appear in previous versions.
Allow the service to interact with the local account
Using the "services.msc" command in the "Run" window, you should open a list of all services. You need to find NVIDIA Telemetry Container, open its properties. In the "Login" tab, check the box that allows interaction with the desktop. After restart your computer.
Checking Nvidia folders
In some cases, the directories in which the Nvidia software (software) is installed may not have the necessary permissions. To fix this, you need to change the ownership of these folders to the "System" group:
Open the C:Program Files (x86) directory in Explorer.
Select NVIDIA Corporation folder, open properties.
In the menu that appears, select the "Security" section and click on the "Advanced" button.
Additional security options for this directory will open. The "Owner" line should be "System". If this is not the case, you need to click on "Change".
A selection window will appear. At the bottom you need to enter "System", click on the button on the right "Check names" and confirm by pressing "OK".
It remains to confirm the changes and restart the PC. After turning it on, you need to check if the error has disappeared.
Removing drivers
There are several programs to completely remove the video card driver along with a utility. For example, you can use the Display Driver Uninstaller. Procedure:
Open the program.
Select video driver.
Click the "Uninstall and Restart" button.
Restart your PC.
After these steps, install the driver again
(he fell out of favor with the new anti-cheat), apparently, the contrast in the game can no longer be changed, visibility cannot be increased ... No! Down with decadent thoughts! The Nvidia Freestyle settings in PUBG will allow you to improve clarity, and generally make the picture much nicer. We will also deal with problems if the program does not turn on or writes that the game is “not supported”.
First you need to install - they must be at least version 390.65, otherwise you will not be able to start Freestyle.
Next, download GeForce Experience - it is this utility that will allow us to work on graphics. The link will take you to the official website where you can get the latest version.
After installing these programs, launch GeForce Experience. Please note that you will have to register an account (you can use Google). But this utility will monitor the release of new drivers and notify you as they are released.
Now let's see how to enable Nvidia Freestyle:
- Immediately go to the settings by clicking on the gear;
- In the window that appears, you need to enable experimental features;
- Just below that is the "In-Game Overlay" feature. Activate it;
- After that, go into the game and open the Freestyle window with the keyboard shortcut "Alt + Z" and open the "Filter" window, or immediately press "Alt + F3" to go to it;
- Start adjusting your game settings.
Filters
Now let's see how the PUBG filters are configured with Nvidia Freestyle and what should be changed in order to be able to see adversaries from afar.
Also, study our guide, where they are - they will help you to notice enemies hundreds of meters away without any problems. And then your skill and luck will go into business.
I will not describe what each of the parameters does - this is pointless, since it is easier for you to turn each slider and see the result with your own eyes. I must say right away that the utility offers a lot of useless things, some of which simply spoil the picture (like, for example, "Retro"), while others do not change anything at all.
In order not to dig too much, I suggest you take a look at the ready-made options. Just remember that they are not a panacea. Feel free to experiment, change the settings to your liking in order to achieve satisfactory results. Also remember that it is better to keep a separate filter for Miramar, and a separate one for Erangel. The fact is that the color scheme of both cards is very different and there is no universal option for them. Again, take ready-made values, and then adjust and look for the most acceptable for you.
To thoroughly, using an example to study this Reshade replacement for PUBG, we will use this screenshot:

First Preset - Enhanced Color and Clarity

As you can see, the picture here is more colorful: the surrounding world sparkled with colors, became more attractive and warm. This will make moving elements in the distance (yes, I mean the people you want to shoot) more visible.
- Saturation - just responsible for the "juiciness" of the picture, for more colorful colors. Bet eighty percent;
- Color changes - five percent is enough.
Detail:
- Sharpness - 25%;
- Clarity - Helps sharpen the edges of objects. So you will better see the enemies running in the distance. Not less than fifty percent;
- HDR toning - 75%;
- Blur to zero.

The second preset is a clear border

This option is a little cheating - it makes the borders of objects clearer. That is, the silhouettes of your enemies will be outlined with a black line. This especially helps to notice a figure flickering in the distance. The color scheme is a little depressing, but you can correct it by playing with the settings yourself: no one forbids you to change everything to your liking.
For those who do not like the shade, reminiscent of films about the war in Iraq, I recommend the "Color" tab. The previous preset showed that it can greatly change the gamma of the game. Practice is the key to success.

Third - blue tint

This option will make the image tone colder. To change this, just turn the "Temperature" slider. Clarity becomes much better due to the "Detail" section. Of course, the effect of this preset is much less than the first two, but it is much better than the original.

Won't turn on or work
Not everyone's setup will go smoothly. Some of you may have problems on the way to perfect gameplay. Let's see what can be solved - and how.
Here is a list of common problems:
- Unable to enable "Experimental Features": the program endlessly searches for updates.
- Nvidia Freestyle writes that PUBG is not supported - this can also come out in CS: GO and Team Fortress 2 - just in those projects where the utility should work.
The root of all these troubles is in the conflict between different driver versions and GeForce Expirience.
If the in-game overlay in GeForce Experience does not turn on on your computer, then you should not rush and install alternative software. You can try to solve the problem yourself, especially since this is not so difficult to do. Today we will tell you what this ShadowPlay function is and what to do if this function does not work.
What is an In-Game Overlay?
The GeForce Experience in-game overlay is a special feature that is used to record video, stream what is happening on the computer, take screenshots, and record video from the desktop. This solution is characterized by minimal consumption of computer resources, which is especially useful when recording the passage of games. This technology is also called ShadowPlay or Share overlay.
Video capture option - ShadowPlay
- More and more experienced gamers are using this technology. Also recently, a new experimental feature appeared in GeForce Experience - .
What to do if the overlay does not turn on?
First of all, you need to determine whether the function is missing initially or whether it disappeared in the process. Where to start? Of course, with standard procedures.
If the ShadowPlay function did not work initially

If these steps did not help you, then there is a chance that the installed GeForce Experience has problems. Download the previous version or wait for the new update to be released. As a last resort, you can try the beta version of the program.
GeForce Experience in-game overlay no longer enabled
This can be caused by various problems and bugs. If the standard actions did not help, then you should try rolling back the video driver to a previous version. If this is not possible, just uninstall the driver and try to start the game. You can also try a clean install of older drivers. In addition, installing a previous version of GeForce Experience will help.
Function ShadowPlay Highlights has certain compatibility issues with OS Win 7/8. This feature is used in games to record significant events. The developers already know about the problem, and will fix it soon.
In the meantime, each game has its own solutions. In particular, for PUBG, you can use the GfeSDK file located at the link: international.download.nvidia.com/GfeSDK.dll . You need to put it in a folder: PUBG\TslGame\Binaries\ThirdParty\NVIDIAGfeSDK\Win64 agreeing to a replacement.
Another life hack from folk masters, suitable in cases where it is impossible to call the ShadowPlay option:

Unfortunately, you will have to repeat this procedure after restarting the system.
Conclusion
As you can see, there are many ways to solve the problem. It is likely that the problem will be resolved with the next driver update. If, after doing everything possible, the GeForce Experience in-game overlay still does not turn on, we recommend that you contact NVIDIA support.
In light of recent reports that the major online gaming servers will be adding the reshade feature to the banned list, there is an urgent need for alternative means. There is a solution to the problem. True, only owners of NVIDIA video cards can use it. New option - Shade Injector is now included in the updated GeForce Experience. Next, we'll show you how to enable and use NVIDIA Freestyle. We will also talk about how to set up Freestyle for PUBG.
What is this technology from NVIDIA?
NVIDIA Freestyle technology is a shader injection that supports multiple presets for each game. In this way, several display variants suitable for different occasions can be created in advance. The technology will be an excellent alternative to the forbidden ReShade.
Freestyle allows you to change the visualization parameters by applying both standard filters and using your own settings. This set of tools contains useful features such as night mode, the ability to adjust the image for people with poor color discrimination. And that's not to mention the styling of the picture with filters. In other words, everyone will find in it something useful for themselves, and, of course, gamers will have demanded technology.
How to enable Freestyle?
First of all, you will need to install/update GeForce Experience and all other video drivers. Along with the update, the Freestyle option will also be installed. After that, just enable the “Experimental Features” checkbox in GeForce Experience, and you can safely launch the game. Why experimental? Because the product is currently in the stage beta testing.
 Enabling the experimental Freestyle feature in the GeForce Experience panel
 Well, then everything is simple: when open window with the game we hold down the combination "Alt" + "F3" - and now we are in the settings menu. Please note that the presets recommended for games may need to be adjusted to fit your screen to provide an optimal picture. Not all modern games are supported by Freestyle, but there are still many popular ones:
- PUBG;
- warfare;
- World of Tanks;
- Diablo III;
- Grand Theft Auto V;
You can check out the full list of supported games here. If the game is not supported by the technology, then below we will tell you what to do.

If NVIDIA Freestyle is Not Working or Turning On

If the game is not supported by technology
Can Freestyle be used in unsupported games? Of course, yes! How to run Freestyle on unsupported games.

The fight against reshade on the part of game developers is intensifying, so it is quite logical that Freestyle also falls into the list of unwanted software. However, there is no way for games to test the functioning of Freestyle on PC, which means that the modified image remains unnoticed by anti-cheats and other protective mechanisms.
Freestyle settings in PUBG
Many people successfully activate Freestyle in PUBG, but they don’t know how to set their settings correctly - let’s figure it out. As already mentioned, you need to build on the display on your monitor. The following parameters can be used as a starting point, further customizing the picture for yourself, you will be able to see enemies better.
- Color: saturation - 80, color change - 5;
- Detail: Sharpness - 25, Clarity - 52.5, HDR Toning -75, Blur - 0;
- The remaining parameters are 0.
- Color: saturation - 50, color change - 0;
- Detail: Sharpness - 100, Clarity - 80, HDR Toning - 80, Blur - 10;
- Vignette: intensity - 0;
- Special: sketch - 50, color change - 90, vignette - 0.
Do not forget that you can install 3 presets with personal settings at the same time - to do this, you just need to switch the cell with the number in the upper part. Have a nice game!
The Nvidia control panel, or in other words Nvidia Update, is a universal software that allows users of personal computers with an Nvidia video card installed, manage it, allocate resources in an optimal way, etc. This software works great on GeForce and ION GPUs, both for personal computers and laptops. In the event that this software is not installed on your computer, then it can be easily downloaded from the official Nvidia website. In the control panel, the user will be able to independently set the necessary settings. For example, run or disable Nvidia Update, set the frequency of checks for updates. You can enable or disable beta driver notifications for your Nvidia graphics card, and you can even edit game profiles.
Launching the Nvidia Control Panel
Unfortunately, some users, even those who have the Nvidia control panel installed, cannot find it, which means they cannot fine-tune the video card settings. There are two quite simple ways to open this control panel. The first method is that the user simply needs to right-click on an empty spot on the desktop, and in the context menu that appears, select the "Nvidia Control Panel" item. The second way is no less simple than the first. To do this, right-click on the system tray image (arrow in the lower right corner of the screen). After clicking, all the logos of programs running in the tray will open. To launch the Nvidia control panel, you need to click on the corresponding icon (Nvidia logo).
Issues with Nvidia Control Panel
Some may encounter one significant problem - the driver control panel does not open. There are several solutions to this problem. First, if you have programs installed on your computer that allow you to directly control the monitor, then you need to remove them. They directly block the operation of the Nvidia control panel and cannot be used. Secondly, the control panel may not open if hardware acceleration is disabled on the computer. It can be enabled in the display properties. And lastly, the driver control panel may not start if the Nvidia Display Driver Service system service is disabled. In order to enable it, you need to go to the "Control Panel", select the "Administration" item and find the "Services" field. If this service is disabled, then you need to enable it to start automatically.
When launching the popular "GeForce Experience" program, we may encounter the message "Something went wrong. Try restarting GeForce Experience." This error has been encountered by many Windows users over the years. recent years, and the factors that cause the problem may differ on each PC. Below we will analyze the most massive causes of the problem, as well as outline options for solving it.
GFE malfunction
The "Something went wrong, please restart GeForce Experience" error usually occurs when the user's PC is unable to run the "GeForce Experience" program correctly. The bug began to be fixed massively with the advent of the GeForce Experience 3.0 version, which contains a new option and improved performance, and was not without various bugs and errors.
The error in question usually occurs due to the following reasons:
- The GFE application is incorrectly configured by the user;
- The body of the program is damaged;
- Nvidia services (in particular, "Nvidia Display Container" or "Nvidia Telemetry Container") either do not start at all, or do not work properly;
- The system has outdated drivers for the graphics card;
- Correct operation of GFE is blocked by antivirus;
- Not installed on the system Latest updates for Windows OS.
In some cases, an unstable network connection may also be the cause of the problem, due to which the GFE may not work correctly.
let's consider effective ways to get rid of the "Something went wrong" error on your PC.
Stop all GFE processes and restart the application
The first step in troubleshooting is “Something went wrong. Try restarting GeForce Experience" try to launch GFE correctly.

Configure Nvidia Services
- Click on Win + R, type services.msc there and press enter.
- In the list of services, find " Nvidia Telemetry Container", hover over it, right-click, select "Properties".
- In the service properties window that opens, select the "Login" tab, activate the "With a system account" option there, and then click on "Apply".
- Now go back to the list of services, find the "Nvidia Display Container" service, right-click on it, select "Properties".
- Go to the "General" tab, and set the startup type to "Automatic".
- Click on OK and restart your PC.
Update existing Nvidia drivers
Also try updating the drivers for your Nvidia graphics card. To do this, you must first completely uninstall the existing drivers (the popular DDU program will help), and then install the drivers from the Nvidia website.
It helped some users to fix the error “Something is wrong. Try restarting GeForce Experience" to uninstall all graphics drivers using DDU, restart your PC, and then install GFE. Then it will be necessary to let the program update the graphics drivers on its own.
Also, programs like "DriverPack Solution" will help in installing drivers, scanning the system and installing fresh drivers for system components your PC.
Reinstall GFE
Completely remove the GFE program from your system (tools such as Your Installer will help). Then install new version program, select advanced installation during installation, and activate the "Clean Installation" option when installing drivers.
Install updates for your system
In some cases, the lack of fresh system updates for your Windows does not allow GFE to work correctly. Click on the "Start" button, select "Settings" from the list of options, then "Update and Security", and click on the "Check for Updates" button. After installing the latest updates, try launching your GFE.

Check the name of the user directory
Make sure that the name of the user directory located along the path C:\Users\User Directory(the last one will be called differently) there are no Cyrillic or digital characters. If there are any, it is recommended to rename the specified user directory, restart all Nvidia services, and check if the GFE is working.
Conclusion
The error "Something went wrong. Try restarting GeForce Experience" usually indicates a problem with the Nvidia drivers on your system. I recommend following the tips above (paying special attention to working with services), which will solve the error "Something went wrong" on your PC.
In contact with
For several years now, video card manufacturers have been supplying their devices with special programs that allow them to optimize their work as much as possible. For example, for nVidia graphics cards, this is GeForce Experience, and if you have this application installed, then you should definitely explore its capabilities. You will be able to customize the operation of your video card as much as possible, as well as optimize those computer games that you play with the help of special functions. However, all this will not be available to you if your GeForce Experience does not start - unfortunately, many users face this problem. Therefore, it is worth looking at how this issue can be resolved without using the help of technical support.
The essence of the problem
If we talk about the fact that GeForce Experience does not start, there may be several options. For some users, the program does not want to turn on at all, while for others it crashes at startup. Someone can use it up to a certain point or action, after which the error still appears. In general, quite a lot of various cases have been registered that lead to unpleasant consequences - up to and including turning off the video card. Accordingly, you need to be able to cope with emerging problems in emergency situations. You should not improvise, it is better to read the instructions and act in accordance with the recommendations - then you will have a chance to cope with the problem without outside help. So, if your GeForce Experience won't launch, what should you do first?
Antivirus check

Naturally, you can run an antivirus so that it checks your computer for malware that blocks it from starting. However, in most cases this does not work. And in this situation, the antivirus was not discussed because of the virus scan, but because it could be the reason that your GeForce Experience does not start. The fact is that many antiviruses indiscriminately add various applications to the list of potentially dangerous ones, thereby blocking their launch on the computer. To check if your video card program is on this list, you will need to go to your antivirus settings. In the event that it got there, you will need to manually remove it from there, and then add it to the exclusion list so that the antivirus will no longer perform such actions with respect to this software. But this may not always be the problem, so you need to know what to do when Nvidia GeForce Experience does not start for some other reason.
Problems with new drivers

From time to time, you may have problems downloading new drivers for your video card. And then you may definitely have questions about why GeForce Experience does not start, because every person who downloaded the update wants to see the improved operation of the device, and not what happens in this case. And anything can happen: your software center may stop starting, it may even turn off for you, and sometimes even the video card turns off. Then you need to manually remove this process, kill all its "tails", and then again manually start it through Windows services. The thing here is that sometimes drivers come out not very smooth, and before the developers notice it, already many people download them, install them and give themselves a headache. Therefore, use fixes that knowledgeable people make and post on public resources so that people can wait for the official patch from the developers. Therefore, if your GeForce Experience takes a long time to start after installation, you should immediately think about the fact that the consequences may not be the most pleasant.
Drivers tab

GeForce Experience has quite a few tabs, each containing useful information, as well as rich customization options. However, in some cases (especially after installing not the smoothest drivers), one of them can bring you a lot of problems. The fact is that without an official patch, the "Drivers" tab becomes a restricted area. Even if you completely fix your graphics card-related software and it starts up again, you only need to go to the driver update tab once and GeForce Experience will stop working again. Therefore, bypass it, and if possible, write in the config so that the program automatically opens on any other tab, for example, with games.
English language
Another way to solve the problem, which works for many, but absolutely no one understands why it works, is changing the language. If you change the language to English (for the US region) in the GeForce Experience program itself in the settings, then the problem may disappear by itself. As already mentioned, this solution has no logical explanation, but it works in many cases, so you should just take the opportunity to fix everything without unnecessary problems. So don't think about why everything works - it's better to take the chance when it comes.
Most games have graphics settings that can be used to change some basic image characteristics. For example, you can increase or decrease the brightness, turn motion blur on or off, etc. But, as a rule, the list of available options is very modest and you won’t get a significant change in graphics in this way.
To solve this problem, you can use NVIDIA Freestyle. In this guide, we'll explain what NVIDIA Freestyle is and how to enable and use it.
NVIDIA Freestyle is one of the new features in GeForce Experience. NVIDIA Freestyle, as well as a number of other enhancements to the GeForce Experience, were unveiled at CES 2018 and became available to users in early 2018.
NVIDIA Freestyle provides the user with the ability to apply image post-processing filters to games. This does not require any intervention in the game files or its restart. Everything happens right in the game with the help of an in-game overlay, which is called by the key combination ALT-Z . In this way, you can change the color or saturation, as well as apply other post-processing filters to the image.
At launch, NVIDIA Freestyle has 15 filters available, each with dozens of different settings. For example, there are filters such as: black and white, sepia, vignette, contrast, depth of field, retro, etc.
It should be noted that NVIDIA Freestyle only works on relatively new . This feature requires a GTX 600 or higher graphics card. Notebooks require GTX 660M or higher to run Freestyle. Also, for the function to work, a fresh driver for the video card is required.
As far as games are concerned, NVIDIA Freestyle works with almost all popular games. For example, you can use it in games from such series as: Assassin's Creed, Battlefield, Call of Duty, Counter-Strike, Crysis, DiRT, Dishonored, Divinity: Original Sin, DOTA 2, F1, Fallout, Far Cry, FIFA, Football Manager , Grand Theft Auto V, GRID, Half-Life, Hitman, Just Cause, Metro, NBA, Need for Speed, Overwatch, Resident Evil, The Elder Scrolls, The Witcher.
How to enable NVIDIA Freestyle in game
For NVIDIA Freestyle to work, you need the GeForce Experience program. Therefore, if you have not installed it yet, then go. The first time you launch GeForce Experience, you will need to create account or sign in with your Google or Facebook account.

After launching GeForce Experience, you need to click on the button with the gear icon in order to go to the program settings.

In the settings, you need to scroll down the page to the list of functions. There you will be able to find the NVIDIA Freestyle feature. If it is available on your computer, then next to it should be the inscription " Done". There will also be links to system requirements and a list of supported games.

If Freestyle is supported, then you can use this feature in games. To do this, launch the game and press the key combination ALT-Z. After that, a menu will appear at the top of the screen, in which you need to select the " Filter".

Now you can customize the appearance of the game. To do this, select one of the styles in the upper left corner, add a filter and set its parameters. When everything is ready, you can save the settings by clicking on the button " Done"or" Done».

In order to turn off the filters and return to the original view of the game, you need to open the NVIDIA Freestyle menu again and click on the " Off" or " Off".
If the in-game overlay in GeForce Experience does not turn on on your computer, then you should not rush and install alternative software. You can try to solve the problem yourself, especially since this is not so difficult to do. Today we will tell you what this ShadowPlay function is and what to do if this function does not work.
What is an In-Game Overlay?
The GeForce Experience in-game overlay is a special feature that is used to record video, stream what is happening on the computer, take screenshots, and record video from the desktop. This solution is characterized by minimal consumption of computer resources, which is especially useful when recording the passage of games. This technology is also called ShadowPlay or Share overlay.
Video capture option - ShadowPlay
- More and more experienced gamers are using this technology. Also recently, a new experimental feature appeared in GeForce Experience - .
What to do if the overlay does not turn on?
First of all, you need to determine whether the function is missing initially or whether it disappeared in the process. Where to start? Of course, with standard procedures.

If the ShadowPlay function did not work initially

If these steps did not help you, then there is a chance that the installed GeForce Experience has problems. Download the previous version or wait for the new update to be released. As a last resort, you can try the beta version of the program.
GeForce Experience in-game overlay no longer enabled
This can be caused by various problems and bugs. If the standard actions did not help, then you should try rolling back the video driver to a previous version. If this is not possible, just uninstall the driver and try to start the game. You can also try a clean install of older drivers. In addition, installing a previous version of GeForce Experience will help.
Function ShadowPlay Highlights has certain compatibility issues with OS Win 7/8. This feature is used in games to record significant events. The developers already know about the problem, and will fix it soon.
In the meantime, each game has its own solutions. In particular, for PUBG, you can use the GfeSDK file located at the link: international.download.nvidia.com/GfeSDK.dll . You need to put it in a folder: PUBG\TslGame\Binaries\ThirdParty\NVIDIAGfeSDK\Win64 agreeing to a replacement.
Another life hack from folk masters, suitable in cases where it is impossible to call the ShadowPlay option:

Unfortunately, you will have to repeat this procedure after restarting the system.
Conclusion
As you can see, there are many ways to solve the problem. It is likely that the problem will be resolved with the next driver update. If, after doing everything possible, the GeForce Experience in-game overlay still does not turn on, we recommend that you contact NVIDIA support.