Retaining wall made of concrete project. Retaining wall on a site with a slope: types and principles of construction
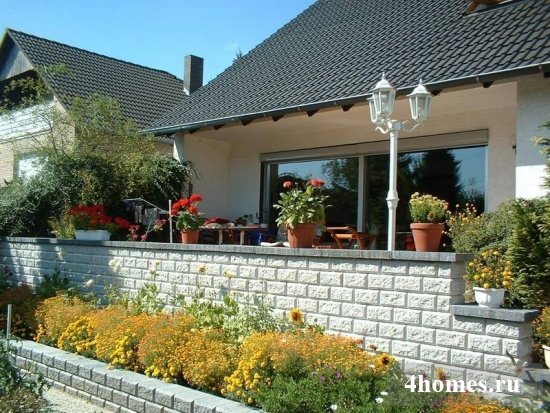
Not every summer resident or owner of a private house gets an absolutely flat area where you can set up a garden or make a comfortable lawn. There are options in which the territory is multi-level, with pits, slopes and ravines. The use of a retaining wall on a site with a slope allows you to beautifully decorate it, prevent the occurrence of minor soil displacements and serious landslides. In order for a structure to be strong and perform its functions well, it must be built in accordance with certain rules.
Basic principles for the construction of a retaining wall
Depending on the functionality, there are two types of retaining walls:
decorative;
strengthening.
If the site has irregularities with level differences of less than 50 cm, it is quite possible to confine ourselves to a decorative retaining wall that has a more aesthetic function. You can build it yourself, without making advance calculations and without delving into the soil to create a foundation. Ground that is too wet and prone to displacement still requires the construction of a stationary reinforced structure, regardless of its final height.
To properly create a fortifying wall, you need to build the following structures in the specified sequence:
1. The foundation, which must be able to support the weight of the entire structure and the soil pressing on it. The most stable form of the foundation, resembling an inverted pyramid. It must be buried in the ground at least half a meter or more, based on previously made calculations. Under the foundation, it is necessary to place a drainage layer at least 20 cm thick, consisting of gravel and poured on a small layer of sand.
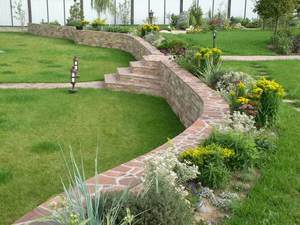
2. Directly a retaining wall, designed to provide containment of soil pressure and performance of decorative functions on a site with a slope. The main condition for the successful construction of a detailed structure is the creation of a slope of 5-10 degrees, directed towards the upper part of the slope. For a high slope, it is necessary to create several retaining walls arranged like a terrace. The base of each next wall should go beyond the top of the previous one by about 1 m.
3. Drainage and drainage, due to which it is possible to prevent the liquefaction of the soil near the wall and its subsequent destruction. Drainage from a gravel embankment should be located not only under the foundation, but also between the wall and the soil, at a slight slope at the top of the slope. To prevent silting, you can wrap the gravel with a special geotextile fabric. It can also be used for a drainage tube, which should ensure the removal of excess moisture into the gravel and can be located both horizontally and vertically, depending on the type of structure used.
Compliance with the basic principles allows you to make a high-quality and reliable fortification. If the height of the slope or ravine is too high, it is better to contact specialists who are able to perform the necessary calculations as accurately as possible.
Types of retaining walls and features of their construction
Retaining walls can be of the following types:
- wooden;
- concrete;
- combined;
- stone;
- from gabions;
- from brick;
- from FBS blocks.
Concrete and natural stone are considered the most durable and reliable materials capable of holding a significant mass of soil from landslides.
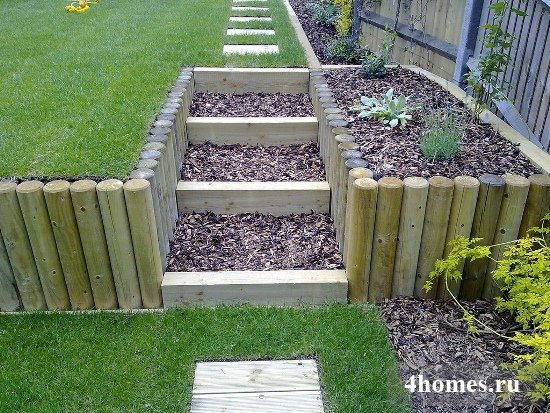
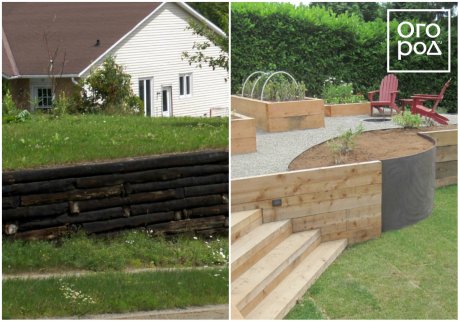
Wooden retaining wall
Wood is an environmentally friendly, but problematic material for creating retaining walls in sloping garden plots. Logs are chosen mainly for low structures, but sometimes they are also used in the construction of fairly high walls.
There are two technologies for stacking logs:
1. Vertical, assuming the location of the logs close to each other and driving them to the required depth instead of creating a separate foundation. The minimum depth for installing logs for the smallest walls is 50 cm. This figure increases proportionally, depending on the height of the finished structure. The above-ground part of the logs must be treated with special antiseptic agents that protect against decay and exposure to various microorganisms, and the underground part must be burned or doused with hot bitumen. For additional protection, it is recommended to lay roofing sheets or high-quality roofing material between the wall and the drainage layer. To fix a low wall, that part of the logs that serves as the foundation is simply covered with gravel and carefully rammed. High structures are poured with M100 concrete.
2. Horizontal, in which several supports of logs are laid in a dug trench over the drainage cushion, leaving a gap between them slightly larger than the diameter of the log. Logs are installed vertically in the resulting "cells" and additionally fixed with iron fittings and self-tapping screws. It is not necessary to pour concrete or fix the foundation in such a wall with gravel, but its strength is less.
With any laying technology, it is better to turn the upper part of the drainage layer into the basis for creating a beautiful flower bed or green lawn.


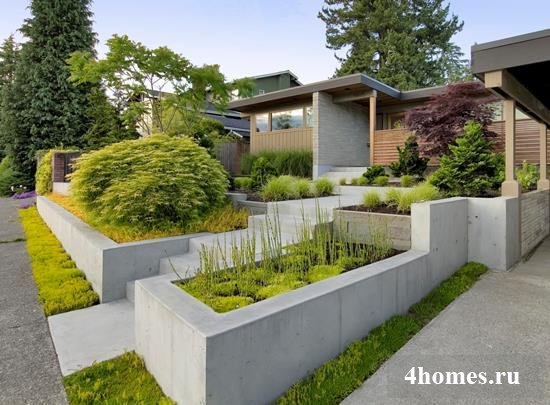
Retaining wall made of concrete
A retaining wall made of concrete according to all the rules is considered reliable. It can withstand strong ground pressure and reach a height of 15m. The only drawback of the design can be called the complexity of the manufacturing process, which includes the following steps:
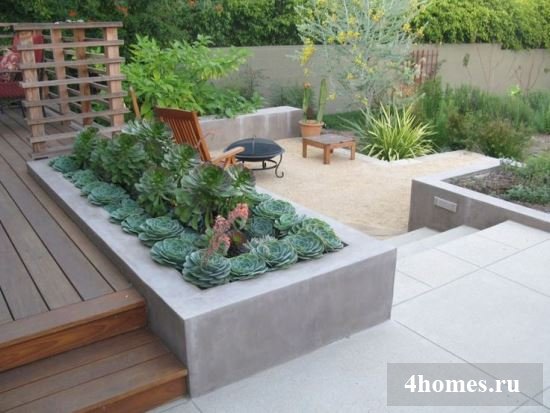
Combined retaining wall
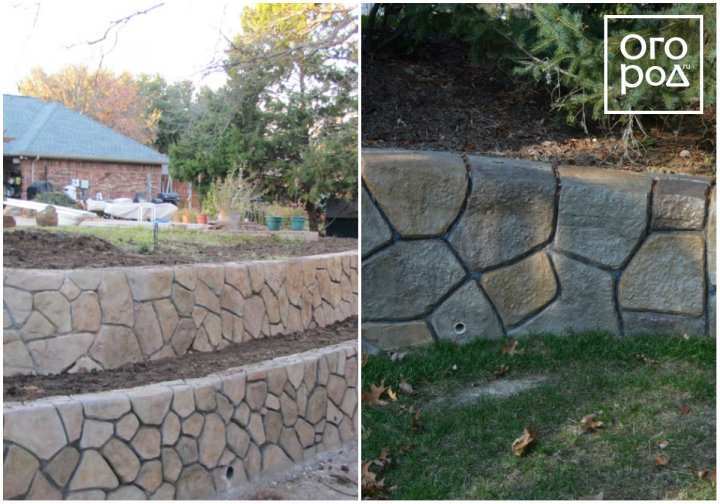
Quite common is the combined version of the retaining wall, in which concrete is used as the main material, and natural stone replaces the formwork and serves as a decorative outer layer. The technology for creating such a wall is identical to that described above, with the exception of the installation of wooden formwork. There is also no need to level the concrete and finish it.

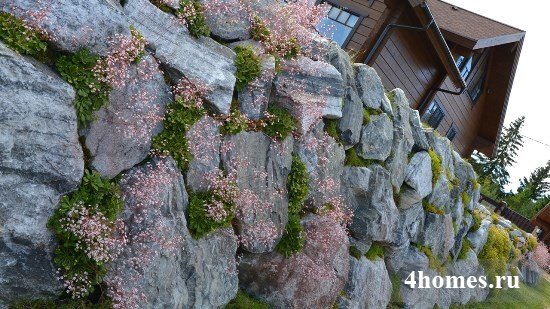
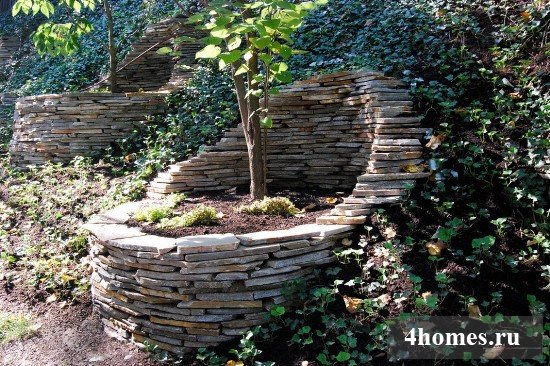
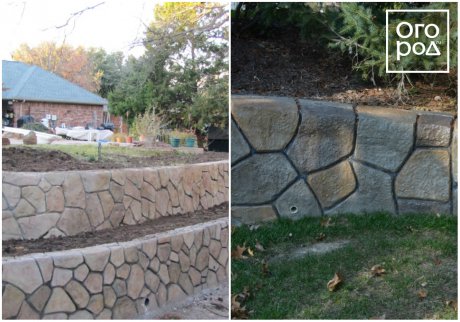
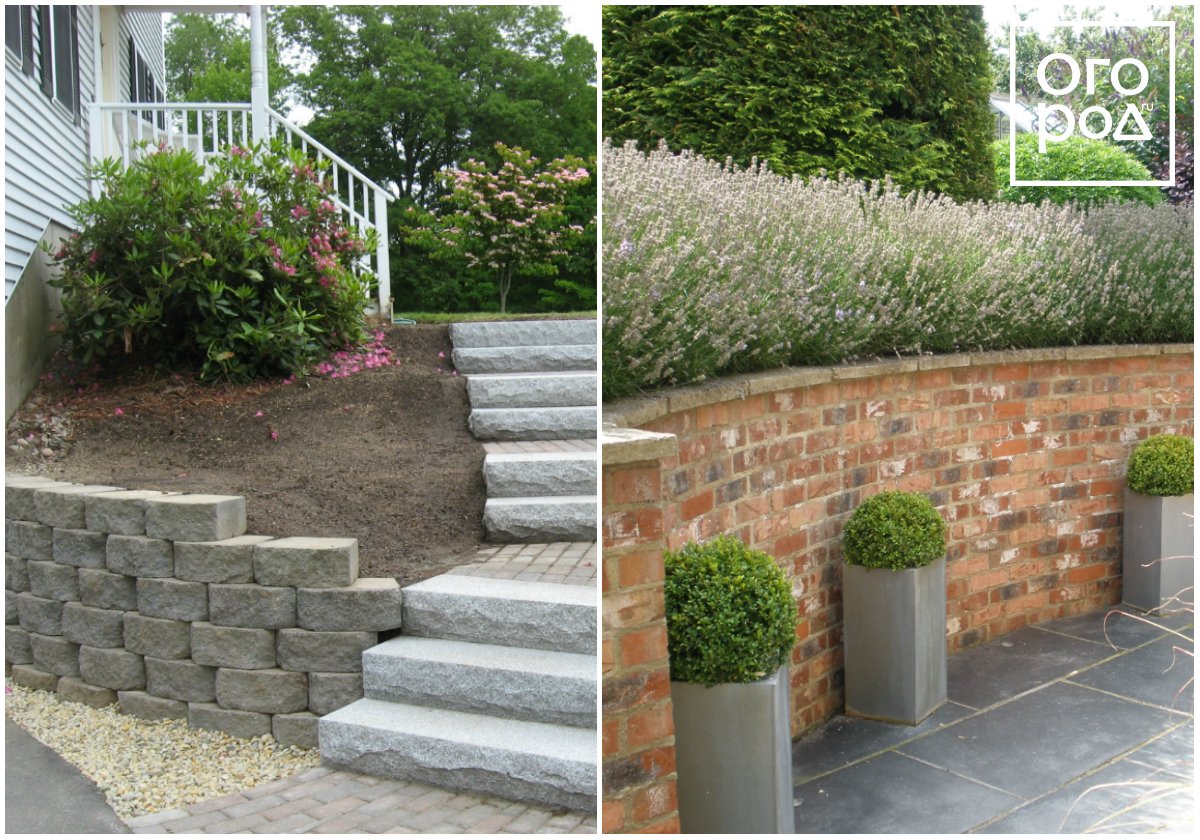
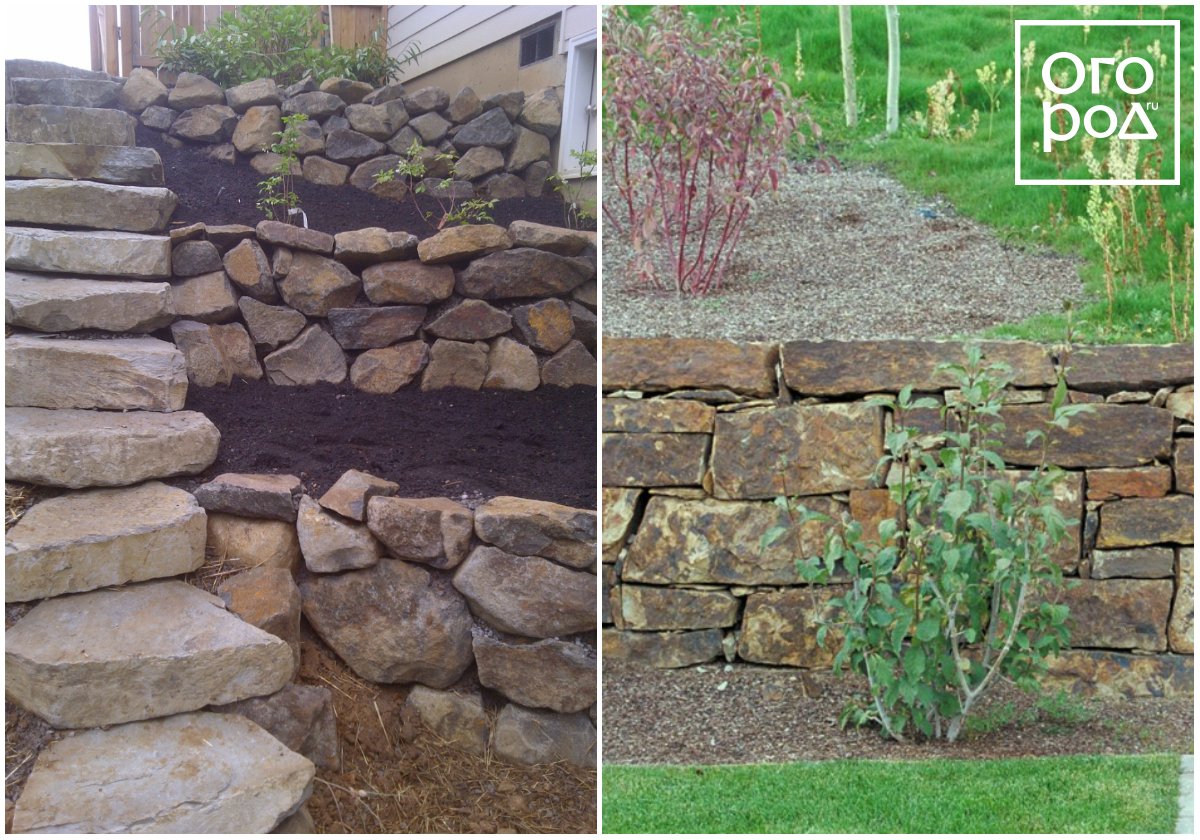
Retaining wall made of natural stone
To create landscape compositions in the old style, retaining walls in areas with ravines or slopes, created from natural hard rock stones - granite, diabase, basalt, quartz, etc., are excellent. They use chipped or sawn stones that match each other in size and shape. The foundation for such a wall is made from a mixture of concrete, sand and gravel in a ratio of 1:6:6. After creating the formwork and pouring the mixture, it is allowed to harden well for 4-5 days. Next, drain pipes are installed and stones are laid, which can be done in two ways:
1. Wet method, which involves fixing stones with a cement-sand mortar. Previously, all dirt is removed from the stones, the surface is wetted with water and the laying is carried out in such a way that at the junction of two stones from one level there is the middle of a stone from another level.
2. Dry method, in which the stones are simply stacked on top of each other, and the space between them is filled with suitable soil. Sometimes plant seeds are added to it, due to which the wall begins to turn green over time and becomes like a real old building.
For high stone retaining walls, internal reinforcement technology is used, during which stones are drilled and strung on strong iron rods. Such reinforcement is mandatory for structures above 1-1.5 m.

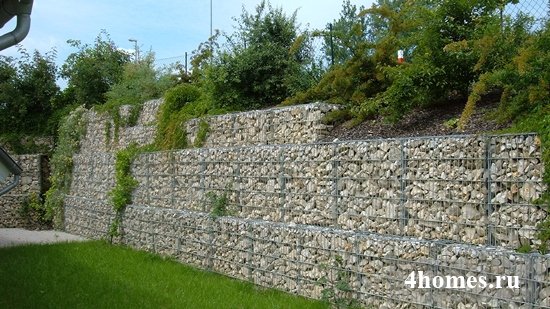
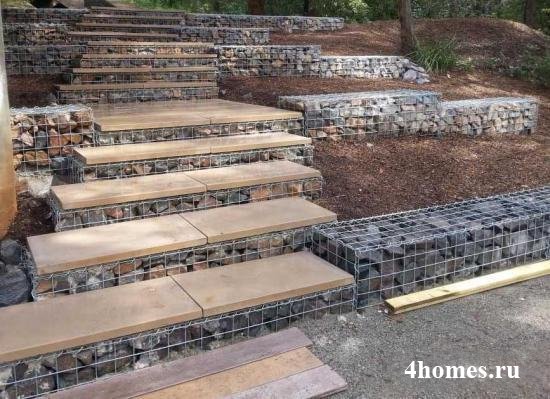
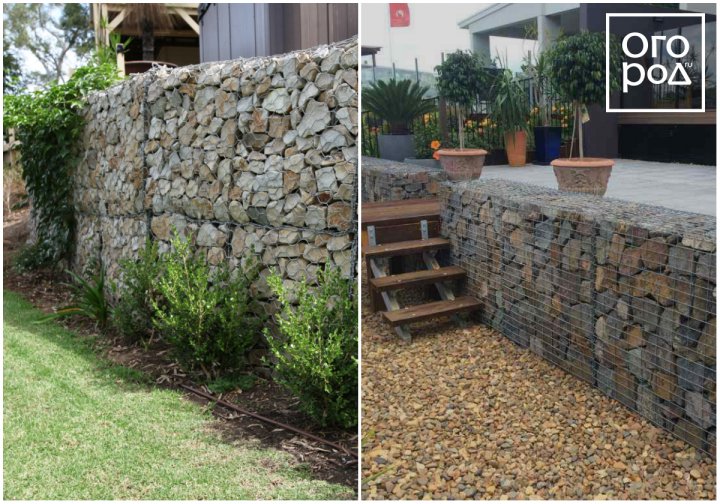
Gabion retaining wall
When creating garden compositions, retaining walls are often used, made of gabions - mesh metal containers filled with stones of various sizes. Such designs are considered quite durable and have excellent aesthetic qualities. allow you to combine modern trends with natural motifs, which looks very interesting.
The process of creating such walls consists of the following steps:
- A trench of the required depth breaks out.
- If the height of the finished wall is more than 1 meter, then reinforced concrete is created. strip foundation, at least three times wider than the wall thickness. Geotextile is laid at the bottom of the trench, a drainage layer of gravel and sand 20-30 cm thick is poured and compacted. The trench is poured with concrete, not reaching about 15-20 cm on the surface of the earth.
- After the foundation has completely solidified, gabions are laid on it like a children's designer and are firmly fastened together with galvanized wire.
- The soil near the base of the wall is carefully compacted, and, if necessary, gravel is sprinkled on top.
Such an unusual way of creating a retaining wall is not difficult, but the finished structures look original.

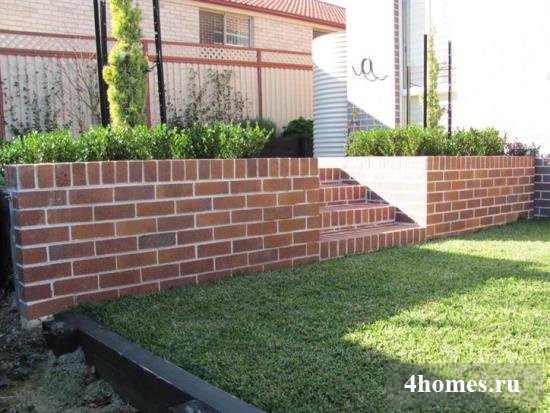
Brick retaining wall
Brick retaining walls are not popular, since such a structure can only be made from solid red brick, which is considered a fairly expensive material. In addition, such a wall can only be strictly vertical, which significantly reduces its reliability and makes it impossible to use in a complex multi-level landscape.
The general technology of laying bricks is identical to the wet method of laying natural stone, and the foundation used is the same as for gabion walls.

Retaining wall from FBS blocks
To create a retaining wall from FBS blocks, a foundation is not required. Instead, several layers of crushed stone and gravel are poured onto the bottom of the excavated trench, tamping them well, and then they begin to install the blocks, fixing them with a hammer and special rubber gaskets. Each even row starts with a half FBS block to get a masonry pattern that is used when creating walls from natural stone.
A wall made of FBS blocks is very reliable, but the process of its construction is considered quite complicated for those who have never encountered such building technologies.
![]()
When choosing which retaining wall to make on a site with a slope, it is important to assess the terrain, soil features, as well as take into account financial capabilities, experience with various materials and the need to create a certain decorative focus.
Having a site with a slope, and planning construction on it, it is necessary to keep the soil in the required position. To solve this problem, there is a retaining wall. And before you strengthen the slope, erecting this structure with your own hands, you should carefully study its characteristic features.
A retaining wall on a site with a slope was invented in order to prevent the movement of the soil mass when the slope angle is greater than the maximum possible for a natural slope device.
So, retaining walls are divided into 2 large groups:
massive. Their peculiarity lies in the fact that the soil is kept from collapsing due to the own weight of the wall, since this element is an integral single structure, clearly not divided into a “foundation-wall”. This feature is expressed in a variety of cross-sectional shapes of retaining walls, the faces of which are either in a vertical or inclined position, or even have the same direction. The types of sections are shown in the photo:

Cross-sectional views of massive retaining walls.
However, this type of retaining wall requires more labor and material resources for their construction. Therefore, it is desirable to build this type of structure where cheap materials are available, or their quantity is in excess.
The materials from which the construction of massive retaining walls is possible include:
- Concrete, rubble concrete, reinforced concrete;
- Fake diamond;
- Stone from natural breeds.
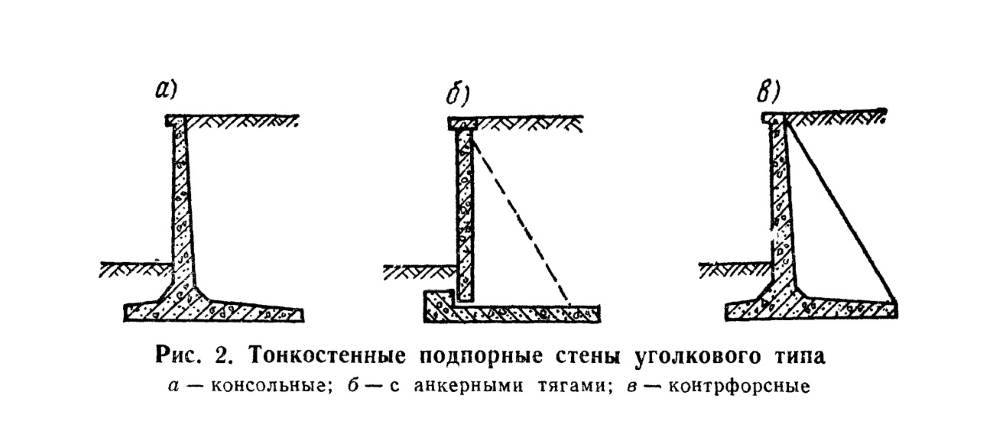
Thin-walled. A characteristic feature of this design is that the "quenching" of the horizontal pressure occurs due to the soil located on the ledges of the base of the foundation, which performs the holding function together with the wall. This makes it possible to create fortifications that are more stable and less expensive. The most common option is a thin-walled retaining wall of the corner type:
- With amplification:
- buttresses. They are transverse ribs with a step of 2-3 m along the entire length of the wall. Works for compression. They are used in high retaining walls, when it is desirable to reduce either the wall thickness or its reinforcement;
- Anchor rods. They work in tension. They are used to create additional forces that will facilitate the work of a retaining wall;
- Console.
"Photo 2 (Angular type retaining wall)"
Its structural elements mainly consist of several parts: foundation and face plates, buttress or flexible steel anchor, if any.
But the materials for corner-type walls do not differ in variety - this is reinforced concrete in 3 different versions:
- Made. Here, the foundation and front plates are prefabricated elements created in the factory;
- Prefabricated monolithic. In this version, the front slab is prefabricated, and the foundation slab is monolithic. It also happens that the width of the prefabricated foundation slab is not enough and then an additional anchor plate is attached to it, made in-situ - this design also belongs to the prefabricated-monolithic type;
- Monolithic. Both slabs are made of monolithic reinforced concrete.
Types of materials
When erecting a retaining wall, it is worth using only certain brands according to the strength of the material resources used:

Sizing
Having dealt with the constructive part, the question arises of how to make a retaining wall.
If geological surveys have not been carried out on the slope, then the design of a retaining wall is possible only if the following conditions are met:
- The height of the soil support on the slope (H) - no more than 1.4 m;
- The depth of soil freezing is not deeper than 1.5 m.
- The presence of stable non-rocky soils at the base;
- Groundwater level - not higher than -1500 mm;
If all points converge, you can proceed to the appointment dimensions of a thin-walled corner wall:
Depth of foundation slab:
- For walls up to 3.6 m high - 600 mm;
- Height up to 6.3 m - 900 mm;
- Above - 1200 mm.
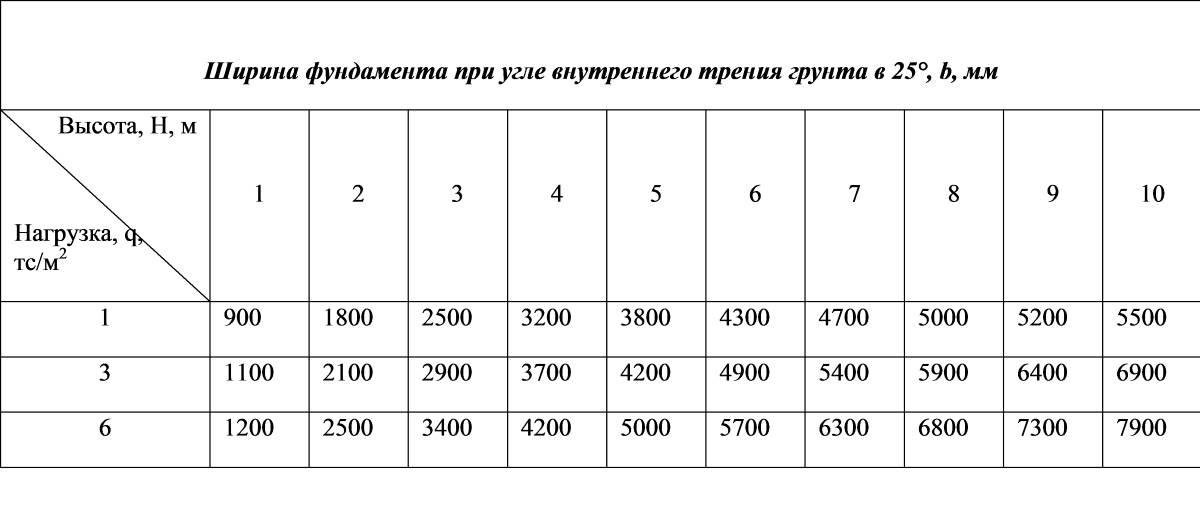
The width of the base of the foundation is selected in accordance with the tables or within (0.6-0.9) H:

Protrusion of the foundation slab beyond the front face of the front slab:
- For wall heights up to 3.6 m - 300 mm;
- Up to 6.3 m - 600 mm;
- Above - 900 mm;
Foundation plate thickness 200 - 600 mm;
The thickness of the front plate is at least 100 mm.
For massive walls:
- The depth of the foundation and the width of the foundation are identical to the thin-walled one;
- The thickness of the wall depends on the material. So, choosing a stone wall, the required thickness will be 600 mm, concrete - 400 mm;
Nevertheless, in order to approve the assigned dimensions of the retaining wall, it is still desirable to make verification calculations, otherwise the wall may not withstand the pressure of the soil and tip over. To check the stability of the soil under the sole, you should use the formulas specified in paragraphs 5.1.17 - 5.1.19, and for deformation calculations - section 5.6.
Installation nuances
Reinforcement
The walls are reinforced with spatial reinforcing cages assembled from flat reinforcing meshes, the longitudinal rods of which have a diameter of 8-10 mm, and the transverse 12-14 mm. The rods at intersections are welded together by contact spot welding in all places or knitted with wire. The reinforcement scheme is shown in the photo.
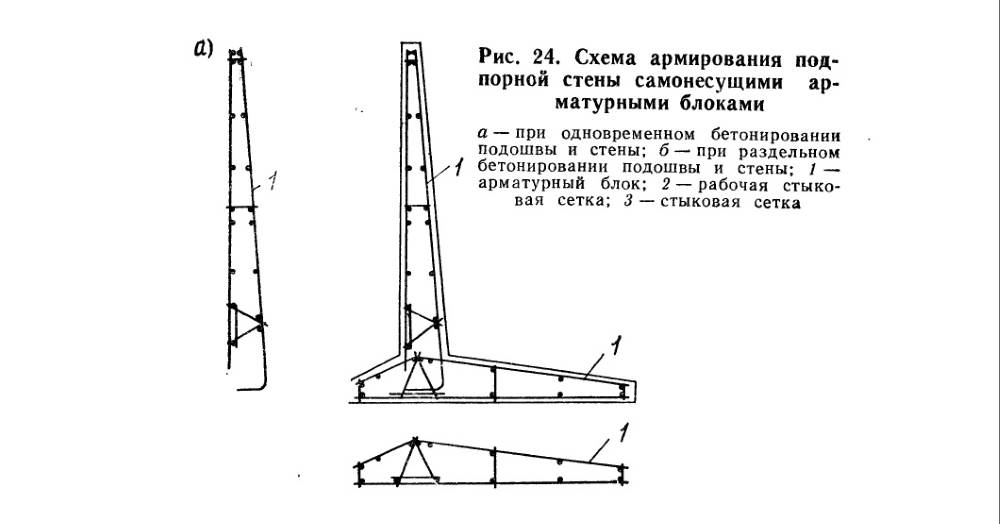
Important! To achieve the integrity of the entire retaining wall, the front plates are interconnected by separate rods with a pitch of 500-600 mm, which are welded or tied to the transverse reinforcement of the distribution grids that form a spatial frame.
Substrate preparation and expansion joints
If heaving soils lie at the base and the depth of freezing of the soil is below the foundation level on the downstream side, then the weak soil is completely removed and replaced with a cushion of crushed stone or sand. Nevertheless, there are differences in the arrangement of bases and joints, depending on the design solution and the selected material:
When assembled:
- The prefabricated foundation slab is mounted exclusively on a crushed stone base, rammed into the ground. Its minimum thickness is assumed to be 100 mm, while the width of the base must be provided such that it protrudes beyond the edges of the foundation slab by at least 150 mm on each side;
- Expansion joints (a structural section in the elements of the structure, dividing the structure into separate compartments) must be made along the entire length of the wall every 30 m. If the plates are in a prefabricated monolithic design, then the step of the joints is 25 m.
With monolithic execution:
- The foundation slab must be installed on a leveling concrete preparation that is 100 mm thick and protrudes at least 100 mm beyond the foundation. For concrete preparation, concrete grade M50 is taken;
- Expansion joints are made every 25 m when using reinforced concrete; in concrete structures without structural reinforcement, every 10 m; and in the presence of structural reinforcement, the step will be 20 m;
Important! The expansion joints must be 30 mm wide. They are formed by introducing a tarred board into a constructive section. In addition, if the soil along the entire length of the wall is heterogeneous, then the expansion joints are organized in such a way that the base of the foundation rests within the same type of soil, while reducing the step of the temperature-sedimentary joints.
Advice! In the longitudinal direction, build walls horizontal or with a slope not exceeding 0.02. If the slope is higher, then perform the longitudinal walls in steps. And in the transverse direction, the maximum slope can be 0.125 towards the backfill. The slope values are regulated by clause 5.1.3.
Drainage and backfill
To fulfill this nuance, it is necessary to make drainage holes with a diameter of 50 mm in increments of 3-6 m in the front elements of the retaining walls. And a drainage ditch should be organized behind the inner surface of the wall. The drainage collector is made of stone, crushed stone or gravel with a slope, the minimum value of which is 0.04, in the longitudinal direction.

Important! The back surface of the front slab and the entire foundation slab must be protected by waterproofing, which is done by coating with hot bitumen for 2 times.
The last step in the construction of a retaining wall is backfilling. But for it you need to use aquifers, such as sandy or coarse-grained. It is also allowed to use clay soils with low plasticity and sand content, but then frost heaving will have to be prevented by laying a layer of coarse-grained non-porous soil on the back side of the front slab to a thickness of 1000 mm. Backfilling is carried out in layers, compacting each layer until a compaction factor of 0.95 is reached.
Thus, by designing a retaining wall on a slope according to approved government documents, the retaining wall will serve for many years without tipping over. And a beautiful stepped area is pleasing to the eye.
Advice! If you need contractors, there is a very convenient service for their selection. Just send in the form below detailed description work that needs to be done and offers with prices from construction teams and firms will come to your mail. You can see reviews of each of them and photos with examples of work. It's FREE and there's no obligation.
If you are the owner of an uneven site located on a slope, you are probably close to the problem of how to strengthen the slopes in order to prevent the soil from collapsing, and at the same time create a beautiful landscape. The installation of retaining walls on the site will help you.
The retaining wall serves to protect unstable soil from shedding. Also, with the help of retaining walls, you can divide the site into zones and decorate the cottage. It is quite possible to build such a structure on your own using various materials.
1. Concrete retaining wall

One of the most durable retaining wall materials is concrete. In order to build a concrete wall on the site, the first step is to dig a ditch (0.3-1.15 m deep and 0.4-0.5 m wide), cover its bottom with crushed stone or gravel with a layer of no more than 20 cm Place the frame, welded from iron rods, into the ditch, then lay the formwork along the walls. For formwork, you can use thin sheets of plywood or wooden bars.
Lay a drainage pipe across the formwork, and then fill everything with concrete mixture. To make the wall look decorative, it can be lined artificial stone or plant climbing plants nearby. Such a strong construction will serve you for a long time, as it is reinforced with reinforcement.
2. Stone retaining wall


This option is within the power of even a novice builder. Dig a trench 0.5 m deep and 0.6 m wide, lay formwork from boards along the walls, lay a drainage system, fill it with a mixture: 1 part concrete, 6 parts gravel and sand. After 4 days, treat the structure with lime mortar and start laying stones. Lubricate each row of laid stones with a thin layer of cement mortar.
Before you start laying the stones, wash them in water.
Such a retaining wall looks natural and harmonious, fitting perfectly into the design of almost any site. For decoration, plant plants in the space between the stones.
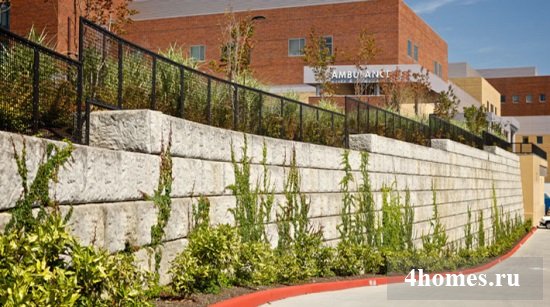
3. Block retaining walls
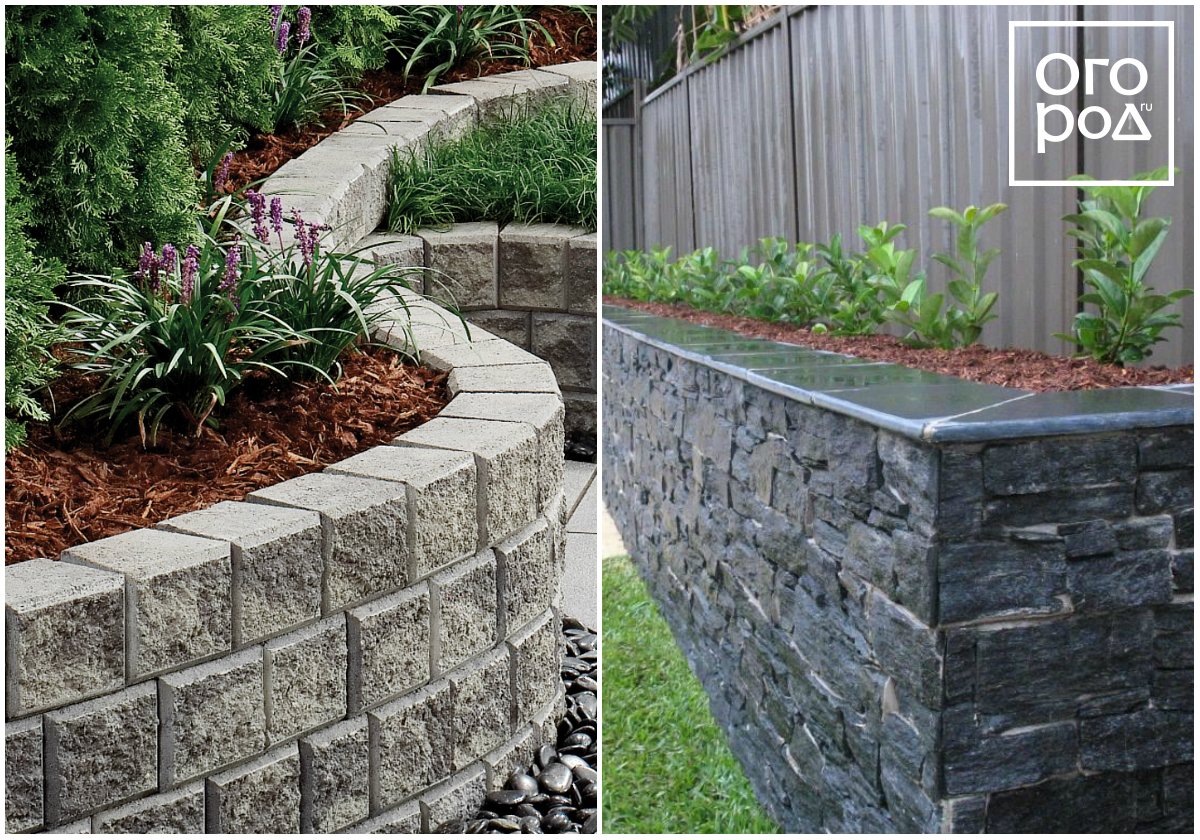


For this type of construction, both concrete foam blocks and FBS blocks (continuous foundation block) are suitable. The width of the trench for the construction of a retaining wall of blocks must match the width of the block. At the bottom of the ditch, as in other cases, a gravel-sand cushion is filled up with a layer of up to 20 cm. Then block stones are installed, which must be fastened with reinforcement. After installing the wall, its surface is lined with decorative tiles or other elements.
4. Brick retaining wall


As with the construction of a stone retaining wall, a foundation must be laid to build a brick wall. Preference should be given to the most frost-resistant and moisture-resistant bricks.
The width of low walls (up to 0.6 m high) can be half a brick, but it is optimal to make higher walls a brick wide.
Drainage pipes are placed every 5 bricks in the second row of masonry. The rows are smeared with cement mortar, and the distance between the slope and the wall is covered with pebbles or rubble.
5. Wooden retaining wall


Pre-treat logs with a diameter of up to 20 cm with an anti-rot agent. For vertical laying of logs, the foundation does not need to be poured, it is enough to dig a ditch with a depth of at least 0.5 m and place the logs in it close to each other.
To lay the logs horizontally, first fill the bottom of the dug trench with gravel or crushed stone, then lay the log and secure it with reinforcement. Subsequently, fasten each next log to the previous one with self-tapping screws or nails. Flowers can be planted in the space between the slope and the wall, first filling it with broken bricks (for drainage), and then with soil.
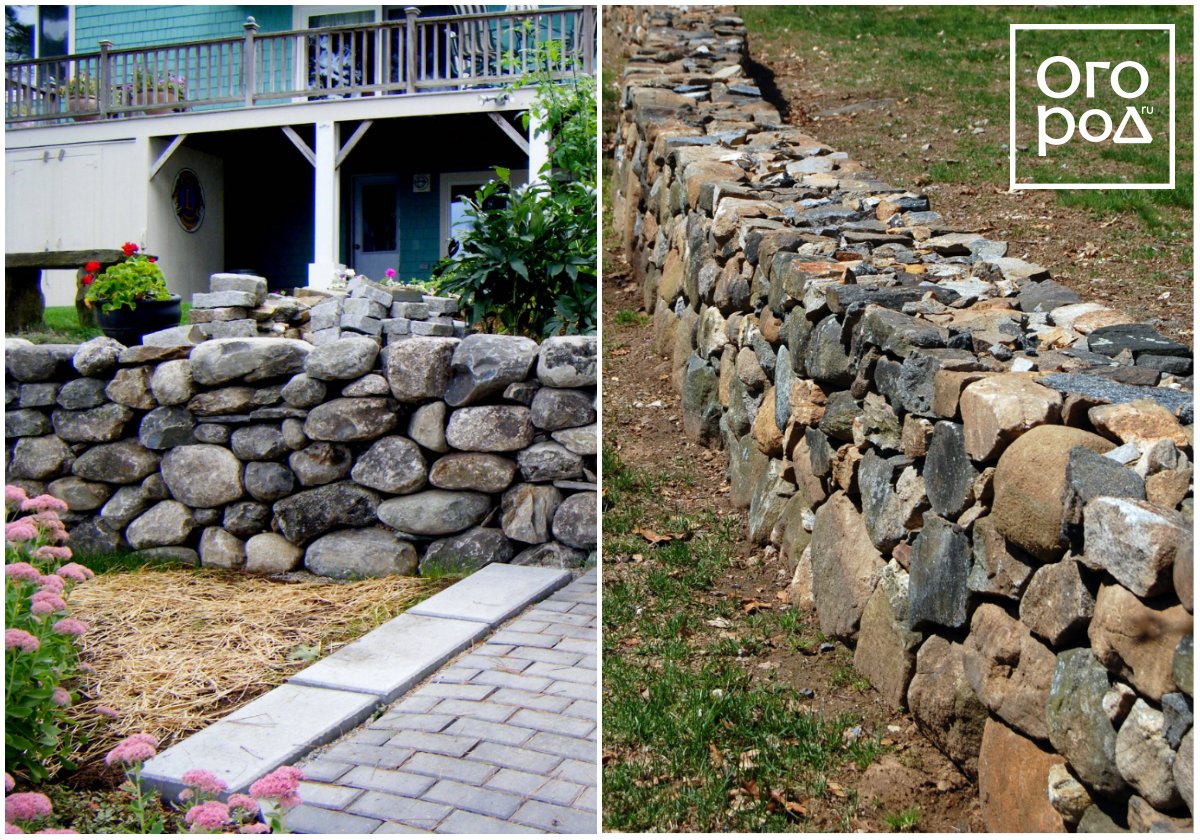
6. Dry retaining wall


A low stone wall (50-80 cm high) can be made without the use of mortar. In this case, dig a wide ditch 0.5 m deep and fill it halfway with gravel. Lay the washed stones in layers, filling the space between the rows with soil mixed with sand (or black soil). When laying, maintain a slight slope to the slope.
For such a wall, drainage is not needed. Plants can be planted in the soil while the stones are being laid.
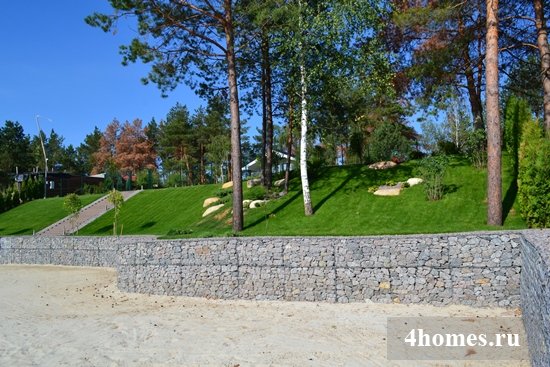
7. Gabion retaining wall

![]()
Gabion is a three-dimensional mesh product filled with various materials. It is used to strengthen slopes, walls and river banks. The advantage of a gabion retaining wall is that for its construction you do not need to spend time on careful selection of stones and their accurate laying, but you will have to purchase a mesh container.
Fill the gabion mesh with stones and attach the structure to a vertical flat surface. If you are building a low gabion wall (up to 1 m), then you do not need to lay the foundation. To save money, cover decorative stone only the front part of the gabion, and from the inside, fill the space between the wall and the slope with crushed stone or gravel.
Installing retaining walls adds style to the garden while still making the most of the sloping site.
Having acquired a land plot, each person experiences joy, but it can not last long if, after getting to know the land, irregularities are found. If there are large and steep slopes on the purchased land, there are elevation changes and other hilly areas, then this will create certain difficulties with the planning and arrangement of the summer cottage.
However, even in such a difficult situation, a solution can be found. They can be a retaining wall.
This design is a seemingly ordinary wall made of durable material, on which entrusted with the functions of support for unstable soils.
If the site has an uneven terrain, provides for elevations and a large number of slopes, then it is recommended to install supports in the most problematic places, which will avoid collapse and slipping of the soil.
Do not ignore the irregularities in your area. It is necessary to take appropriate measures as soon as possible to help protect the site itself and you from trouble. And a retaining wall, which you can make yourself, can help you with this. If you correctly approach the choice of material for this design, then this wall can turn into a beautiful design element of your site, as a result, your cottage will acquire an original look.
When choosing a retaining wall design, it is necessary to take into account its purpose. Therefore, before its manufacture, it is necessary to find out whether it will play only a decorative role or whether it will have to solve the problem of strengthening the site. The very process of creating a retaining wall includes three main stages:
- Making a foundation that will act as a support for the supporting wall;
- Wall construction. Here we mean directly the support itself, which will provide support to the ground on the inside, and provide decorative properties to the site on the outside;
- Water supply and drainage device. These measures are necessary in order to prevent excessive moisture. Moisture will definitely accumulate between the wall and the ground, so the owner will have to think about how to ensure its effective removal.
Kinds
Depending on the purpose, all retaining walls can be classified into two types: decorative and reinforcing.
The first ones are installed in order to transform the site and add originality to it. As for the fortification walls, their main task consists in reinforcing irregularities and prevent their destruction.
Fortunately, a retaining wall often combines the functions described above, therefore, in addition to solving the problem of strengthening the soil, the owner gets the opportunity to use this design to perform zoning of the territory.
Another feature of the classification of retaining walls is the material used to make them. According to it, the following types of these structures:
- Wooden. These walls are of interest because of the minimal cost associated with their construction. To make them, you need even logs.
- Concrete. Among all other walls, these are distinguished by maximum strength and long service life. However, the process of manufacturing concrete walls is too labor-intensive and time-consuming.
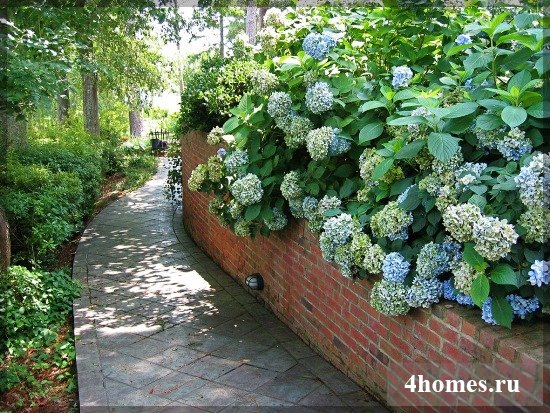
- Stone. This type of retaining wall may suit owners looking to impress their guests. Moreover, this design can be made even more attractive if plants are planted between the stones. Then such a wall will turn into a real masterpiece.
- Brick. It is this type of wall that most summer residents most often choose. They are attracted to them by high strength, reliability, as well as the ability to transform the appearance of the site.
Manufacturing instructions
The first thing to do for the owner of the site, who plans to install a retaining wall on it, is to perform calculations. The easiest way to do this is to create a design drawing in which to display required amount material. Also on the drawing it is necessary to indicate what type of drainage system will be built and where it will be located.
Types of drainage systems:
- Transverse. During the construction of the wall between each 1-2 layers, it is necessary to fix the tube at a certain angle, which will allow water to flow down it.
- Longitudinal. This option provides for the placement of a tube with a cross section of 15-20 cm along the entire length of the wall, and its end should go out. Both ceramic and corrugated pipe can be used for this drainage scheme, but in any case it is necessary to wrap it in geotextile material.
When the drawing is drawn up and the issue with the material for the construction of the wall is resolved, you can proceed to the next step: here we need to mark the territory using a rope and pegs for this, which will determine the installation site of the retaining wall.
Let's start digging trenches. For softer ground and a higher wall, it is necessary to increase the depth of the trench. If the structure will have a height of 1 m, then a depth of 40 cm will suffice.
Then we proceed to create a pillow, for which the bottom must first be filled with rubble, and a layer of sand is laid on it, after which everything is carefully tamped. It is necessary to arrange a drainage system in such a way that the pillow is located at a slight angle to the slope.
wooden retaining wall
For the manufacture of this design, a log of any section, including 20 cm, is suitable.
For laying wooden logs, you can choose one of the following options: vertical or horizontal.
Vertical installation
![]() In the first case, the logs are arranged in such a way that they are closely adjacent to each other. The advantage of this laying option is that there is no need to make a foundation. The minimum depth that must be maintained for the installation of logs, should be 50 cm. It is best to set the logs to the maximum depth, as this will only increase the stability of the structure.
In the first case, the logs are arranged in such a way that they are closely adjacent to each other. The advantage of this laying option is that there is no need to make a foundation. The minimum depth that must be maintained for the installation of logs, should be 50 cm. It is best to set the logs to the maximum depth, as this will only increase the stability of the structure.
Horizontal laying
With the horizontal installation method, the logs are stacked on top of each other. To do this, first dig a trench, the depth of which should slightly exceed the thickness of the log. The ditch is filled with a layer of rubble, after which the log is laid and fixed with iron fittings. After that, the laying process is continued, adding new logs, which are fixed with self-tapping screws.
Before proceeding with the installation of logs, it is necessary treat them with machine oil, bitumen or other means that will help protect the tree from decay.
The space between the wall and the ground must be filled with fragments of crushed bricks and coarse sand. It is recommended to turn the top layer of drainage into a base for decorative plantings.
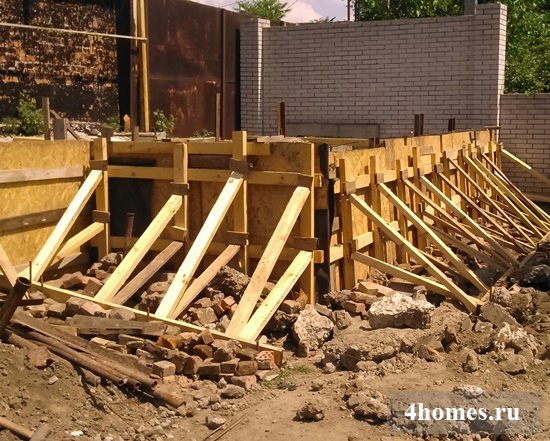
Retaining wall made of concrete
The manufacturing process of this retaining wall begins with digging a trench, the length of which should correspond to the wall being built, including turns and corners, after which the bottom is filled with a layer of crushed stone or gravel. Next, you need to make a frame from reinforcement and install it in a trench. Combination of concrete and rods will provide a more secure fastening, which will increase the strength of the structure.
Next, you need to make formwork. When installing supports from boards along the length of the wall, they must be further strengthened. Roughness can be avoided if appropriate measures are taken to prevent buckling of the support boards. This is done by knocking down iron tubes that will provide support for the formwork. They should be placed in increments of 1-1.5 m.
When the formwork is ready, they begin to pour concrete, making sure that it is distributed in even portions over the entire area. After waiting 4-5 days from the moment of pouring, the formwork is removed.
For a concrete retaining wall, it is recommended to arrange a transverse drainage. To do this, even at the pouring stage, the pipe is laid across the formwork, through which moisture will be expelled. On this, the main part of the work on the manufacture of a retaining wall made of concrete is completed. Now it remains to add moss, thereby the design will acquire the effect of antiquity.
 First, it is necessary to mark out a place for the future wall, after which we begin to dig a trench 40-50 cm deep. To make the formwork, it is necessary to prepare the boards and lay them in the trench along the entire length on both sides.
For pouring, a mixture is used, which will require the following materials:
- concrete;
- sand;
- gravel.
They need take in proportion 1:6:6.For the mortar to harden well, it is necessary to wait 3-4 days.
Next, the frozen foundation must be covered with a layer of lime mixture. For its preparation, you will need lime, sand and water, which are taken in a ratio of 1: 4: 300. Next, add the resulting mixture to the cement in a ratio of 1: 7 and apply it to the foundation.
We begin to lay the stone. First, the stones must be prepared by removing dirt from their surface, as well as moistening with water. The laying itself should be carried out according to the following scheme: two stones are laid side by side, and the middle of the next stone should be at the junction.
It is recommended to put stones on the edges larger sizes. After laying the next stone, it is necessary to rotate it in order to find by experience the most stable position for it. Each level of masonry must be covered with a layer of lime mortar, the thickness of which should not exceed 1.5 cm.
In addition to the above, you can offer another option for laying stones. It differs from the first option in that the stones do not need to be moistened: before work, the stones are stacked on top of each other, and the gaps formed between them are filled with fertile soil, which will allow plants to be planted there in the future.
During the installation of a stone retaining wall, it is necessary to withstand a slight slope in the direction of the slope.
When the stone retaining wall is completed, the space between it and the slope filled with pebbles or rubble. You also need to remember about drainage: for the design in question, a longitudinal version is used, which is arranged between the second and third rows.
 As in the case of a stone wall, work begins with the construction of the foundation, for which supports are used. If you have to work on heavy soil, then concrete can be poured directly into the trench without the use of support boards.
If the walls being erected have a height of up to 60 cm, then masonry equal to half a brick will suffice. If the structure exceeds 1 m in height, then the thickness of the masonry is increased to one brick.
When laying the first or second row, it is necessary to provide an opening through which water will be removed. For this, the area where are 4 and 5 bricks, do not need to be treated with cement mortar, subsequently pipes for drainage will be installed there.
During the laying process, the bricks are placed on top of each other, at the end of each row, a cement mortar is applied, for which cement, sand and water are taken in a ratio of 1: 3: 3.
Conclusion
 Not everyone manages to acquire a land plot that is successful in all respects. Seeing steep slopes, elevation changes on the site, it immediately becomes clear that with the improvement of the backyard territory there will be some difficulties. However, today there is a solution that will help to cope with these natural irregularities. With the help of a retaining wall, which can be built from different materials, you can not only solve the problem with unstable soil, but also significantly transform your site.
Of course, without theoretical preparation, this task will be quite difficult to solve, so first you need to familiarize yourself with the technology of work, prepare the necessary materials, and with due diligence and patience, each owner can acquire a rather original and practical element of landscape design.
Retaining walls, their types and designs are regulated by SNiP. It is customary to call retaining walls a technical structure, the main purpose of which is to retain soil layers in places of elevation change. The full name of such structures is fortification retaining walls. Depending on the purpose, retaining walls are usually divided into 2 main types: decorative and reinforcing. Other types of retaining walls can be considered only certain modulations of the two main types.
A decorative retaining wall is made to divide the garden plot into zones with different heights. As a rule, a small load from the soil acts on such walls. For this reason, almost any material can be used to build a wall: stone, brick, wood.
A retaining wall made of wood looks interesting, but the service life of such a structure is limited: literally in 3-4 seasons it will already have an unsightly appearance and it will not be practical to use it in the future. The reason for this is the constant contact of wood with moisture drawn from the soil. A retaining wall made of concrete will last much longer.
Building structure
It is quite possible to make a retaining wall of concrete with your own hands. But first you need to figure out which retaining structures are used in construction. Regardless of the design, retaining walls include several main elements: foundation, drainage system for the removal of groundwater, holding elements (the walls themselves).
The deepening of the foundation depends on the density of the soil. On the clay soils it is enough to have a foundation with a recess of 30 cm for each meter of the height of the retaining wall. The calculation of the retaining wall shows that on light soils, the deepening of the foundation should be 1.5 times larger. The foundation is made traditionally, as for other structures.
According to the cross-sectional profile, different types retaining walls. All of them can be conditionally divided into:
- rectangular (built easier than others);
- trapezoidal (the most popular types of retaining walls today);
- inclined (the side parts of such walls have a different angle of inclination from the outside and inside).
All of these structures have certain advantages over their competitors and are installed depending on the density of the soil. On light soils, SNiP recommends installing structures with a trapezoidal section. When using them, the probability of wall displacement is minimized by distributing the load from the soil in different directions. In this case, part of the load will be directed vertically, which will positively affect the stability of the entire structure.
All wall designs imply that the side of the wall facing the ground must be rough or even cellular. Cellular surfaces in this case have 2 important functions: adhesion to the soil will be much better due to an increase in the contact area, the distribution of the load from the soil will occur more evenly in all directions.
Do-it-yourself retaining wall
And now consider the question of how to make a retaining wall of reinforced concrete with your own hands. Retaining walls made of monolithic reinforced concrete will be stronger and more reliable. They are made using formwork. A lumber formwork is installed on the foundation erected in advance. Before this, it is advisable to cut off part of the soil from the slope to almost a vertical level.
Immediately between the foundation and the slope surface, you need to install a pipe with holes in the side walls. It will be needed for drainage. At an angle of 80º to the level of the horizon, one of the formwork walls must be installed. The space between the formwork wall and the slope surface must be covered with crushed stone to a level of 35-40 cm. In some cases, expanded clay can be used for such filling.
We install the outer part of the formwork with a smaller angle of inclination or vertically. Initially, it is not recommended to make the formwork height large, since you still have to reinforce the retaining walls. And this means that you will have to weld the reinforcement, which will be inconvenient to do in the depth of the formwork. And the formwork frame may not withstand a large mass of concrete.
We make concrete for retaining walls from cement, sand and crushed stone, taking them in a ratio of 1: 3: 3.
Reinforcement of retaining walls is carried out both from the side of the soil and from the outside of the wall. Bandaging of the reinforcing planes in this case is required. It is desirable that the reinforced soil planes of the wall and foundation be interconnected. As the concrete hardens, we build up the formwork and continue work in the same sequence.
In increments of 2 m at the level of the drainage pipe in the retaining wall, pipe cuts must be installed horizontally. This is necessary in order to take ground water from the foundation. Such a measure will not allow the foundation and the entire wall to sag under the influence of soil erosion.
Wall of individual blocks
As you can see, the installation of a retaining wall does not have any particular difficulties and can be done independently. Much more often, the owners of garden plots or cottages make walls from separate blocks. The technology here will differ only in that not the entire wall will be cast, but its individual elements are made on a horizontal surface.
First, a casting mold is made, reinforcing elements are placed in it, and the entire container is poured with concrete. The advantage of this method is speed. Separate parts are made faster, and then a wall is built from ready-made blocks. If you are ready to use this particular method, then you need to make a number of calculations in advance and make at least primitive drawings similar to these.
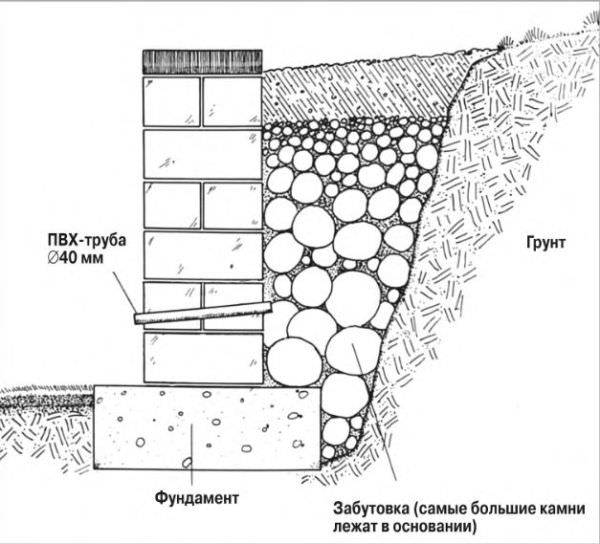
Scheme of the device of the retaining wall
This is necessary so that the corner retaining walls have a certain angle of inclination from the side of the ground. You can independently calculate the angle of inclination only if the height of the slope does not exceed 1 m. In other cases, you must contact the engineering services and be sure to study the SNiP. This document provides recommendations for the installation of these structures. SNiP also introduces restrictions on the installation of these types of walls in the immediate vicinity of a water supply system, gas pipeline and other communications.
Finishing work on retaining walls is not included in the mandatory part. But on personal plots, it is the decoration that is of great importance. Various materials can be used: natural stone, finishing tiles, shell rock, textured or structural plaster. There are many finishing options.