Gates wooden for giving. Wooden gate: main types
If the gate is the face of the house, then the gate is a smile on it. Even if it is somewhere inside and leads to the garden. Do-it-yourself wicket - a welcoming and relaxed smile. Therefore, it is necessary to treat the manufacture of this generally unpretentious product diligently and with soul.
materials
Here the choice is not so rich. Plastic sections of the fence, gate leaves and wickets are durable, can be quite attractive and do not require preliminary earthworks, but, alas, they are not fire resistant and do not resist vandalism: it is easy to stick into the ground - it is easy to pull out from there. Outside of production conditions, plastics are low-tech and labor-intensive, therefore do-it-yourself gates and are most often made of wood and metal. In this case, plastic can be used as an auxiliary and finishing material, which is discussed below.
Note: fittings will also be required for gates and gates. To make it yourself (the fittings are not structurally complicated) or to buy it is a master's business. What to choose sensibly or take as a sample, see fig. right below. Something in addition, if and where necessary, see later in the course of the presentation.
In general about the design

It is customary to make the entrance gate open inwards. This is necessary, first of all, for the safety of both visitors and hosts: moving away from the swinging sash, the guest runs the risk of getting his shoes into the mud, or even crashing onto the roadway. Also, if the gate opens outward, then the hinge hinges will be on the street, which will facilitate the work of potential intruders. If the swing gate can be made to open only outwards, anti-burglary hinges must be installed, and either a viewing window should be made in the sash, or an intercom should be installed at the entrance.
The width of the gate leaf (sashes without hinges and locks) is taken as for interior doors- 750-1000 mm. It is impossible to narrow its canvas to 600-650 mm, as for doors to utility rooms and common areas: they go through the gate in outerwear. If you make it wider, then accidentally unlocked, it can slam in the wind so that the loops will turn out. The height of the gate is taken according to the height of the fence, but for the same wind reasons, not more than the height of the passage above the stairs, i.e. 1.9-2 m. Between the leaf of the gate, the pole on which it is hung, and other framing elements, a gap of 6 mm from the side of the hinges, from 80 mm at the bottom and from 2 mm along other 2 sides.
In order not to put extra poles, which in this case is the most time-consuming, one of the gates is often made common with the gate: gate hinges are attached to it on one side, and gate hinges on the other. The "backbone" of this pillar in any case should be steel, although a wooden pillar is also possible for the opposite collar. A reinforced common post is also required if the gate is built into the gate. Then you need to take into account something else, see below.
Note: it is impossible to make gate pillars in the form of an asbestos-cement pipe concreted and filled with concrete, as is sometimes advised - the entire pillar turns out to be fragile. Remember - the gate pillars are not piles, they are subject to fast alternating dynamic loads, and without an elastic base, the pillars will either crack or loosen pretty soon.
If the fence posts are solid brick, then the gates should be laid in 1.5 bricks with a gate height of up to 1.6 m and in 2 bricks with a higher height, using special schemes (orders) of 3-row dressing of seams for corner fence posts, see fig. .

This business requires a fairly large experience of a bricklayer, but steel embedded parts for attaching hinges still do not always hold securely. So it would be better to make brick gate posts by folding them around a steel pipe ridge according to a simplified masonry pattern for intermediate fence posts; rows of masonry then simply alternate in mirror image.

Brick in this case is a more decorative material, so you can use a fragile, but beautiful facing: a pipe with a diameter of up to 120 mm will enter the central clearance of the pillar. Mortgages, which have now become just overlays, are connected to it with pieces of reinforcing bars for welding, see fig. on right. The locations of the mortgages and their connections with the ridge must be calculated in advance so that they fall on the masonry joints, otherwise you will have to hammer grooves in the bricks. The pipe-line is being concreted "in full", not less than 0.6 m below the standard freezing depth in the area.
Note: in general, the erection and fixing of pillars and columns in the ground is a special branch of the construction industry. Concreting here requires particularly reliable. For gates and gates, it can be simplified using the techniques of TISE technology, see for example. video below. By the way, the idea of the authors is really good, but it is still not necessary to prime the concreted parts of steel parts. And we will return to the gate as such.
Video: concreting pillars for gates and gates
About corrugated board
A gate made of corrugated board is good not only due to the availability of material, speed and manufacturability, but also because the corrugated steel sheet gives the sheet additional strength. It is believed that the appearance is utilitarian. However, gates with corrugated wicket doors can be improved in various ways, see below.
wooden gates
Simple picket and rack
Cloths of gates of small height, or openwork, or located in places sufficiently protected from gusts of wind, are made of wood according to the so-called. frame scheme, although in truth it is not a frame, but with a load-bearing sheathing: the entire canvas acquires design rigidity only when overhead strips are installed on the “frame”. For gates of ordinary sizes, the supporting supporting elements are made of boards (30-40) x (130-150), and overhead strips are also made of boards (15-25) x (60-100). In this case, the "frame" is made in a Z-shaped pattern, pos. 1 and 2 in fig.

wooden gates
If the decorative filling is very subtle and is not capable of carrying loads, the frame is made into a “butterfly” or “hourglass”, in the form of an X-shaped support with crossbars along the edges. In the “butterfly”, 2 horizontal crossbars are placed under the crate of slats from 10x20 mm, at the top and bottom, and the “hourglass”, pos. 3, for any, even film, finish, framed on all sides. Such gates are more labor-intensive, because the support boards at the crosshairs cut into half a tree, and the hourglass must also be cut into the frame.
For a gate extended in height, the E-shaped support structure, pos. 4. A special case is a wattle gate. The wattle thing is quite strong and tough, but not for twisting diagonally. In the gate, the earth does not hold him back, so the wattle gate is reinforced with an Λ-shaped support. It is enough to reinforce only the lower half in this way, pos. 5, this does not deprive the wattle gate of a rustic look, especially when the wood darkens.
Garden and rustic
The garden gate is most often not designed uniformly and is openwork. Then, in order to ensure the rigidity and strength of the canvas, it is made framed: all the loads are taken over by a frame made of timber from 40x100. Its parts at the joints are cut into half a tree with waterproof glue and pulled together with pairs of diagonally located screws. Excellent frame gates are obtained from the wings of old doors and windows for fine glazing, pos. 1 in fig. Under an oblique lath crate without a tie-in at the crosshairs, the corners of the frame are additionally reinforced with scarves from the board (15-30) x (80-150), pos. 2. Sections of the frame for heterogeneous decorative filling are separated by crossbars, pos. 4 and 5.


Solid input
Particularly durable, and when impregnated with fire retardants, synthetic resins and made of hardwood and vandal-proof, there will be a panel wooden gate, see fig. left. In this case, the frame is made of timber from 50x150, and its details are connected in the corners into a tenon-groove. A grooved board from (30-40)x100 is used for filling. The dimensions of the frame are taken such that an integer number of boards fit in its window without taking into account the height of the tongue crest. Inside the frame along the contour, a groove is selected; one of the extreme boards enters it with a tongue tongue, and the tongue groove of the opposite one is connected to the frame groove with dowels (lamellae).
Note: overhead hinges of frame and shield gates can be shortened, see fig. on the right, so-called. semi-barn (overhead loops of full length - granary). You can't use card loops anyway.
Wicket - arrow

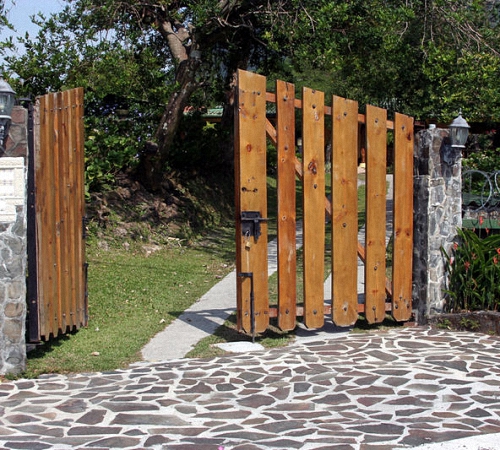
In the garden, a wooden lancet gate looks especially elegant, see for example. photo in fig. on right. The gate-arrow is considered quite laborious, but in fact it is not difficult to make it for a novice master. The material is enough for a sheet of plywood with a thickness of 5-6 mm, and from a special tool you will need a jigsaw and, preferably, a screwdriver.
The scheme of cutting the material and assembling the lancet top of the gate is shown in fig. below. You will need 12 pieces in total, 6 per side. 4 medium ones, if necessary, are narrowed from the inside under the decorative filling (shown by the dotted line). Before assembling the boom, all blanks are impregnated twice with a water-polymer emulsion, if the plywood is ordinary construction or packaging. The "legs" of the 2 middle parts are shortened by about 100 mm to fit on the spike.

An lancet pommel is assembled on PVA glue and small notched nails or self-tapping screws. Fastener length 20mm for 5mm plywood and 24mm for 6mm plywood. First, 4 front parts are assembled, including those shortened for a spike, and then 2 remaining back parts are attached to them. The parts are knocked down / screwed together with a “snake” (zigzag) in increments of 80-150 mm with an indent from the edge of 30-40 mm. The back "snake" should be a mirror image of the front.
The straight legs of the "boom" can be shortened according to the overall design of the gate. At the upper ends of its vertical posts, a spike is cut out for landing an arrow. They plant an arrow on the same PVA and reinforce it with 4 diagonal pairs of self-tapping screws, 2 each in front and behind. The back pairs should be a mirror image of the front ones.
Wicket and pergola
A pergola in a general sense is a building without walls and a roof. For example, a garden pergola may simply be a trellis tunnel through which vines are planted. The classic pergola, a colonnade in 2 more rows, crowned with crossed beams, became known in Europe thanks to the ancient Greeks, but was invented either in Ancient Egypt, or in Persia for palaces and temples.
The fact is that a classic pergola gives a rather strong psychological effect of dominance of the structure and, accordingly, of its owner. In the despotic East, the pergola was supposed to suppress the pride of the visitor before he approached the throne or altar. Unfortunately, there is no way to go into the subtleties of why this is so, but this effect is quite objective, like the pacifying effect of a pond mirror with water lilies or thoughts of abundance inspired by a lush flower bed.
Therefore, to supply the entrance gate with a monumental pergola, as in pos. 1 fig., it’s better not to: the guest may turn out to be a person on whom the course of your affairs depends. And then he will not know why he lost loyalty to you, and to you - why everything suddenly went to pieces.

In less authoritarian Europe, this was immediately understood, and the pergola, wrapped in flowers to soften the pressure, was moved to a resting corner of the garden, where guests are allowed at the owner's choice. In addition, as soon as the arch was invented, they began to crown the pergola with it, pos. 2; rounded pommel significantly softens the effect of dominance. In the chambers, the pergola was replaced by an enfilade, inspiring a sense of grandeur, without humiliating dignity.
If the overall design still requires a classic pergola at the entrance, then it should be made visually as light as possible, and the fence and gate should be openwork and as low as possible, pos. 3. Openness will negate the dominance of the pergola. Another option is a single-row pergola, somewhat stylized as a Buddhist-Shinto shrine, pos. 4. It evokes a feeling of belittling more weakly and it is already associated with higher powers, which is not offensive to anyone in their right mind.
Metal gates

The basis of a metal gate is a metal profile; as a rule - a square steel pipe 60x60 (2-3). A rectangular frame is welded from it according to the size of the gate leaf. For reinforcement under corrugated sheathing, the 1st cross member from the same pipe, located in the middle of the web height, is sufficient. If a round water pipe is used, to reinforce under the profiled sheet, you need to put a diagonal stiffener and strengthen the corners with scarves from 200x200 to 300x300 from a steel sheet of 3-5 mm. In this case, when sheathing with a sheet 1.5 mm thick with a wave of 15x150, it is possible to bring the width of the leaf up to 1.5 m, this is already a real gate leaf, see fig.
How is the metal gate arranged for any other decorative filling, incl. and wooden, see fig. below: the frame is additionally reinforced with the same cross member, but from a professional pipe 40x25 (1.5-2), and 2 struts from the middle to the outer corners.


The reinforcement elements are edge-welded to the frame flush with the inner plane of the frame, this will give a recess for mounting the filling. Under it, from small parts (for example, a rack grate), the same pipe 40x25 (1.5-2), or a steel corner, is mounted inside along the contour of the frame.
A gate of this design, sheathed with scraps of metal siding, looks pretty decent, see fig. on right. And for garden sheathing or other, to which vandals cannot reach, the remains of any external finishing material will be used: plastic lining, blockhouse, etc.
Note: the steel wing of the gate weighs more than 20 kg even without sheathing. Therefore, bearing in mind the same sudden wind loads, the hinges for it must be taken garage, see fig. left. For the gate, loops with a diameter of (16-20)x120 with a ball stop are sufficient. More powerful on the support bearing, of course, will not interfere.

The “most complete” scheme for reinforcing a metal gate, designed for any sheathing and for operation in the most severe conditions, turns out to be not much more material and time-consuming: it comes down to a short additional brace at each corner and mounting the gate on a separate post. A drawing of a metal gate frame with a gate for all occasions is shown in fig. below.

The manufacture of such gates with a wicket has some features, namely: first, the gates themselves are made, with precise installation of the pillars, checking for opening and closing, etc. Then there is a technological break of 20 days, until the concrete foundations of the gate pillars gain 75% strength; meanwhile, you can make a gate with a pillar. Its canvas is temporarily fixed tightly in the closed state with bolts or clamps. Sheathing gates and gates are not yet done.
- A pillar with a gate is placed in the well;
- Align vertically in the transverse plane, fixing with wooden inserts;
- The gate leaf is moved to the gate post, solid gaskets are placed under its edge, providing the necessary operational clearance, see above, and fixed with clamps;
- The wicket post is set vertically in the longitudinal plane, simultaneously controlling whether the installation has gone astray in the transverse plane, i.e. use 2 plumb lines;
- The wicket post is finally fixed and concreted;
- Sheathing of all doors and installation of fittings is carried out no earlier than 7 days (at +18 in the shade) after the concrete has set in the foundation of the wicket column.
Wicket at the gate
A lot of work and a lot of money will save a gate with a gate built into the gate leaf. True, this applies only to metal swing gates. A gate built into a sliding or lifting gate complicates their independent production so much that it is perhaps better to put an additional post. If the gate is hinged, then the gate in their leaf is made according to the following rules, see on the right in fig. below:
- The pillar adjacent to the gate is made of reinforced steel (pipe from 100x100x4) and concreted for at least 1.2 m, regardless of the freezing depth.
- The width of the gate leaf is made no more than half the width of the gate leaf.
- The scheme of reinforcing the gate leaves is preserved, but on the gate with the gate it seems to be compressed horizontally.
- The wicket frame is made with a cross member from the main pipe (60x60x3) and a pair of diagonal stiffening ribs from the 40x25x pipe from the middle to the outer corners.

With wooden gates, the situation is somewhat more complicated: putting a gate in the leaf of a wooden gate without losing overall strength is only possible if the gate is made of durable solid (and expensive) wood. If the gate is made of ordinary coniferous wood, then the gate must be hung nearby, and the pole common to it and the gate must be steel, concreted to full depth. In both cases, gate leaves and wickets are framed with additional diagonal stiffening (see left in the figure) from timber from 150x50.
Different wicket differences

Portal
The portal of the gate is not necessarily a pergola, it has only recently come into fashion. Most often, a canopy (visor) is made over the gate from the rain, on the left in fig. He does not require extra space outside (which is no longer the property of the owner), but it is convenient for the guest, and there is reason to respect the owner. According to the old rules of hospitality, it was considered good form if the portal-canopy of the gate was brought out at least 3-4 feet (about 0.9-1.2 m). Inside - as much as you like, even a continuous tunnel to the porch.
Note: of modern materials for the roof of the canopy portal, cellular polycarbonate is best suited. relatively inexpensive, technologically available for making with your own hands, strong, durable, aesthetically well consistent with a fence, gates and gates made of any material or combinations thereof.
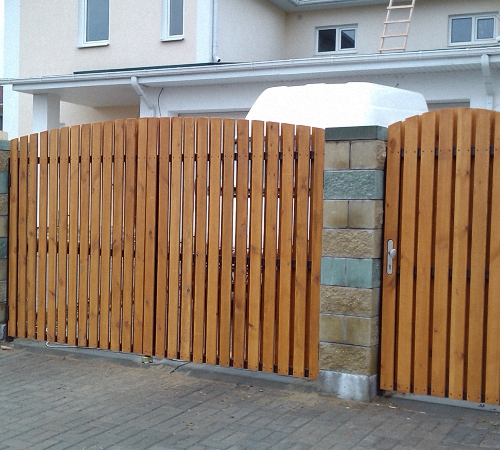
The second type of wicket portals is constructive and technological. These are designed primarily to ensure the strength of the capital stone fence, right there. It is not forbidden to equip the capital portal of the gate with a canopy by anyone, anywhere.

Fences with gates and wickets made of mesh are not very aesthetic, they don’t block anything from view, but they are inexpensive, technologically uncomplicated, less labor-intensive and more maintainable than others. Therefore, they are most often fenced in household yards, premises for productive pets, etc. For sheathing the fence, the chain-link mesh is mainly used as it is more technologically advanced and durable.
The peculiarity of gate leaves and wickets made of mesh is that the sheathing, on the one hand, is not capable of bearing any load; on the other hand, it is freely blown and gives very little wind loads. Therefore, the sash frames can be made from a corner from 40x40 for a gate and from 60x60 for a gate. But in both cases, the reinforcement should be in the form of at least the 1st full diagonal connection, as in a gate on a frame made of a round pipe, from the same corner, see fig. Gate posts - round pipe from 100 mm in diameter or square from 60x60x3.
Forged gates
A good custom-made hand-forged gate, on the left in the figure, will cost at current prices hardly cheaper than 35-40 thousand rubles. And yet, a forged gate, and a unique one, for a middle-class householder may not be such an inaccessible luxury at all.

Blacksmiths don't make lazy people. Blacksmith craftsmen in their free time gradually forge monograms, flowers, etc. from the remains and scraps. for sale. A lot of work will either be, or not, and small forged decorative elements will always find a market. Here you can buy them at reasonable prices. There is also a decor for gates with wickets, forged (more precisely, stamped) under production conditions, but such products of the same type are all the same, and handmade is handmade.
The gate, sheathed with the most utilitarian smooth steel sheet, with piece forging superimposed on it, takes on a completely different look, in the center in fig. Forging is especially well combined with wood. Look at the right in Fig. To give respectability to a completely unpretentious picket gate on a Z-frame, just 3 small forged parts are enough. That's really cheap and cheerful.
Nothing spoils the view of the house from the street like an old gate that has fallen into disrepair. Fortunately, you can make your own garden gate, while spending a minimum of money. A simple wooden gate with your own hands is quite easy to do. Having purchased all the necessary materials in advance, it is quite possible to cope with this project in one day.
Gate with their own hands made of wood. Tools and materials.
We will consider the basic model of how to make a wooden gate for a summer residence. And then you can add your beautiful details to it and complicate the design.

A simple gate with your own hands. Required tools:
- screwdriver with drills and bits;
- hacksaw;
- roulette;
- level.


And, of course, boards.

And you need two types of boards. Thin ones will go to the skin, and thicker bars are needed for the frame. The exact parameters depend on the desired size of the gate. The larger it is, the thicker the beam for the frame should be.

A simple gate with your own hands. Stages of work
The first step is to accurately measure the opening. Make sure that its width is the same throughout its height (i.e. that the posts are installed in parallel).

When specifying the size of the gate, be sure to leave a margin on both sides. Firstly, this is necessary so that the gate can open freely. And secondly, the tree can gain moisture and swell during rain and in wet weather. Therefore, wooden gates and gates should not be fitted back to back. 5-6 millimeters on each side is quite a reasonable margin. On the opening side, up to 10 mm can be left.

Assembling the frame of the gate made of wood.
For our gate, we will make a simple but strong frame. It will be fastened with metal corners - this is a simple and reliable way to fix the details and avoid the wicket skewing under its own weight.

Mark and drill holes for the screws.

And then we assemble the frame with a wrench or ratchet. Make sure the frame is really square before tightening the bolts. The simple way to do this is to measure the diagonals. Their lengths must be the same.

DIY garden gate. Installation and upholstery.
Advice! Expose the gate and fasten the hinges to the frame even before sheathing. This will greatly facilitate the process and save you a lot of nerve cells.
It would be possible to immediately sheathe the frame with boards and complete the assembly of the gate, but this is somewhat unreasonable. While the gate is not sheathed, it is much more convenient to expose it in the opening.

In order to set the gate correctly, it is necessary to carefully fix it in the closed position and make sure that it stands vertically (otherwise it will open or close by itself) and that the side gaps are the same at the top and bottom.

To do this, as a rule, you have to resort to a number of tricks. For example, temporarily drive a nail into a pole, or insert a chip of the required thickness between the pole and the gate frame.

The thickness of the chip should be equal to the width of the gap.

Special attention should be paid to the distance from the bottom bar to the ground. People often try to hang the gate lower, but then it may not open well due to snow or overgrown grass. It is better to leave a gap of at least 8-10 centimeters between the gate and the ground.

The bottom must be set very carefully.

Be sure to check the correct installation with a level.

As soon as the gate is well exposed, mark the holes for attaching the hinges to the frame, as well as to the post. It is important to do this carefully - without changing the position of the gate. Then attach the loops.

Make sure the gate opens and closes well.

Now you should remove the gate from the hinges and sheathe it with pre-prepared and cut-to-size boards. The ends of the boards can be rounded or cut at an angle to make this simple gate a little more interesting.

It remains only to attach the bolt!

That's all, the wooden gate is ready! As you can see, making a wooden gate yourself is not super difficult. Even a teenager can do it! And it doesn't require expensive tools. The main thing is attentiveness, accuracy and patience. Knowing the basics of making a gate with your own hands, you can make your own version.

For example, such a modern design of a garden gate with a viewing window for a dog.

Now, if a wooden gate is dilapidated at your home or in the country, do not be afraid to make a new one with your own hands.  A beautiful gate is the first thing your guests see, and you can be proud that you made it yourself.
In most cases, the construction of infrastructure facilities in a summer cottage does not require qualified intervention by builders. Since the construction of a fence and the organization of a check-in are top priorities in the arrangement of any home, it is best to understand what types of entrance structures exist and which materials are most rational to use when installing them, as well as how to make a gate in the country.
For the successful manufacture of any type of gate structure with your own hands, three main components are needed - facing material, tools and a margin of time. Each garden plot and internal area is characterized by the use of a certain type of gate, since each of them has its own opening and installation technology, drawings, recommended finishes, and consumables. To determine the optimal one, it is necessary to identify the properties, advantages and disadvantages of the most used types of gates.

The principle of operation of swing gates is due to their structure, which includes two wings that swing open in opposite directions from each other. The construction of such gates will help save a lot of time when organizing entry and exit.
The main advantages are:
- ease of installation;
- reliability;
- durability.

Flaws:
- the presence of a cleared space for opening the gate leaves, which must be maintained in good condition in the winter;
- in the option of using the gate in automatic mode, you will need to purchase two sets of motors for each of the wings, which will significantly affect the total cost.

Possessing an indisputable advantage over the previous type, sliding gates are a structure consisting of one leaf, shifting parallel to the equipped support pillars, along the fence line, in a certain direction.
This category of gates, in turn, is divided into three subgroups, which are suspended, cantilever and rail, therefore, when purchasing one or another set of such gates, it is necessary to understand the specifics of construction and the features of further operation. So, the suspended view provides for the manufacture of a special hinged safety beam, which is the basis for fastening and subsequent movement of the wings.

The cantilever view implies the installation of cantilever mechanisms and a channel beam, as well as the presence of several additional meters for optimal rollback of the gate, and the rail version is inherent in the placement of the guide rail at the bottom of the structure.

The advantages of these gates are:
- compactness and no need to prepare a cleared space for opening the sashes;
- the possibility of using automation;
- practicality;
- moderate pricing policy;
- organization of a wide passage, as well as the convenience of remote control of the gate).
Flaws:
- constant control over the cleanliness and presence of lubrication of roller mechanisms;
- carrying out a number of preparatory procedures (calculation of the distance for the rollback of the valves and the presence of a perfectly even fence);
- basic construction skills and knowledge of installation features.
Any owner of suburban housing will be able to cope with the construction of such a structure, following the step-by-step instructions of the masters, however, due to the high cost of component materials and fixtures, as well as the high chance of making mistakes in calculations or assembling the structure, it is more expedient to seek help from specialists. In this case, you can count on a free visit of the master and warranty service during the agreed period.

Being a kind of retractable structures, sliding gates are two leaves, moving apart in two opposite directions. According to the technology of movement, sliding gates are also divided into constituent groups, as well as the type of gate described above. The defining advantage of such an opening mechanism is the reduction in the total weight of the gate by distributing the load on two frames, but this plus is achieved by using two sets of motors, which greatly increases the final cost.

Among the huge variety of materials presented in the assortment of building stores, which are most widely used in the arrangement of entrance gates, metal and wood should be distinguished. In this matter, the choice of one or another raw material mainly depends on the financial capabilities of the owner.

Of course, the preference in this category of materials is given to the profiled sheet, since it has a number of important distinctive advantages, however, like every raw material, it has some disadvantages.
The advantages of such material are:
- strength due to the rigidity of the fundamental principle;
- moderate cost;
- ease of installation;
- resistance to the harmful effects of the external environment;
- wide choice of colors;
- duration of operation.
Flaws:
- with slight damage to the protective shell of the sheet, corrosion may occur;
- noise from atmospheric precipitation.

In the presented category of materials, one can single out such a representative as a chain-link mesh. Gates of such a plan have a high light transmission capacity, they have a small windage and are light in weight. In addition, the fastening of the mesh is carried out in a short time and without exhausting efforts.

Currently, wood-based gates are a rare occurrence. This circumstance is due to the endless desire for safety and durability, which are easily achieved using metal products. The implementation of the frame for the doors and the cladding of wood, over time, leads to sagging of the gate and deformation of the entire structure due to its bulkiness and high specific gravity. Of course, the use of wood as the basis for gates, the construction of summer cottages and site decorations highlights the natural component of the appearance and allows you to feel the unity with nature, but it requires special processing of each element and subsequent regular seasonal repairs.
Among the advantages of such raw materials should be highlighted:
- low cost;
- the availability of the material;
- the minimum number of tools and consumables, which significantly saves the budget;
- pleasant aesthetics;
- fast installation;
- ease of processing.

However, the pleasant positive characteristics are largely offset by the negative properties of such a material. The main ones are:
- short period of operation;
- low strength;
- exposure to negative environmental factors;
- fear of sudden changes in temperature and high moisture content;
- tendency to ignite.
If, nevertheless, you are determined to use wood for facing the “calling card” of your backyard allotment, then it is most expedient to perform this process on a metal frame from a profile pipe or any other metal support ceilings.

The main purpose of the support base is to securely fix all the constituent elements of the gate. As a rule, the foundation is represented by a reinforced rectangular concrete block placed along the perimeter of the proposed installation of the structure under construction. In our case, concrete pouring is carried out away from the travel line, in the inner house adjoining territory. When manufacturing swing gates, the foundation should be located in the direction of opening the leaves to reduce the load on the hinges in the open state.
Particularly acute is the issue of high-quality pouring of a concrete base in the manufacture of metal gates, since it ensures a uniform distribution of the pressure of metal products on the soil, protecting the entire structure from shrinkage and distortion.

When starting to work on the arrangement of this element, it should be clearly understood that what quality the foundation will be, such will be the functioning of the gate. When erecting massive objects, it is most rational to prepare deep foundations, for small structures - lightweight supports.
A useful measure preceding the procedure for pouring a reliable foundation is sampling and soil analysis along the perimeter of the future installation sites. Knowing all the features of the soil will subsequently ensure the stability of the gate and determine the optimal type of foundation.
Based on the above recommendations, each owner of a suburban area will be able to easily choose the most suitable gate manufacturing option for him and implement it in the shortest possible time. Any self-made work allows not only to significantly reduce the cost of building a particular object, but also to clearly represent the structure of each connecting component, which subsequently greatly simplifies the possible maintenance and repair processes.
Video
You can learn about the manufacture of different types of gates by watching the videos we offer:
Schemes and drawings
The mechanism of operation of swing gates is quite simple, but automated sliding gates are more difficult to manufacture. We hope the drawings and diagrams we have proposed will help you understand this issue:


Making a wooden gate with your own hands has a lot of advantages. First of all, wood is an environmentally friendly material that has high strength, attractive appearance and good performance. Let's look at how to make a gate out of wood.
Advantages and disadvantages of building a wooden gate
Wood is a fairly popular and affordable building material. Among its advantages should be highlighted:
- affordable cost, which is several times lower than iron or other alternatives;
- ease of processing, the construction of the gate requires a minimum set of tools and little experience with it;
- high speed in the manufacture of gates.

Among the disadvantages of using wood in the manufacture of wooden gates, we note:
- low duration of operation of the product, since the tree is exposed to moisture, ultraviolet radiation and other factors;
- high level of fire safety;
- ease of breaking.
The choice of materials and tools for a wooden gate
Since the gate is located outside the room and is exposed to various kinds of external irritants, the choice of materials for its construction should be approached with particular seriousness. Among the wide variety of wood, we highlight several options that are ideal for these purposes:
- making a gate from larch is the most practical option, since this type of wood is compared in strength with oak, although the cost of larch is slightly lower;
- the choice of pine or spruce is cheap and easy to process, in addition, due to the fact that the materials contain a large amount of resins, they resist moisture, biological pests and mold well;
- cedar - has good performance and attractive appearance, but is quite expensive;
- the most suitable and durable material is the use of oak, it has sufficient hardness, lends itself well to grinding and polishing, in addition, the texture of wood is perfectly manifested on such a gate.
The use of glued laminated timber from larch is a practical option, but it is better not to use glued laminated timber from other types of wood in the manufacture of gates.
Please note that purchased materials must be pre-cut and have the same thickness and optimum moisture content.
After preparing the materials, you should start selecting tools that will help you complete the construction of the gate. We suggest that you familiarize yourself with the minimum set of tools that will be needed during the work:
- the presence of an electric or manual drill is mandatory, because it is used to drill holes for the installation of fasteners;
- using an electric jigsaw or hacksaw will help divide the material into parts;
- it will not be superfluous to have a chisel, hammer, manual or electric planer;
- in addition, you will need a screwdriver or screwdriver;
- to check the evenness of the connection, a water level is required;
- also, it is necessary to prepare a rope, brushes, joiner's pencils, squares and a router.
Affordable cost and fairly high strength are distinguished by materials based on coniferous wood. But, at the same time, the needles are distinguished by the presence of resin passages and pockets, which degrade its strength. Such boards are unsuitable for work. But still, if, when purchasing a material, resin was found on one of the boards, then to eliminate it, one of the solvents presented below will be required in the form:
- gasoline;
- acetone;
- potash;
- caustic soda;
- ethyl alcohol, etc.
The solvent is placed on the surface of the wood, on which the resin is found and washed off with water. If it was not possible to wash off the resin, then the boards are not used in the work.
Particular attention should be paid to checking tools such as square and level. They should show only correct values. When marking, leave a few centimeters in stock. In order to avoid the appearance of corrosion on the surface of the wicket, you should choose fasteners that are coated with zinc.

Wooden gate: main types
Before manufacturing a wooden gate, its design should be determined, on which the appearance and presentability of the entire building depends.
There are gates:
- lattice type;
- deaf type;
- with the presence of a strut;
- without brace;
- from wood;
- combined.
To make a simple lattice gate, you will need an ordinary picket fence, the width of which is 10 cm. To fix it, you will need screws or nails. This procedure helps prevent sagging of the gate.
To ensure the strength of the gate, due attention should be paid to its drawing. There is an option to create them yourself. Although almost any drawing of the gate is on the Internet.
The choice of a lattice gate will allow you to enjoy free communication with your neighbors, as it practically does not block access to the house. These gates have a second name - through. They are lightweight, practical and durable.
The layout of this gate is based on the installation of the gate with the help of two supports in the form of pillars. They are dug into the ground to a depth of 40 to 100 cm. It is preferable to dig a hole that will be located below the freezing depth of the soil in order to eliminate the risk of heaving of the soil and deformation of the gate and gate.
The wicket frame includes upper and lower crossbars, which are connected to the supporting section by strapping and slats. In order for the gate to receive the necessary rigidity, a strut is required. The support post fixes the frame with hinges, and in order to prevent the gate from opening in strong winds, there is a latch on it.

The second option, the arrangement of a deaf gate, is distinguished by the ability not to show neighbors and all people passing by their yard. To make such a gate, you will need a solid piece of wood, which is reinforced with rails and mounted on two support pillars.
In addition, some homeowners prefer combined gates, such as wood and glass, wood and metal, wood and polycarbonate. These materials complement the wood and give the gate even more presentability.
How to make a lattice gate
There are two options for installing this type of wicket frame:
- spiked;
- metal-toothed.
The first option is more convenient and practical, as it is characterized by high strength and the presence of a closed joint. But, at the same time, it requires certain skills in working with carpentry tools. Since the spikes and grooves should be connected with a slight stretch.
For gluing wooden parts, PVA glue is used, designed for woodworking. After manufacturing the frame, it will be checked for compliance with the geometric shape and evenness. All corners must be straight. After using the glue, screws are used for additional fixation of all elements.
To check the frame, also measure it diagonally. The two diagonals must be absolutely even.
The dimensions of the gate depend directly on the size of the opening in which it will be installed.
The second connection option using metal plates involves fixing them on wooden slats. This type of connection does not require much experience and is carried out very quickly. The gate constructed in this way is practically not inferior to the slot gate in strength and reliability. However, the appearance of the structure becomes less presentable.
To improve the durability of a wooden gate, combined metal parts are added to it. This type of gate is more durable and resistant to mechanical stress. After the end of the life of the tree, you just need to change the crate in it.

Installing a wooden gate involves the following actions:
- marking the installation site of the supporting parts on which the gate is fixed;
- installation of the picket fence on the finished base of the gate;
- during the installation of the picket fence, all right angles must be maintained;
- in the space between the slats and the pillars, a special gasket is installed, its thickness is about 7 mm;
- after installing the gate in the pit, it is leveled;
- slopes are used to strengthen the gate, then a crushed stone and sand cushion is installed and further concreting is carried out.

Design and characteristics of the gate
It is possible to manufacture a gate of complex shape, in the form of an arch or an asymmetric figure. The main thing in this matter is a correctly selected and drawn up drawing. For the manufacture of complex curved parts, it is better to contact a master who has some experience in this matter.
With your own hands, it is preferable only to assemble and paint the gate. All connections must be strong, and set in accordance with the level. Next, the finished product is primed and stained with varnish or paint.
Before applying the paint, the gate is sanded, which improves the presentability of its appearance.
We suggest that you familiarize yourself with the materials in the form of accessories that will be required in the manufacture of the gate with your own hands. Among them are:
- automatic sample latch;
- overhead loops;
- valves;
- cap pressure;
- manual latches;
- heck;
- locks;
- double sided loops.
Wooden gate photo:

In order to extend the service life of a wooden gate, it should be treated with an antiseptic, a primer and moisture-proof agents. After drying, the gates are painted or varnished. When choosing paint, be guided by materials designed for outdoor use.
There are a huge number of colors that are suitable for these purposes. The technology for staining is quite simple. To do this, use a medium-sized brush. To begin with, an antiseptic is applied, then a primer, and only after they have dried - paint.
When choosing a primer, it is better to give preference to universal compositions designed for application to both wooden and metal surfaces. Among them are:
- coating materials of opaque type;
- primers of the glyptal type;
- pentaglyphthalic compounds.
Please note that the primer must interact well with the paint. After applying the primer and drying it, the surface is painted with the first coat of paint. Next, the gate is sanded, painted again and sanded again. The last coat of paint is not sanded.
If you plan to apply varnish to the surface of the gate, then you should adhere to this technology:
- grinding is done before applying varnish;
- after grinding, the surface is wetted with water to raise the remaining pile;
- the tree is dried;
- one more grinding and varnishing in several layers is carried out;
- if the gate has a presentable appearance, then it is ready for operation;
- otherwise, the sanding and varnishing procedure is repeated.
Among varnishes, it is best to focus on yacht types. Although they are more expensive, their service life is equal to the service life of the gate itself. This material perfectly tolerates moisture, ultraviolet radiation, frost, heat, etc.
Tip: When choosing all the materials that are used to process a gate made of wood, you should first study the compatibility table of paints and varnishes in order to avoid mistakes when choosing the wrong type of paint or varnish.
Do-it-yourself gate manufacturing technology
We suggest that you familiarize yourself with the main stages of work on a wooden gate:
1. Installation of support pillars made of wood.
Before starting work, two holes are drilled, the depth of which is about 1-1.5 m. Each recess is filled with sand and watered. Next, a crushed stone pillow is installed on which the pillar is located. The structure is leveled and poured with concrete mortar. It is recommended to treat the surface of the post with an antiseptic and water-repellent impregnation. In addition, a waterproofing film is installed in the pit to prevent wood decay.
2. Construction of a wooden frame.
Rails are installed on the Z-shaped structure, which will create a solid foundation for the gate. The bars are laid out on a flat surface, they are cut off in relation to the length required for this and mounted on a frame. To get rid of small irregularities, the use of a planer is recommended.

3. Work on the skin.
Depending on what type of construction was chosen for the gate, it is sheathed. During the construction of a solid gate, no gaps are left between the boards and slats. In the process of manufacturing a lattice-type gate, each board is cut separately in relation to the desired length.
4. Installation of fittings.
The installation of fittings, in the form of canopies, a door latch and hinges, completes the manufacture of the gate. After completing this procedure, the gate is checked for performance and prepared for painting or varnishing.
How to make a gate video:
As you know, almost every suburban area has fences (fence, wall around) that are simply necessary for a safe and comfortable stay. Each of the fences (depending on needs) must have an entrance in the form of a gate or an entrance, for which a variety of gates are mounted.
Gates for giving, in contrast to the usual door entrance, can vary in:
- Manufacturing material.
Usually, metals or wood are used for their implementation.
metal gate
- Overall dimensions.
For a clear understanding of the principles of installing the gate, it is necessary to determine their type. According to the standard, the gate is made in the size of 2 m 60 cm. If necessary, the width of the entrance can be increased to 3 m 50 cm.
- Opening method:
- Swing (open like shutters in the house).
- Retractable - do not require space (drive off to the side along the fence). The ideal solution if the suburban area is small.
- Lifting - entry is carried out by manually or mechanically lifting the gate up.
- Gate for giving with a gate (have an additional doorway).


Each of the types has some features, for example, lifting and sliding gates do not require much space to open (this is very convenient in winter, when snow can interfere with the normal movement of the gate). In this regard, swing gates are quite impractical.
This look is very easy to install. Of course, it, like any gate, has some drawbacks, for example, when used in winter, snow will have to be discarded before opening. On the other hand, if you decide to install the gate yourself, this is the best option.
This is the oldest type of gate and has not changed at all since then. This design is used everywhere, especially in the private sector. Its advantage over other types is the absence of a foundation required for the construction of sliding gates and load-bearing beams used in the lifting version.
The swing version consists of two iron or wooden doors, of arbitrary dimensions, suspended on poles or a brick support, with ordinary large-sized hinges. They open, depending on the design of the hinges, inward or outward. But most often, there are options with plowing in both directions (outward and inward).
As mentioned above, the choice of material is small (wood, metal) and depends on the owner or customer. For example, from metals, most often they buy steel or corrugated board. Wooden sashes can be made of any breed, but larch is best, because it is the least susceptible to decay.
Swing sashes are performed in two versions:
- Deaf - the opening is completely closed.
Solid sewing (with the selected material) is made after the frame is completed. For example, they are sewn with galvanized iron or corrugated board of at least 0.7 mm.

- Transparent - the stitching is not continuous.
A frame with stiffeners is made from round or shaped rectangular pipes. The stitching is carried out according to the design decision, previously approved by the customer. It can be in the form of a pattern or simply made in the form of verticals.

Installation, for example, of a metal version is quite simple and includes several sequential operations:
- First you need to prepare the frame (frame). It should include two vertical and three horizontal profiles.
To do this, rolled metal (pipes, profiles, squares) is cut (according to the prepared drawing) with a grinder. The dimensions of the rental depend on the dimensions of the gate. For example, when assembling a frame 3X2 m, corners or a profile 40X40-60X60 mm are suitable
- Then the profiles are connected by a welding machine or bolts.
The profiles must be securely fixed to avoid frame defects; for greater strength, iron triangles can be used, which are welded in the corners or braces (metal beams) welded diagonally across the gate.

- The final stage is plating.
Connections are made by welding, self-tapping screws or bolts. Sheathe, for convenience, in the direction in one direction, for example, to the right - if you are right-handed, and in the opposite direction - if you are left-handed. If you used corrugated board, then screw the screws into the recesses.
After completing all the work, the hinges are welded. All welding joints are cleaned and painted.
Drawing of swing metal gatesThe frame of a wooden gate is simply assembled on nails or self-tapping screws. Sheathe it with anything, and screw the loops at the end. The braces are required in this case as well.
Support poles can be made of bricks, logs or pipes (metal). Pole holes are dug about 1.8 m deep and 30-50 cm wide. They fall asleep 20-30 cm with sand and gravel
Pillars of logs or pipes are inserted into the pit, fixed and poured with concrete so that the mortar is level with the ground.
The main criterion that must be followed is to concrete the supports at a depth of at least 100 cm (this is the amount of soil freezing, overcoming this threshold, you guarantee the necessary strength and durability of future gates.
The preparation of the cement mortar will not be difficult (mix 2 buckets of sand, 3 buckets of crushed stone, and 10 kg of cement, pouring water until the desired consistency is reached).
Sliding gates are installed if you are not satisfied with conventional swing gates, or to save space. After all, they resemble a compartment (its doors). Rolling back along the wall, fence, premises, hangar, they practically do not go beyond its dimensions.
Such gates are very popular, but expensive. If you compare them with other systems, installing sliding gates with your own hands always requires certain skills and some training. The person who performs the installation must have relevant experience.
sliding gateThe general frame of such gates is also made of profiles, it is distinguished by the presence of a guide welded to the lower profile. The guide is needed in order to move along the rollers that are welded to the channel and poles (rollers are welded to the poles to support the gate).
In addition to the posts, special catching elements are also attached to reduce the collision force when opening and closing the gate.
Sliding gate schemeThey can be opened (rolled back) by hand, but if you want to automate the gate, then use an electric motor to control it. Additionally, install a movement mechanism (rack with teeth or chain drive).
The installation of rollback systems cannot be performed without purchasing a ready-made installation package, which includes:
- load-bearing beam (U-shaped);
- plugs;
- 2 main rollers;
- end roller;
- trolleys;
- traps;
- limiters.
You can purchase large, medium or small packages yourself to install sliding gates.
Sets of components (mounting packages) are selected based on the weight and dimensions of the cantilever-type structure.
 Mounting package and location of components
 Two roller supports are strengthened on a channel blank prepared in advance. The U-shaped carrier is welded (screwed) from the bottom of the frame so that roller carts are inside it. This will ensure long-term operation and minimal contamination of the mechanism.
Roller supports are fixed to the foundation with bolts or plates. This will allow them to move freely, withstanding the weight of the gate.
Do-it-yourself installation of sliding gates is performed as follows:
- We dig a trench under the foundation with a depth of 1.7-3 m, a width of 40-50 cm. The length of our concrete foundation should be 1/2 the width of the passage.
- Next, we make a frame of reinforcement. We take reinforcement with a caliber d12, channel No. 18 and weld the details. The length of the channel is also equal to 1/2 of the width of the opening. Reinforcement bars must lie below the freezing level of the soil.
- We cover the bottom of the trench for the base of the gate with sand and ram it.
- Next, we lower the welded frame into the ditch and set the horizontal level to the building level. With two bars located at the ends of the channel, we check its parallelism to the rollback line.
- After that, we fill our trench with concrete mixture at the rate of:
- cement - 5 bags;
- crushed stone - 0.3 cubic meters;
- sand - 0.5 cubic meters.
 Sliding gate installation
 After 5-7 days, the base will finally set and become strong.
If you want to control the gate using automation, you must prudently lay the cables in plastic (can be from the sewer) or metal tubes.
After 5-10 days after the foundation is completed, they begin to install the rollback system. The instruction suggests the assembly process to be divided into stages:
- Preparatory.
- along the opening, at a height of 20 cm from the road, we stretch the twine to set the position of the carrier.
- insert the roller supports (checking the instructions) into the beam and move them (just roll them) to the center of the gate.
- we insert roller carts into the U-shaped carrier and fix it on the sash.
- we put the assembled structure on the workpiece from the channel.
- we place both roller supports according to the markup.
- align the gate so that it is parallel to our cord in the opening.
- we fix roller carts on the laid channel.
- we weld an adjusting platform to the channel, for the second roller support.
- we roll the structure to the end to check the horizontal position of the supports and the sash.
- then we only weld the platform (adjustment) of the first support.
- then we remove everything and weld the platforms of the remaining supports to the laid channel.
- again we strengthen all the supports and push the door leaf.
- we close the gate for fine adjustment of the horizontal position of the bearing element. They do this with a wrench by simply raising / lowering the roller platforms.
- Free play setting
Adjustment is achieved by the correct location of the roller carts.
 Free play setting
 They take the appropriate wrench and loosen the nuts securing the adjusting platforms and roller supports. We close / open the gate several times to set the roller supports in the desired position. When easy and free movement is achieved, only the top nuts need to be tightened.
Next, install the plugs and the roller at the end. It is mounted on the front side of the gate in the U-shaped rail itself. We fix it with bolts and proceed to install the plug, which is supplied in the mounting package of the retractable mechanism. It is reinforced from the back. The plug is provided to protect the rollers from rust and jamming due to bad weather.
Then we mount the upper bracket. First, its rollers are slightly loosened and this element is placed so that the rollers are flush with the upper edge, and the bracket itself is turned to the support post by the place of fasteners. Then we press the part and fix it.
 Ready-made sliding gates
 - After that, we begin the sheathing of the gate. We cut sheets of prepared material:
- iron;
- steel;
- stainless steel;
- corrugated board;
- other.
sheathing starts from the facade of the gate, fixing the material with self-tapping screws, rivets, iron strips.
After that, we install the upper and lower catchers to relieve the load from the mechanism and prevent the gate from swinging.
Lifting gates for summer cottages save a sufficient amount of space, but their installation is not carried out without the help of specialists. Gates have an electric mechanism for lifting and devices with which it is carried out (ropes, rails, gears).
Such gates are difficult to open by hand due to their heavy weight. Therefore, they are not suitable for summer cottages that are not supplied with electricity, as they require a constant supply network.
There are three types of such gates:
- Blind type.
- Lifting swivel.
- Rising vertically.
The easiest to manufacture is the third option. It represents two pillars with guides, along which gates with rollers slide. If you use an electric motor with a rack and pinion mechanism, installing it vertically, you can automate the process.

One of the options for lifting gates.
Blinds are difficult to make yourself, so you have to buy them. This is the most expensive of all options. Instructions for self-assembly are provided in the video. Therefore, you can try to install them yourself.
In principle, with a wicket door, you can make any of the gates, except for louvered ones, you only need the wicket door itself and several additional profiles.
There are two types of gate installation:

The gate on the sash is performed as follows:
First, we choose in which half of the gate the gate will be, then we mount 4 profiles (vertically). Two profiles will mark the limits of the frame (those that are further from the gate - external) and two in the future will form an opening for the gate (internal).
 Separate gate
 To increase the strength, braces are welded (in the corners, to the external racks). In addition, the middle profile (horizontally) is mounted, which defines the inner opening of the gate. After that, the profile is typed, taking into account the additional 2 cm of the opening diagonally. 2 cm is the accepted tolerance for possible metal expansion or deformation. Finishing work is carried out similarly with swing gates.
It is quite logical that the gates are mounted after erection and require the preliminary installation of supporting pillars.
Preparation
Before starting work, for their high-quality implementation, we need the appropriate tool, namely:
- welding machine (for attaching profiles, the power of the machine must be at least 1000A);
- grinder (for cutting blanks and general metal processing);
- dye;
- hammer;
- building level;
- roulette.
 Tools are your faithful assistants
 In addition to tools, you need to prepare the source material - shaped pipes (ideally, a pipe with a size of 60x40x2.5). The amount of material needed, including metal, is calculated in estimates or found out when drawing up drawings or diagrams.
When constructing sliding gates for summer cottages, for their further normal operation, you additionally need:
- rollers (including trailer);
- beams;
- capturing mechanisms.
 Mounting package for assembly
 All these elements form a console, without which it is simply impossible to make a sliding gate.
Before installing a gate for a summer residence, you need to determine the dimensions (standard parameters are length, width, height). If the gate is used for the passage of vehicles, then 2.6 m will be quite enough for an ordinary car (for a truck - 3.5 m). Remember, if you have swing gates, increasing their size will increase the space needed to open and close them.
After preparing all the materials and tools, they begin to pour the foundation.
Foundation
When installing a gate for a summer cottage of a retractable type, it is also necessary to organize the foundation. We will dig a trench in advance (about 1.5 meters deep and 40 cm wide). Let's place a channel with welded pieces of reinforcement there and fill it with concrete at ground level, as indicated in the paragraph on sliding gates.
The installation of the channel is carried out using the building level to avoid distortions. It takes 7 days for the concrete to harden and work to continue.
Foundation scheme for sliding gatesHow to make a frame
From the very beginning, with the help of any improvised tools (grinders, brushes for metal), they clean the pipes, and then paint them. For the manufacture of frames of various types of gates, including sliding ones, pipes of different sections (60x40 or 50x50) are used. The outer frame is made of pipes, and then the inner frame is welded into it. Further, the structure is sheathed with wood, metal or corrugated board.
If you are installing sliding gates for a summer residence with your own hands, you will also need to set the rollers on the channel, then put on the guide on top (set it evenly) and weld special carts with rollers to the channel itself. Then the supporting rollers, which were already mentioned earlier, are welded on, and at the final stage the entire frame is painted to give it anti-corrosion properties and aesthetic design.
The gate is usually made of the same material as the fence. Depending on the needs of the owner, the wooden gate is varnished or painted.
The most common option is to make a gate from a picket fence
Picket fenceFor normal use of the structure, determine in advance the distance between the gate supports, this will determine the size of the door itself and the width of the passage. Support posts can be made of concrete, brick, metal or wood. After concreting the supports and drying the solution, hinges are attached to the supports and the door is hung so that a gap of 5-10 mm remains below. Try on the gate to the supports even before they are concreted, measure the distance required for normal opening / closing, and only then mount
Photo of the gate in the country


