How to make a columnar foundation on your own. Do-it-yourself columnar foundation - it's easy! Correctly make a columnar foundation
A columnar foundation is a variant of a non-solid structure, which is used for the construction of light buildings, frame and panel houses. Its main advantage is the speed and simplicity of construction, the minimum cost of building materials. A step-by-step instruction for building a columnar foundation with your own hands consists of several main steps: calculating the number of pillars, breaking down the site, earthworks and building the foundation.
Table No. 1 Calculation of the number of pillarsThe calculation is based on two indicators:
- ground resistance,
- bearing capacity of supports.
The first value is tabular, therefore it is selected taking into account the type of soil at the construction site (see table No. 1). It depends on it what section the pillars will have. The second is calculated, where the weight of the building is mainly taken into account. But since the support-columnar foundation is being built for light one-story buildings, the calculations can be simplified by taking the location of the supports as a basis. They must be erected at the corners of the building, as well as at the junction of partitions and external walls. Intermediate pillars are located in the range of 1-2 m between each other, depending on their cross section.
For example, if a solid concrete block measuring 390x180x190 mm is used for the construction of supports, laid in pairs, then the distance between the posts can be left 2 m. If one and a half bricks are used, then the spacing should be reduced to 1.5 m.
Materials for column foundation
The foundation structure of the pillars is built on dense soils, on heaving soils it is necessary to use a pile variety, tape or slab. Therefore, a columnar foundation is either a shallow structure, or laid 20-30 cm below the freezing of the soil.
It is erected from block materials (brick, concrete or gas silicate blocks, logs or timber) or in the form of a monolithic element by pouring concrete mortar into the formwork. The formwork can be collapsible or non-collapsible from pipes (plastic, steel, asbestos-cement).
Marking the locations of pillars, for example, a rectangular foundation, is an accurate drawing of the perimeter of the structure on the plane of the construction site. The main thing here is to set the corners of the structure at 90 °. Make it simple. It is necessary to take as a basis the rule of the "golden triangle", it is also the Pythagorean theorem. That is, one side of the angle should be 3 m, the other 4 m, and the distance between the ends of the sides, which is also the hypotenuse of a right triangle, should be 5 m.
The perimeter of the building is indicated by a strong string or twine, which is stretched between wedges driven into the ground at the corners of the building. You can finally check the correctness of the applied markup by measuring the diagonals. They should be equal in length. 
Excavation
It all depends on what material the columnar foundation is decided to build from:
- If these are block materials, then a rectangular hole is dug under them with a shovel. The depth is determined at the stage of calculations. Usually a block variety is a shallow or surface design.
- If it is a concrete solution, then round wells are drilled under the pillars, for which you can use a garden drill. For example, a monolithic support with a cross section of 200 mm² and a depth of 1 m can withstand 3-7.5 tons of load, depending on the type of soil.
- A monolithic structure can also be of rectangular section, for which it is necessary to construct a formwork of the appropriate shape for each pillar. The volume of excavation in this case increases greatly, because space is needed to install the formwork. Therefore, the size of the pits is increased by 40-50 cm on each side.
Construction of a columnar foundation
Consider all varieties separately, taking into account the building materials used.
Pits of square section are dug out, in them it is necessary to make a rammed pillow of sand 30 cm thick. This size is not chosen in vain. Sand of this thickness additionally performs the function of waterproofing. Through such a layer, water from below will not reach the foundation pillars. 
Now about the assembly of blocks:
- In the pits located at the corners of the building, one concrete block is laid. They are placed closer to the outer wall.
- With the help of a string stretched between the blocks and a level, the blocks are set in the same horizontal plane. Usually, sand is poured under those that are lower, raising it to the required level (to the laces).
- Next to the already laid blocks, one more is laid so that both elements form a single upper plane located exactly along the horizon.
- Intermediate poles are laid and exposed along the stretched laces.
- After that, the second row of blocks is laid on the masonry mortar on top of the first row, only across, so that a bandage is formed. Here the sequence is exactly the same: corner elements are assembled, a cord is pulled between them with horizontal alignment, and intermediate pillars are built up.
If the columnar foundation is built of brick, then the assembly technology is no different from the previous one.
Stone laying should be carried out with a bandage not only vertically, but also horizontally.
There are two ways of pouring, which differ from each other by the presence of formwork or the absence. If the soil on the site is dense clayey, then there is no need to install pipes in prepared wells. A piece of pipe is required only to form the basement (above the ground). It is important to line up the pipes with each other horizontally. 
This must be done in exactly the same way as when placing pillars from block materials:
- To do this, sand is poured into the well and rammed.
- A piece of roofing material is twisted into a tube with a diameter equal to the diameter of the well, where it is inserted.
- A pipe with a height equal to the height of the outer part of the support column is installed on top of the well.
- Inside, you can install a reinforcing frame made of reinforcement. If the structure is light, for example, a gazebo or a summer terrace, then the armored frame can be omitted.
- Concrete mortar is poured with tamping.
- After 28 days, the foundation can be loaded.
If the soil on the site is soft (loose), for example, with a lot of sand, then it is better to install pipes in the wells. Their installation, exposure in a horizontal plane, pouring of concrete mortar are carried out in the same way as in the previous case.
 This is a more complicated process, because it involves the assembly of the formwork, which must be dismantled and removed 7 days after the concrete has been poured.
- A sand cushion is poured into the prepared pits.
- Square formwork is assembled from boards or flat durable materials: plywood, OSB, metal sheet, corrugated board, etc. The main requirement for the design is strength, because the concrete mortar poured inside will press on the walls of the formwork with its weight.
- A reinforcing frame of steel reinforcement is installed, which in shape is a cage with a step between the rods within 10-20 cm.
- Concrete is poured and rammed.
- After a week, the formwork can be dismantled, and the supporting pillars can be loaded after 28 days. During this time, concrete will gain its branded strength.
- After stripping, the pillars are covered with soil with a rammer.
stone pillars
Natural stone, as a material for the construction of a columnar foundation, is often used. Its structures are durable and reliable. Purely technologically, stone pillars are cocked according to two technologies:

Masonry technology is considered difficult, because you have to select pieces of material according to size. Large stones are laid down. As the column rises, their dimensions can be reduced, but it is better that all blocks are the same. At the same time, the chipped surface of the stones makes it difficult to fit one element to another. The foreman must have experience in laying stones in poles.
In this regard, the rubble-concrete method is simpler, but in terms of the consumption of concrete mortar, it is unprofitable, because the mixture itself must fill all the voids between the stones. And this is a large volume. Concrete pillars are constructed using the following technology:
- formwork is going;
- a sand cushion is poured into it;
- stones are laid in one row;
- concrete is poured, which should fill the voids;
- the second row of stones is laid;
- concrete is poured;
- And thus up to the required height of the supporting column, or rather, to the upper edges of the formwork.
Any formwork method of constructing supporting pillars requires precise alignment of the formwork, both along the height of each element, and horizontally between all. To adjust the height of the pillars, the last layer of stones can be laid out from pieces of small sizes or by pouring concrete in a thick layer.
Video: Installing the formwork of the column, armo-frame and pouring the heel of the column foundation
Video 2: Backfilling and pouring the post
The foundation is the most important element of any structure: from a light garden gazebo to a capital multi-storey country mansion. This is the beginning of the construction and its foundation in the literal sense. The strength, durability and safety of the operation of the building depends on how correctly the foundation is chosen, calculated and executed. The question of what type of foundation to choose arises even at the stage of construction planning. Its optimal solution in many cases will be the decision to build a columnar foundation with your own hands: a step-by-step instruction for performing work can give a complete picture of the principles of its design and the intricacies of the arrangement process.

Advantages and disadvantages of a columnar foundation
Self-calculated and do-it-yourself columnar foundations for frame houses and buildings without basements that do not exert strong pressure on the ground are easy to perform and relatively cheap.

According to reviews, columnar foundations have a fairly impressive list of advantages:

At the same time, there are only two disadvantages of columnar foundations:
Types of columnar foundation
Before proceeding with the detailed design and calculation of the columnar foundation, it is necessary to decide on which site, what type and by what technology the building will be erected on it. The choice of material for the columnar bases of the foundation and the depth of their laying depend on these factors.

Foundation materials
The following materials can be used for foundation foundations:
- reinforced concrete;
- rubble concrete;
- blocks;
- brick;
- a natural stone;
- tree;
- pipes: asbestos or plastic.

Foundation depth
The depth of the columnar foundation is determined by its design, technological parameters of the structure and the geological characteristics of the soil in the building spot.
According to the depth of laying, columnar foundations are divided into three main types:

For a do-it-yourself columnar foundation, step-by-step instructions are needed as the most detailed and visual aid.
In the general case, the design of a support-columnar foundation is a system of supports of the smallest possible cross-section located at the points of load concentration: at the corners of the building, at the intersection of walls, under load-bearing beams, piers, under the furnace. To determine the number of stand-alone columns, the distance between them is assumed to be 1.5–2.5 m. To connect the foundation supports into a single structure, a grillage is made between them.

The height of the pillars above the zero mark is individual and depends on the design features of the grillage.
Calculation of the column foundation
The construction of a columnar foundation begins with a calculation. Most likely, to independently perform calculations, you will need a program like "Foundation" or some other program that can be found on the Internet and downloaded for free. To work with such programs, you will need the following parameters:

The technology for building a foundation with columnar supports also requires additional data:
As a result of the calculations, the following values \u200b\u200bare required for the installation of a columnar foundation will be obtained:

Columnar non-buried foundation
A columnar, non-buried foundation on supports spaced in 1.5-2.5 m increments is used quite often. Such foundations can be erected on non-rocky and slightly heaving soils, despite the fact that the building (wooden or panel house, bathhouse, utility block, annex or summer kitchen) has a small area and, accordingly, light weight. Moreover, if construction is carried out on rocky, coarse-grained or non-movable soil, this type of foundation can also be arranged under a fairly large house made of logs or timber. It is also possible to build a foundation on non-buried supports, provided that the effect of heaving forces on the structure is reduced. To do this, the soil under the supports is replaced with a sand cushion.

As a material for pillars, it is possible to use concrete, rubble concrete, sand concrete or concrete blocks for the foundation, the sizes and prices of which are very diverse. However, most often they take foundation blocks with dimensions of 20x20x40. The price of such a foundation, as well as the number of blocks required for its construction, can be calculated independently or using the "fundamental" online calculator. You can also make a columnar foundation of bricks with your own hands, but it must be taken into account that the use of silicate or ceramic bricks with low frost resistance is unacceptable.

Work on the construction of an unburied columnar foundation from prefabricated blocks can be divided into several main stages:

When building a foundation from 20x20x40 blocks with your own hands, video clips and step-by-step instructions will help you understand the technology of work, understand the process and more accurately assess financial costs.

Shallow columnar foundation
Shallow foundation is one of the most popular types of columnar foundation. The means and efforts required by its device are minimal, and the range of application for frame-type buildings is very wide.
As a basis for a frame house or a light bath, a columnar foundation is often made using pipes as formwork for the concrete mix. Since the reinforced concrete pillar will take on the entire load, the material of the pipes does not really matter: both plastic and asbestos pipes, usually used for sewer networks, are suitable.
The diameter of the pipes depends on the load. For light buildings such as gazebos or outbuildings, 10 cm is enough; for buildings made of logs, pipes of 25-30 cm are needed. The amount of concrete in the end is determined precisely by the diameter of the pipe. For 10 m of a pipe 10 cm in diameter, 0.1 m3 of concrete will be needed, a pipe of 20 cm will require 0.5 cubic meters, and 30 cm - 1 cubic meter. The calculation is made taking into account the concrete cushion of the base.

The scheme for carrying out work on the installation of a columnar foundation from asbestos pipes with your own hands (a video of the process can be found on the Internet) is in general terms as follows:
- preparation of the construction site - garbage collection, removal of foreign objects, removal of sod and leveling. Marking the perimeter of the future building, corners, internal walls and their intersections. The installation sites of the foundation supports are marked with pegs;
- then, holes are made in the ground with a hand drill for pillars. The depth of the well should be 20 cm more than calculated: for the installation of a sand cushion;
- arrangement of a sand cushion with obligatory tamping and spilling sand with water. After the final absorption of water, pieces of roofing material should be laid on the bottom in order to prevent moisture from leaving the concrete mix in the sand;
- installation of pipes in wells with a height margin of at least 10 cm. Alignment of pipes according to the level and fixing them in wells using wooden blocks. With a close occurrence of groundwater, the pipes must be smeared with bituminous mastic to the ground level for waterproofing;

- then the base of the pipe by 40-50 cm is poured with a thoroughly mixed concrete-gravel mixture (1 part of cement and 2 parts of sand, diluted with water to a batter state, are combined with 2 parts of fine gravel). Immediately after pouring, the pipe is raised to a height of 15-20 cm and left in this position until the cement has completely solidified. This is necessary to create a base that resists extrusion during heaving of the soil;
- after the concrete has hardened, it is necessary to waterproof the pipe from the outside with roofing material and fill the well with sand with gradual pouring and tamping;
- fittings are placed inside the pipes, after which the rest of the pipe is poured with concrete;
- after the final hardening of the concrete - after 2-3 weeks - continue construction work. It should be added that it would be useful to waterproof the foundation with polymer or bituminous solutions.

According to the same scheme, do-it-yourself installation of a columnar foundation made of plastic pipes is possible. Videos and photos will help you navigate the intricacies of the workflow, which is generally simple.
Pillar foundation with grillage
The grillage is a system of rand beams and strapping beams. It rigidly fixes the foundation, excluding its displacement in the horizontal plane or overturning of the entire structure. In the presence of a grillage, the load from the structure is distributed evenly over all installed columnar supports, as a result of which stability and resistance to destruction increase.
To facilitate understanding of the process, the necessary work is outlined in stages.

Preparation and installation of supports:
- in any case, the initial stage of preparation for the construction of the foundation is the arrangement of the construction site. After removing debris, etc. along the perimeter of the future foundation, the turf and the topsoil are removed;
- for supports, it is necessary to dig holes with a depth of 20 cm more than the level of soil freezing. The width of the pit should be 40 cm more than the width of the wall, since 20 cm are added on each side for formwork and spacers;
- at the bottom of each pit, a well-compacted and spilled pillow of sand-gravel mixture 20 cm high is made. The pillow is lined with roofing material or polyethylene so that moisture from the concrete poured into the pit does not go into the ground;

- formwork boxes are assembled from boards 20 mm thick;
- it is recommended to thoroughly moisten the formwork installed in the pits to prevent the absorption of moisture from the cement mortar and facilitate removal;
- after the formwork is installed, a reinforcement frame is placed in the pits. The frame is assembled separately, from a bar 10-14 mm in diameter. The length of the bars is selected in such a way that when the concrete hardens, their ends stick out 30-40 cm above the ground level;
- the concrete mixture is poured continuously, in layers of 20-30 cm, leveling with a vibrator to avoid the formation of air bubbles;
- the formwork is removed after 3-4 days, the surface of the supports is treated with any suitable waterproofing mixture, and the rest of the pit is covered with sand. Before backfilling, it is also possible to insulate the foundation with extruded polystyrene foam.

Grill device:
There are two options for mounting the grillage: laying it on the ground or lifting it above its surface. The advantage of the second method is the exclusion of the effect of heaving forces:

The cost of works on the device of the columnar foundation
The total cost of a columnar foundation is the sum of the cost of materials and the cost of the actual work. In most cases, it is significantly lower than the cost of other types of foundations, since almost all types of columnar foundations can be built with your own hands. Videos and photos, instructions and manuals found on the Internet are also usually cheap or free.
The calculation of the cost of most types of columnar foundations can be done independently using special online calculators or programs. Many of them are quite easy to find on the Internet, are free and have an intuitive interface.
The foundation of the pillars is a universal option. Such a foundation is built without taking into account the type of soil, and it does not require serious work on waterproofing and insulation. Therefore, they decide to build a columnar foundation without a doubt, even without having the knowledge of a builder.
Unique foundation of "rods"
To understand what a columnar foundation is, it is worth considering in detail its pros and cons, tasks and device.
The column foundation differs significantly from the strip foundation, since it is not built around the entire perimeter of the building
Advantages and disadvantages of a columnar base
The indisputable advantages of the foundation of the supporting pillars are:

The disadvantages of the columnar foundation are attributed to:

All the minuses of the base of the pillars can not be considered as something important if you build this structure, taking into account its purpose.
The tasks of the construction of supporting pillars
It is advisable to build a columnar foundation for objects such as:
- a house without a basement with walls made of light materials;
- a brick building, which, for economic reasons, cannot be placed on a strip foundation and therefore is built on pillars sunk into the ground by 2 meters;
- a building erected in an area with soil prone to heaving due to low temperatures and, as a result, adversely affecting any foundation other than a columnar one.
It is reasonable to put only small houses made of light materials on the pillars, because the weight of other structures of the support will not withstand
It is better to abandon the construction of a structure from supporting pillars in the following cases:
- the soil on the construction site is weak or mobile, which can cause an insufficiently stable foundation to overturn;
- the land on the site contains a large amount of peat, sedimentary rocks or clay saturated with water;
- the house is planned to be built from heavy raw materials, for example, bricks more than 5 cm thick or reinforced concrete standard slabs;
- finances and time for arranging the basement are significantly reduced (when creating a columnar foundation, the basement does not form by itself, as happens during the construction of a strip base);
- the soil on the site for the construction of the house is characterized by a sharp difference in height (from 2 meters).
A columnar foundation can only be built on firm and even ground, since it is not perfectly stable.
View of the foundation from individual supports
The columnar support structure under the house is a system of pillars placed in the corners, in the areas where the walls cross and where the load-bearing walls or beams are located, which bear the weight of the entire building. In order for the pillars to function as a single structure and be as stable as possible, they are combined by means of a grillage - strapping beams.
The columnar foundation, constructed most often, is considered to be a structure made of monolithic reinforced concrete blocks.
The foundation can be made of concrete blocks, and the grillage can be made of wood
Usually the pillars are placed, leaving between them from 2 to 2.5 meters of empty space. But in some cases, builders go beyond the traditional option for arranging supports.
When the pillars are mounted in the ground every 2–2.5 meters, the grillage is created as a standard reinforced jumper. At the same time, the veranda, porch and terrace attached to the house are not combined into a single ensemble.
For places like the porch, separate bases are organized, separated by an expansion joint. This is a necessary measure, because the weight of additional premises is always different from the weight of the house, which is why the shrinkage of these buildings cannot be the same.
Usually the poles are placed at a distance of 2-2.5 m from each other
The distance between the posts is made large (from 2.5 to 3 meters), referring to the significant power of the strapping beams. The most reliable grillage is created in the form of a single or prefabricated beam. And a simple structure connecting the supports can be made of metal parts, such as channels or profiles.
Pillar base variations
What will be the columnar foundation, they decide, based on the amount of finance and the ability to independently engage in construction.
Block supports
The columnar foundation can be made up of concrete or reinforced concrete blocks, manufactured separately and mounted directly during the arrangement of the supporting structure for the building.
Each pillar of the structure can be assembled from separate blocks - a very reliable material
The GOST states that the blocks that will be used for the construction of the foundation must be made from concrete of a grade not lower than M-100. As for the size of the blocks, private developers are used to taking raw materials with parameters of 20 * 20 * 40 cm and a weight of 32 kg. Relatively light are considered foundation blocks made of expanded clay concrete - a material that is resistant to thermal effects.
Large block structures made of reinforced concrete can only be laid with a construction crane, because their weight can even be equal to two tons. Such blocks are reinforced with special reinforcement with a diameter of 9 to 15 mm and are used exclusively for the construction of tape and slab bases for huge brick buildings.
Most often, light small blocks are taken for the independent construction of a columnar foundation, since it will be possible to build supports from large raw materials only with the use of technology
The best depth for fixing a column of blocks in the ground is from 50 cm to 1 meter. If the type of soil and the weight of the building dictate other requirements, then it is more reasonable to build not a block foundation, but a foundation of asbestos-cement pipes filled with concrete. It is too difficult to lay blocks to a depth of more than 1 meter.
brick pillars
Having decided to build a columnar foundation of brick, it is necessary to purchase only red full-bodied ceramic building materials. This material meets all the necessary requirements: it is waterproof, extremely durable and frost-resistant.
Such a characteristic of a brick as frost resistance is considered extremely important. The higher the resistance to low temperature, the longer the building material lasts. For example, a frost resistance of 70 indicates that a brick will deteriorate no sooner than after 70 years.
For the construction of the foundation, it is customary to use red full-bodied ceramic bricks, because it is the most durable
Bricks can be used to build both shallow and deep columnar foundations. The depth of the first version of the foundation varies between 40 and 70 cm. And the deepened foundation is always set below the freezing level of the soil by 30–50 cm.
It is decided to locate the supporting structure at a considerable distance from the surface of the earth when the soil on the construction site is heaving and the groundwater level is unstable.
To make the base reliable, the brick supports of the columnar foundation must be created in 2 bricks
The main foundation pillars (supports standing at the corners of the outer walls and at the intersections of the inner partitions) are usually made in 2 or 2.5 bricks. In other cases, the pillars are allowed to be one and a half bricks and placed at a distance of one and a half or two meters from each other.
"Legs" made of wood
The base of wooden "legs" is the most economical option. Logs suitable for the foundation are easy to cut and process on their own.
It is customary to build a columnar foundation of wooden supports for a house for living during the summer or a tiny building made of wood.
Wooden poles are only intended for the lightest temporary structures, as they can break under excessive pressure.
The best raw material for creating wooden supports is pine, oak or larch wood."Rods" are cut out from the butt of a log with a diameter of 2 to 40 cm. Putting in holes, wooden pillars are fixed on the sides with bricks, stones or a compacted mound of rubble.
Sometimes wooden poles are fixed in place with concrete mortar. In this case, the pillars are immersed in liquid concrete by 10 cm. Another good fixator for wooden supports can be a cross, made of two plates 0.8 meters long, arranged in a crosswise position.
To fix the pole on the crosspiece, a spike is cut out in its lower part. It is inserted into a groove made in the central zone of the cross. Then the pillar is fixed on a kind of platform with scarves.
For reliable fixing of the post in the ground, a cross and jibs are used.
Wooden supports are supposed to be protected in a special way from decay. First, they are covered with clay so that a layer 1 cm thick is formed, then they are fired with hot coals. The last task is carried out slowly, making sure that literally 1.5 cm of wood is charred. Burnt pillars are treated with heated bitumen or tar and dried.
Under the outer walls, wooden supports are immersed in the ground to a depth of 70 to 120 cm. And the pillars to support the partitions inside the house are placed at a depth of 50 cm.
The main pillars of the wooden foundation are supposed to be immersed to a depth of 70–120 cm
Monolith
Buildings with 2 or 3 floors are preferably built on a columnar monolithic base. Such a foundation will not sag even under significant pressure.
The columnar monolithic foundation has been serving without problems for more than 100 years. Each pillar of this supporting structure is capable of supporting an object weighing 100 tons.
A monolithic foundation is considered the most popular design compared to other columnar foundations.
A monolithic base of pillars is made of concrete, reinforced with metal rods and poured into special forms - pipes or formwork. This foundation turns out to be unusually durable, as it is completely devoid of seams.
Do-it-yourself column foundation: step by step instructions
The construction of a columnar structure under the house is started only after the calculations have been completed and the construction site has been prepared.
Necessary Calculations
The calculation is needed to find out how many pillars are needed, and what they should be in size.
Before the computational steps, it is required to test the soil at the construction site - to drill a well with a depth of 60 cm below the level at which it is planned to install the foundation pillars. In the event that soil is found under the bearing soil, soaked with water and therefore weak, it is better to cancel the decision to build a columnar foundation. Poles under load in unstable ground are unlikely to be able to stand still.
The first well at the construction site should be a test one - to check the condition of the soil
Determining the load on the soil
After making sure that it is possible to build a columnar foundation on the site, you should find out what pressure the earth will experience. To do this, you need to determine the weight of the future home.
Calculating how the pressure on the ground will become after the construction of the house, the weight of the foundation should be added to the weight of the structure. To do this, it is necessary to determine the approximate volume of the structure and multiply the resulting figure by the specific gravity of the material. For example, for reinforced concrete, this figure is 2500 kg / m³.
Table: approximate values of the specific gravity for building elements
| Constructions | Specific weight, kg/m² |
| Walls | |
| Brick walls (half a brick thick) | 200–250 |
| Walls made of foam concrete or aerated concrete blocks 30 cm thick | 180 |
| Walls made of logs with a diameter of 24 cm | 135 |
| Walls made of timber 15 cm thick | 120 |
| Frame insulated walls 15 cm thick | 50 |
| Overlappings | |
| Basement and between floors on wooden beams (insulated with material with a density of up to 200 kg / m³) | 100 |
| Attic on wooden beams (insulated with material with a density of up to 200 kg / m³) | 150 |
| Concrete hollow slabs | 350 |
| Monolithic (from reinforced concrete) | 500 |
| Operating load for basement and interfloor ceilings | 210 | 105 |
| Roof including rafters, lathing and roofing material | |
| With a roof made of sheet steel, metal tiles or corrugated board | 30 |
| With a roofing roof in 2 layers | 40 |
| With slate roof | 50 |
| Roofed with natural ceramic tiles | 80 | 100 | 50 | 190 |
*When the roof slope is more than 60 degrees, the snow load is reduced to zero.
The total area of the bases of the pillars
As soon as it becomes known how much the future house will weigh, they will find out the minimum required total area of \u200b\u200bthe bases of all pillars. To determine this parameter, use the formula S \u003d 1, 3 * P / R 0. The number 1, 3 indicates the safety factor, P is the total weight of the building in kg (including the foundation), and R 0 is the calculated resistance of the bearing soil in kg / cm².
Table: approximate values of the resistance of the bearing soil at a depth of 1.5 meters
An example of determining the number of base pillars
Let's try to calculate how many round supports will be needed to build a columnar base for a small frame-panel house with dimensions of 5x6 meters. At the same time, we take into account that the height of the first floor is 2.7 m, and the same parameter at the gable is 2.5 m. Also, do not forget to use data such as roofing material (slate), type of bearing soil (loam) and freezing depth ( 1.3 m).
The frame house can be installed on 10 pillars
The calculation of the weight of the building is performed as follows:
- The area of all walls is determined, taking into account the gables (72 m²) and their weight (72 × 50 = 3600 kg).
- There is a total area and a mass of floors. Since the house has a basement and interfloor floors, their area is 60 m², and their weight is 6000 kg (60 × 100 = 6000 kg).
- The operating load is also available on the 1st and on the attic floor. Its value will be equal to 12600 kg (60 × 210 = 12600 kg).
- The roof area in our example is about 46 m². Its weight with a slate roof is 2300 kg (46 × 50 = 2300 kg).
- We take the snow load equal to zero, since the angle of inclination of the roof slopes is more than 60˚.
- Determine the preliminary mass of the foundation. To do this, we conditionally select the diameter of future pillars and their number. Let's say we have a drill with a diameter of 400 mm, and we will take this value. The number of pillars is preliminarily taken based on the condition - one pillar per 2 meters of the foundation perimeter. We get 22/2 = 11 pieces. Now we calculate the volume of one column 2 meters high (we deepen 0.2 m below the freezing depth + 0.5 meters rises above the ground): π × 0.2² × 2 = 0.24 m³. The mass of one pillar is 600 kg (0.24 × 2500 = 600 kg), and the mass of the entire foundation is 6600 kg (600 × 11 = 6600 kg).
- We summarize all the obtained values and determine the total weight of the house: P \u003d 31100 kg.
- The minimum required total area of \u200b\u200bthe bases of all pillars will be 11550 cm² (S = 1.3 × 31100 / 3.5 = 11550 cm²).
- The area of the base of one column with a diameter of 400 mm will be equal to 1250 cm². Therefore, our foundation must have at least 10 pillars (11550/1250 = 10).
If you reduce the diameter of the base supports, then their number will increase. For example, armed with a drill that creates wells 30 cm in size, you will need to install at least 16 pillars.
Preparation for construction
Before pouring the columnar foundation on the site, you need to take care of the following:
- Clear the site of debris and remove a fertile layer of soil 30 cm thick.
- Coarse or medium sand found under the removed soil should be taken as the foundation for the foundation, and clay soil, which is found no less than sandy, should be strengthened by filling it with a layer of two materials - sand and gravel.
- Level the site for construction, eliminating bumps and pits, and check its horizontalness using a level set on a two-meter flat board.
The evenness of the prepared area is checked with a rail
- Bring building materials to the site and install a cast-off around the perimeter of the future building (pillars at a distance of 2 m from the building and boards nailed to them with marks for the size of pits and supports). The correctness of the breakdown of the center lines must be controlled by measuring the distance with a tape measure. In addition, it is supposed to check whether the corners of the foundation turned out to be straight in the form of a rectangle or square.
- Break the plan of the future house on the site, that is, mark its parameters with the help of pegs.
- Create holes for installing pillars (if necessary, make holes for wooden supports, you can use a drill, and in the case of installing reinforced concrete pillars, you should arm yourself with a shovel).
- Fill the bottom of the pits with gravel and sand and moisten. Ready "pillows" need to be compacted and covered with polyethylene or roofing material.
The bottom of the drilled pits is reinforced with hard material, for example, gravel.
Creating formwork for pillars
An excellent option for formwork for supports under the house can be a temporary structure made of planed on one side (the planed part is installed facing concrete) boards of any kind of wood, 25 to 40 mm thick, 12 to 15 cm wide and with a moisture content of not more than 25%.
Instead of boards, when constructing formwork, you can use chipboard, waterproof plywood or metal sheets. However, it is preferable to choose exactly the boards, since they adhere less to the concrete solution.
Wooden formwork of the columnar foundation is the standard option
The temporary auxiliary structure must be installed close to the walls of the dug well and perpendicular to the sole of the base. It is recommended to check the correctness of the completed task with a plumb line.
If boards were chosen as the material for the construction of the formwork, then it must be borne in mind that they must be thoroughly moistened with water. By ignoring this condition, you can get fragile pillars, because dry wood absorbs moisture like a sponge, and because of this, worsens the properties of concrete.
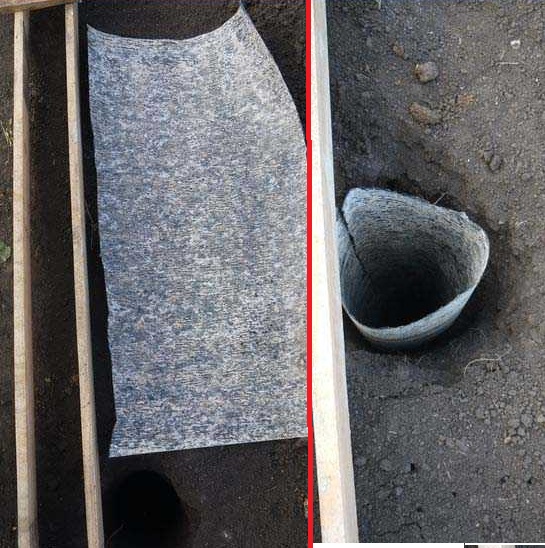
Roofing material formwork is an innovation
An auxiliary structure in the construction of a columnar foundation can also be a fixed roofing material formwork. This material performs several tasks at once: it serves as a form for pouring concrete and protects the supports from moisture.
Roofing material formwork is a good solution if the soil in the created well is dense and not crumbling.
To make an auxiliary structure of roofing felt, proceed as follows:
Features of pouring the foundation
If the home craftsman is a supporter of the traditional way of pouring the foundation, then in order to fulfill this mission, he must do the following:

Anyone who is not averse to alternative methods of building a foundation for a house can make a foundation using a TISE drill. The tool will allow you to create a column structure with a broadening at the base, which will provide a unique opportunity to support a heavier building or reduce the number of columns.
A pillar with broadening (according to TISE technology) is formed in stages:

Video: an example of the construction of a columnar foundation using TISE technology
Even one person can cope with the construction of a columnar foundation. For this work, you do not need to look for either equipment, or hired workers, or a large amount of materials.
At first glance, it may seem that building a columnar foundation for a house with your own hands is an almost impossible task. However, this statement is not true.
Features of the column foundation
Initially, you need to understand the definition of a columnar foundation. To put it simply, it is a complex of supports that carry the weight of the structure under construction. Racks are installed in places of maximum load - these are the corner points of the building, the connection points of walls and spans longer than 2.5 meters.
The distance between the racks, as well as the shape of the pillars, are calculated values \u200b\u200bdepending on a number of factors:
- type of racks;
- material of manufacture;
- building structure;
- the planned mass of the structure;
The standard distance is 1.5 - 2.5 m, the cross-sectional diameter for round supports is from 20 to 25 cm. The size for rectangular supports is from 25 by 25 to 40 by 40 cm. It is desirable that the ground part be at least 50 cm in height, length underground part depends on the depth of the bookmark.
The top points of the supports should be at the same level, which must be carefully checked after installing the racks and adjusted if necessary.
Disadvantages and advantages
Before building a columnar foundation with your own hands for a frame house, you need to understand in which cases its use is suitable and in which it does not make sense, as well as its pros and cons.
Flaws:
- it is impossible to equip the basement of the future house;
- can not be used on floating and water-saturated soils
Advantages:
- quick drying and;
- insignificant costs;
- construction in any season;
- separate installation of each support;
- ease of installation;
- affordable replacement and repair.
Types of columnar foundations
There are different foundations depending on the parameters, the shape of the supports in the section, the materials and processes for the production of pillars and the depth of laying the foundation. In the context of the rack are round, square, rectangular. It is possible to make supports in a monolithic form of concrete, or in a prefabricated form of bricks, blocks, buta.
The classification by bookmark depth is as follows:
- for heaving soil, buried pillars are laid below the freezing point;
- for non-rocky and low-rock soils with a sandy-gravel air embankment, shallow racks are used with a laying of up to 70% of the freezing point of the soil;
- for non-buried soils with low or non-rocky soils using a dense sand cushion.
Base device
In order to competently build a columnar foundation with your own hands for a frame house, it is important to clearly understand the device and the process of its construction.

Ground work
- To start work, it is necessary to prepare the site for the construction of the foundation.
- Complete removal of debris and removal of sod by about 15-20 cm.
- Leveling the surface of the earth.
- Marking the site with pegs according to the plan. The pegs are installed at the corner points of the future foundation, connected with a cord, after which the marking accuracy is checked along the perimeter.
- The marking of the installation points of the pillars is carried out.
- Digging holes.
Support device
1. brick supports . Separate situations make it possible to make support posts from bricks, which is advisable to do on stable soils and in places of deep groundwater.

Laying is possible in two ways:
- laying on a pillow of sand;
- the construction of a concrete shoe, then the laying of bricks on a hardened base.
Most often, supports are prepared 25 by 25 cm (a row of 2 bricks). If you plan to build a large building, then you can lay 4 bricks - 38 by 38 cm with additional installation of reinforcement inside the column.
It is important to observe the exclusively vertical position of the supports with regular checks with a plumb or level.
2. Block . An alternative option is wall or shoe (pillow) rectangular concrete blocks measuring 20 by 20 by 40 cm. The second ones should be mounted on top of a sand cushion at the base of the supports, the shape of the racks is trapezoidal. Most often erected as shallow or shallow supports.

3. Monolithic . Such supports are made by pouring concrete mortar into a pre-installed formwork, round or rectangular in cross section, additionally reinforced with steel rods.

4. Rectangular supports . The formwork for such supports is constructed from plywood or edged boards. If the construction takes place on stable ground, then the formwork is created naturally from the walls of the recesses. Before pouring the solution, it is necessary to cover the walls of the pit with waterproofing material.

When mounting racks in loose soils, it is necessary to erect formwork along the entire height of the future pillar, the recesses are dug out in such a way that it can be installed and fixed without problems.
5. Round poles . It is allowed to erect supports round in section. For manufacturing, wells are drilled 20 - 25 cm in diameter. The construction technology coincides with the manufacture of rectangular supports, roofing material, plastic or asbestos pipes serve instead of formwork.

In some cases, TISE technology is acceptable when specialized drills are used with a plow for wells with an extension at the bottom in order to increase the footprint.
6. Combined supports. In some cases, a do-it-yourself columnar foundation for a frame house is built not from one material, but from two. For example, first, the buried part of the support is concreted, after which the ground part is erected, but already with the use of bricks.
formwork
Before formwork is erected for both installation options, it is necessary to create a bed of sand and gravel mixture 30 - 50 cm high for shallow and non-embedded props and 10 - 20 cm for buried props.
Formwork is mounted strictly vertically on the pillow, fixed with stops. Inside the walls are covered with waterproofing.

Supports can be of uniform thickness along the entire length or with a thickened bottom - a “shoe”. In this case, the width of the pit for the support must correspond to its dimensions. The "shoe" can be installed separately with the release of reinforcement from it, after its hardening, the formwork of the support is installed from above.
Four ribbed reinforcing bars with a diameter of 10 - 12 mm make up the frame, connected by clamps 6 - 10 mm in diameter from ribbed or smooth reinforcement. The distance between the reinforcement and the formwork is more than 3 mm, a similar gap from the pillow in order to protect the metal against corrosion. You can ensure the distance by means of plastic supports, which will also prevent the reinforcement from moving.
When erecting supports with a "shoe", the rods are installed before mounting the formwork.
If a grillage is not planned, then the upper end point of the reinforcement is 5 - 6 cm down relative to the level of pouring the mortar. Installation of embedded studs with a diameter of 14 - 16 mm is envisaged for connecting the supports with the bottom trim.
For foundations where the grillage is planned to be erected, the frame protrudes 15-25 cm above the fill level in order to link it with the frame of the latter.
Next, a concrete solution is poured, made independently or purchased with a brand of at least . Portion pouring with tamping with a vibrator or other means. Removal of the formwork is permissible after the final hardening.
Grillage
You can install a grillage, you can do without its construction. This is a one-piece cast concrete structure, which serves to ensure uniformity of the load on the supports. The lower surface of a high grillage is located at a distance of 10 - 20 cm from the soil surface, a low one is laid on a sand and gravel pillow buried 15 - 10 cm deep in the ground.

Formwork for grillage
To install a hanging grillage, it is necessary to build a formwork. Two installation methods are allowed here: place the bottom at the level of the supports' heads, or build it to its full length to the ground level, and then fill the space between the soil and the grillage with sand. The formwork must be closed with waterproofing.
The height of the formwork is important, its top should end flush with the level of pouring the concrete mortar, or exceed it by 5–6 cm. , and width from 25 to 40 cm.
Reinforcement
The frame is made up of 1 - 2 rows of longitudinally located reinforcement, which is connected by transverse rods or clamps. The connection is made with a soft wire. The gap between the frame and the formwork is not less than 3 - 5 cm, the same rule applies to the upper surface of the grillage.
The reinforcement must be linked to the releases of the reinforcing cages of the supports. If the length of the reinforcement bars of the supports exceeds the height of the grillage, they must be bent at the highest points of the grillage surface at 90 °.
Mortgages for blowers are mounted at the stage of fixing the formwork together with studs for fixing the bottom trim. The diameter of the latter is 14 - 16 mm, and they are placed strictly parallel to the supports along the line where the lower trim beam is located.
Concrete grillage
Concrete is poured carefully, with full coverage of the reinforcement and without the formation of cavities. It is recommended to use tools for compacting the solution. At the end of the pouring process, it is necessary to level the top layer so that the surface is even over the entire area. The formwork can only be removed after the concrete has completely hardened.
Use of waterproofing
For those parts that are the above-ground component of the supports, waterproofing is necessary, as they are vulnerable to environmental influences and the weight of the building. In order to protect against external sources of moisture (rain, snow), wind, physical and chemical influences, roofing material or solutions designed for such tasks can be used.
Conclusion
In general, it is obvious that a do-it-yourself columnar foundation for a frame house is a completely feasible task. In addition, the installation of such a foundation makes it possible to build a truly reliable foundation for the future home.
The columnar foundation has been used for many years to be placed under lightweight structures made of wood, foam blocks or frame buildings. According to the estimates of the masters, the cost of such a foundation is 1.5-2 times lower than when pouring a tape one. In addition, making a columnar foundation with your own hands, using step-by-step instructions, is simple and takes a minimum of time.
Price column foundation more acceptable, and strength and durability are no different from expensive structures
How to make a columnar foundation with your own hands?
For the construction of a country frame house, one cannot do without pouring a solid foundation - a columnar foundation. It will be quite enough for the building to serve for more than one decade. The cost of this option is more acceptable, and the strength and durability of the foundation is no different from other expensive structures.
The columnar foundation is an excellent basis for placing such buildings on it as:
- frame house;
- wooden bath, sauna;
- outbuildings;
- summer kitchen made of bricks;
- patios, pergolas, verandas;
- terraces attached to the house;
- gazebos with fireplaces.
 In recent years, craftsmen use asbestos or plastic pipes to make a columnar foundation under a building.
The columnar foundation can be used in the construction of any lightweight building. The use of this option is especially justified if a deep foundation is required. When pouring the tape version, a huge amount of material, time and effort will be spent.
Among the main disadvantages of the columnar foundation under the building is the lack of the possibility of arranging the basement. The columnar foundation is not used in the construction of multi-storey, heavy structures. The maximum weight of the building must not exceed 1 ton per m 3.
When planning construction activities, it is worth choosing the type of foundation. The most common types are:
- monolithic;
- brick;
- stone.
In recent years, craftsmen have used asbestos or plastic pipes to make a columnar foundation under a building, which, after reinforcement, are filled with concrete mortar. In this case, the pipe is used as a formwork and protects the concrete from external influences.
 The support system is placed at the points of maximum load concentration, and these are the corners of the building, the intersection of walls or beams
Do-it-yourself column foundation: step by step instructions
The support system is placed at the points of maximum load concentration, and these are the corners of the building, the intersection of walls or beams. Between themselves, each column of the foundation is connected with the help of a grillage - a reinforced concrete or log frame on which walls, partition walls and other structural elements rest. The distance between the supports is from 1.5 to 2.5 m.
Depending on the type of soil, the columnar foundation is distinguished:
- Buried. Its depth usually exceeds 1 m.
- Shallow. The laying depth is about 50-60 cm.
- Unburied. It is used in the construction of very light and temporary structures and its depth is not more than 20-25 cm.
To make a columnar foundation with your own hands, we recommend that you follow this step-by-step instruction, which includes such construction work as:

Do-it-yourself columnar foundation from pipes And
The construction of a columnar foundation using pipes takes a minimum of time, and even a novice builder can cope with the work. Step-by-step instructions include the following construction work:
- drilling a well of the appropriate diameter;
- careful tamping of the base of each well;
- installation of a plastic or asbestos pipe;
- fixing each column with soil;
- making concrete mortar using a concrete mixer;
- pouring the bottom of the pipe with a solution of approximately 30 cm;
- at the next stage, the pipe is lifted, and the solution from it will fill the entire space of the well, so the master will receive a concrete pad at the base of each column;
- half-filling the inside of the pipe with concrete mortar;
- installation of a reinforcement rod 12-14 cm in diameter;
- again pouring the remaining void with a solution, while not forgetting the need for thorough tamping of the mixture.
Now it remains to give enough time for the solution to harden and gain strength. Usually it takes 2-3 weeks. Some craftsmen during construction make formwork with a broadening at the bottom and narrow at the top. This form has a number of advantages over the traditional one. With a wide base of the columnar foundation, its bearing capacity increases significantly, since the load is evenly distributed over the entire base. This form of foundation has a high resistance to winter heaving of the soil.
Video about making a columnar foundation with your own hands, step by step instructions:
Do-it-yourself columnar foundation, step-by-step instructions - that's what interests those who want to build a frame house or other building on the site. You will find important recommendations, tips, features of pouring the foundation in this article.