Print an enlarged chessboard. Introduction to chess. Chess board
How to make a paper chess board with chess. Master class with a detailed description
Berdnik Galina Stanislavovna, primary school teacher of KEI KhMAO-Yugra "Laryak boarding school for students with disabilities".
Description: Chess is not only a game that gives children a lot of joy and pleasure, but also an effective, effective remedy their mental development. The process of teaching the basics of a chess game contributes to the development in children of the ability to navigate on a plane, the development of analytical and synthetic activities, thinking, judgments, conclusions, teaches the child to remember, compare, generalize, anticipate the results of their activities and Practice has shown that a well-organized process of teaching chess gives a lot and gifted children, and conditionally ordinary, and weak, and children with various functional disorders. Therefore, it is desirable to start learning the wise game as early as possible, but, of course, at a level accessible to the child.
Provided in the master class detailed description making a paper chess game and paper chess pieces using a magnet.
Purpose: ready demo material necessary in the classroom when studying any topic of the subject of chess.
Target: Production of demonstration material on the subject of chess.
Tasks:
1. Repeat the concept of "figures on a plane". Develop design abilities.
2. Development of children's ability to visual modeling.
3. Cultivate the desire to make the product with your own hands.
4. Cultivate the habit of working independently, carefully, bringing the work begun to its logical conclusion.
5. Develop compositional skills and aesthetic sense.
Materials and tools:
1. Paper for drawing A-4 or drawing paper.
2. Colored paper, corrugated cardboard.
3. Ruler (50cm), pencil, scissors, cutter.
4. Magnets, adhesive tape, glue.

Description of the manufacture of visual aids
"Chess and the chessboard".
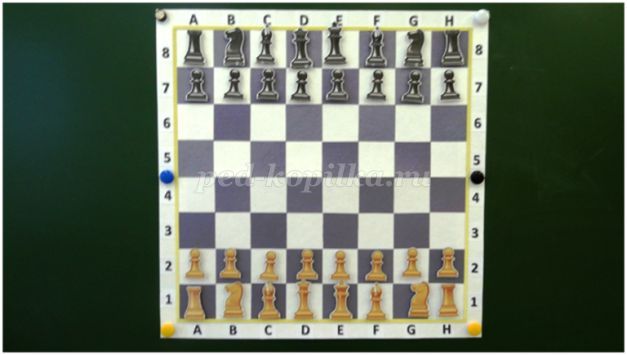
1. To make a chessboard, prepare 2 sheets of A-3 drawing paper. The standard sheet size is 42 cm by 29.7 cm.
The photo shows half of the chessboard. For easy storage of the manual, prepare two such parts. They were glued from the wrong side with a strip of wide adhesive tape.
Also, you can make a chessboard from a single piece of whatman paper. After marking in pencil on the base of the squares, prepare figures from black or gray paper. Make sure that the black square matches the markings on the white sheet of paper.
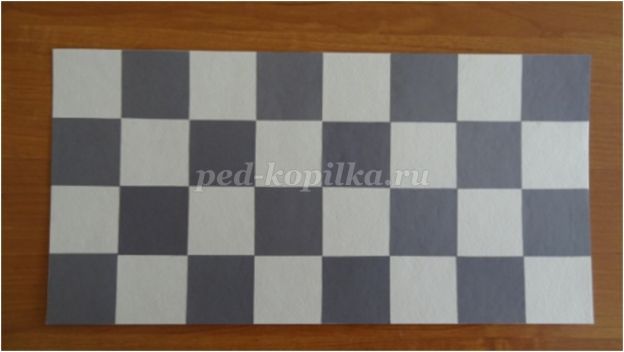
The color of the chessboard is not fundamentally important. You can combine yellow and brown or yellow and green.
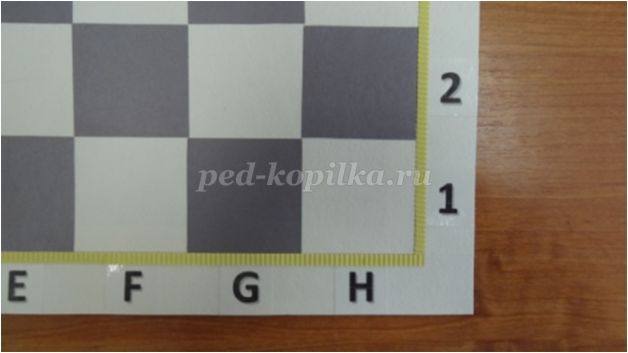
2. A thick white strip of paper was glued to each half of the chessboard. We will place letters and numbers on it to determine the location of the chess pieces.

3. You can print on a printer, you can write beautifully with a felt-tip pen or marker on a white strip of a chessboard.
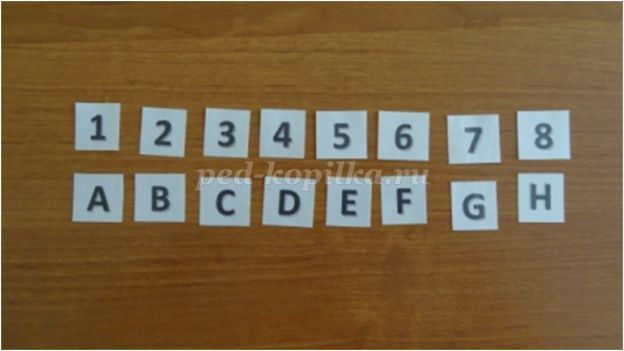
4. Placed and carefully glued, in the appropriate place, numbers and letters.
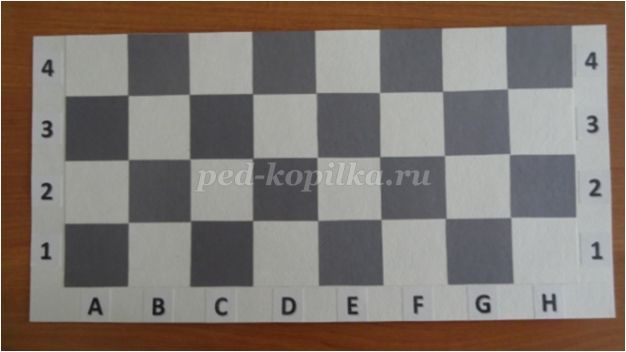
5. For greater aesthetics, the chess fields were bordered with a thin strip of corrugated cardboard.
Here, closer you can see the corner of the chess half.
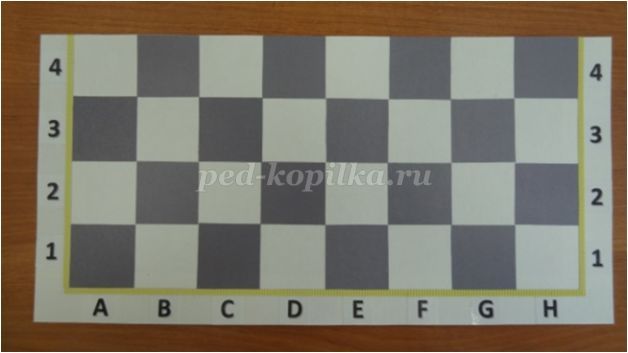
In the same sequence, we make the second half of the chessboard. We connect the halves from the wrong side with tape.
Now, you can fix it on a metal board with magnets.

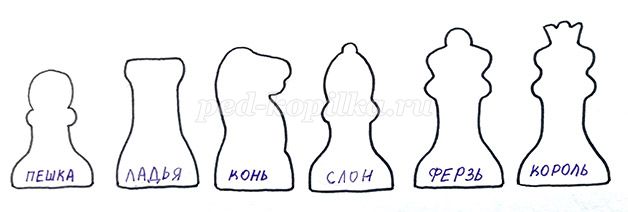
6. Let's start making chess pieces.
Pre-print on the printer pieces used in chess.
Chess pieces templates:
Shapes may vary. colors and forms like this:
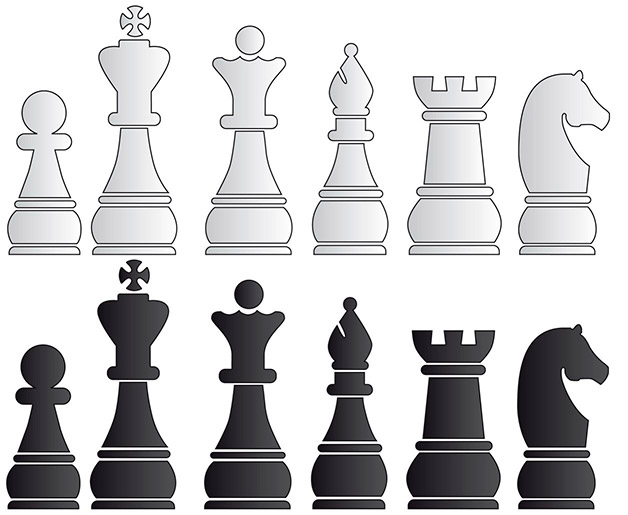
We liked the streamlined shape of gray-yellow shades more.
Glue the printed thin sheet of paper onto thick cardboard.
It is advisable to "laminate" each figure with a wide adhesive tape. This will give strength and longevity in the use of didactic material.
Important advice! If you decide to use adhesive tape, then first you need to glue it directly onto the figure, and only then cut it out. So, the outline of the figures will turn out to be smooth and durable, and the details themselves will look neat.

7. Glue a piece of magnet on the wrong side of each figure. You can use Moment glue.
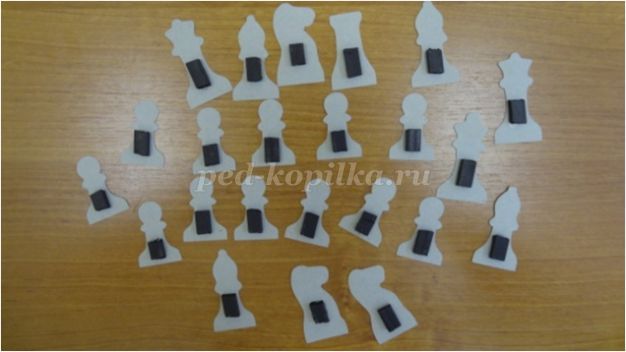
8. Our pieces are ready to take the initial position of the chess game.
Closer view of the chess troops.


We use this demo material in every lesson.
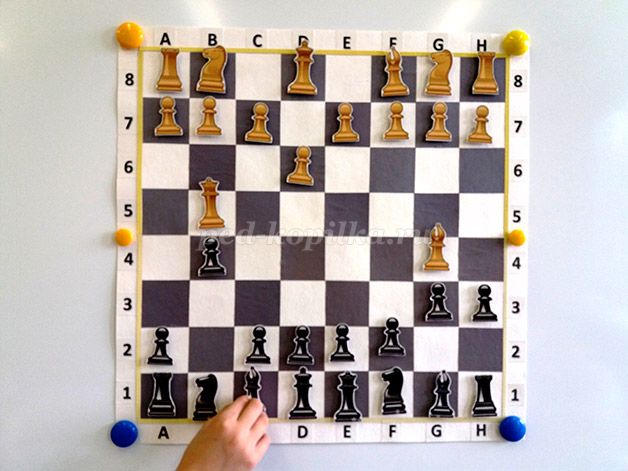
You can name moves, rearrange pieces, solve any logical problems. Explain and find ways to solve winning moves.
Thank you all for your attention! I will be glad the usefulness of the material provided.
The editors of the site are not responsible for the content of the article in this section.
Introduction to chess. Chess board.
Goals:
- to continue acquaintance with the history of chess;
- introduce the lines of movement of figures: diagonal, vertical, horizontal;
- introduce the alphanumeric designation of chess lines;
- exercise in quick and correct finding of chess fields;
- fix the names of chess pieces;
- bring up careful attitude to the figures.
Course progress.
1. Organizational moment.
2. Actualization of knowledge.
In the last lesson, we met with one of the versions of the origin of the chess game. In fact, there are a lot of such versions, because it was about 2000 years ago. Let's remember:
Review questions:
Where and when did chess originate?
- Name the chess pieces.
- What figure is the most important?
- What is another name for a chess cage? Why? How many are on the board?
3. From history.
Over time, chess has spread all over the world, and now this wonderful game is played in all countries of the world. Chess traveled to Russia for a long, long time. Between India and Russia are high mountains and large deserts. Therefore, dear guests of chess had to sail to our country on ships-rooks across the seas-oceans. (picture "Princes on the boat" see Appendix).
One of the favorite pastimes in Ancient Russia was the game of chess. Everyone played chess: princes, boyars, warriors, merchants, women and children. This is evidenced by archaeological finds, written sources and folklore. In epics, the ability to play chess is even equated with heroic prowess. And the fact that they could lose all their fortune in chess is confirmed by old Russian proverbs, for example: “We lived to the mat: no bread for hunger, no firewood for a hut.” And chess has become one of the types of craft. The peasants made figurines from wood, clay, stone and other materials and sold them at a good price, thereby earning money for their family.
4. Lines.
In the last lesson, we got acquainted with the figures. And we know that the game is a battle between two armies. Since the army must fight, the pieces must move. Therefore, there are three directions of movement on the chessboard, as in a fairy tale: if you go straight - you will find death, if you go to the side - you will also disappear, if you go obliquely - maybe you will still live ...
Guys, what direction can you go? (Straight, sideways, obliquely)
(The explanation is accompanied by a demonstration of a diagram with colored lines.)
1) A straight path from top to bottom resembles the movement of an elevator: up and down. It's called VERTICAL.
2) The path from left to right reminds us of the line where the earth connects with the sky, the horizon line.
What will it be called? (HORIZONTAL).
3) The third track goes obliquely and is called DIAGONAL.
So that you remember these tracks, I give you reminders that you need to stick in your notebook.
(Appendix "Lines")
Look, there is a number in front of each horizontal line. These are the names of the contour lines.
(The teacher shows the horizontal lines and asks for their names: first, second ....)
How many horizontals are there? (eight)
- And how are the verticals indicated? (Children: in letters)
- These are the letters of the Latin alphabet. On the board - letters in large print
a - a
b - be
c - ce
d-de
e - e
f - ef
g - zhe
h - ash
The teacher reads the letters, showing them on the chessboard
At first, some letters will be unusual for you, they need to be remembered and learned by heart.
Chess players have come up with a rhyme that will help you remember the vertical lines.
A-artist B-im ts-irkul d-ash, e-go f-amilia Zh-e A-sh.
(We distribute printed letters, paste them into notebooks)
Children, how will this counting rhyme help us?
(The first letter of each word is the letter of the chess vertical). Let's pronounce it together.
5. Didactic game « sea battle»
Now that we know the notation of horizontals and verticals, we can easily find any figure.
It's like a naval battle. The intersection of the lines gives the desired cell. First we call the letter, and then the number. For example, Rook, a1, pawn h7…
And now let's play chess Sea battle.
One student calls the address of the field, and the other - the figure they hit.
6. D / and "Postman".
The pieces still want to sleep in their chess box, and you can't wait to invite them to meet you. A big request - treat the figures with great respect. These are not toys! Among them there are real royal persons. Do not shake out the chess, but take them out one by one and immediately put them on the table so that the pieces do not roll and fall to the floor. When falling from Their Majesties, crowns can fly off. Then, when playing, it will be difficult to figure out where the king is and where the queen is. The elephant will lose part of the helmet and become like pawns, and the horse will lose its ears and mane and will become not your fighting companion, but a water-carrying nag.
Before you start playing
Board needs to be checked
On the left is a black cage, on the right is a white cage.
Look again! So do you have the board?
Imagine that you and I are postmen in a chess kingdom. And we need to deliver a telegram by pawn to a certain address. The first option takes black, the second - white.
I name and write down the address, and you place the postman pawn on that square.
After the game, carefully put the chess in the boxes.
7. D / and "Name the diagonal"
But how to read the diagonal? The diagonal is formed from the intersection of a vertical and a horizontal line, which is why it has two addresses. For example, diagonal a1 - h8, h1 - a8.
The teacher asks to name the address of the diagonal on which the pawn stands.
8. Summary of the lesson.
Today we learned which lines chess pieces move along. Name them.
How are the horizontal lines defined?
How are the verticals defined?
- Name all verticals.
- How to read the field address?
Good day, dear friend!
The space for playing chess is called the chessboard. If you don't like the word "board", you can call it like this: a playing chess field. Just not to be confused with another field - a cell. All this in today's article.
So, let me explain my idea.
chess field can be considered in two forms: the chessboard as a whole and each of 64 parts - cells into which it divides.
Let's go in order:
Board
The chessboard is a set of dark and light cells (fields) arranged alternately .
Surely you have heard this expression: "They are arranged in a checkerboard pattern." That is, alternately.
Total on the board 64 cells or fields.
The color is usually brown. Accordingly, the color of the fields: dark fields - dark brown, light fields - light brown. This applies to the board as a real object. Electronic charts can have a wide variety of colors.
chess cage
The cells on the chessboard are called fields.
The fields are arranged in rows. Total Rows 8 . Eight fields (cells) in each row. Rows of fields are called horizontals. Accordingly, there are also verticals - they are also 8 .
Each row (horizontal) has your number: from one to eight . Verticals are indicated by Latin characters: from a before h
Surely you have noticed that the board resembles a coordinate system. So he is. Only instead of the names of the axes, each field has names.
For example:
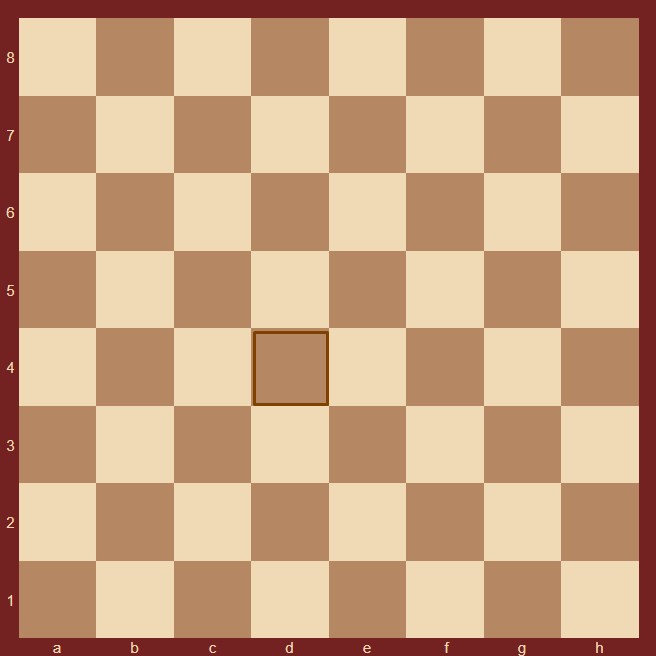
Each field (cell) has its own unique number. The number is made up of the designation of the vertical, in this case - d, and row numbers, in our example - 4 .
That is, in our figure, the field is indicated d4.
All other fields are marked in the same way.
Arrangement of figures
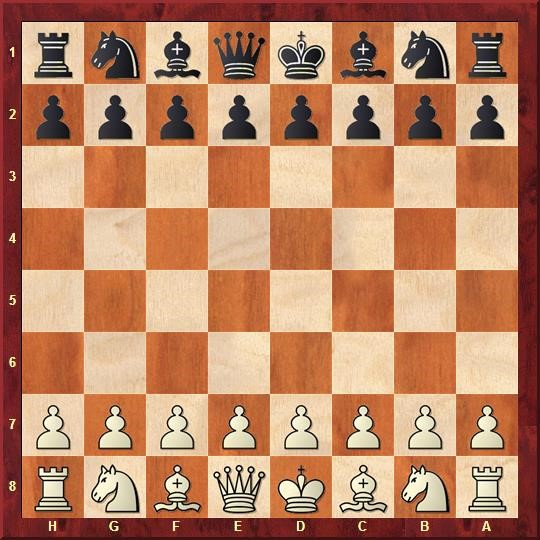
white pieces located in the initial position strictly on the first and second row (horizontals) .
black- symmetrically, 7 and 8 row (horizontal).
The initial set of pieces: king, queen, two rooks, two knights, two bishops and eight pawns.
Along the edges, (for whites in the fields a1 and h1) rooks are located, further to the center are horses, then bishops. In the center are the Queen (field d1) and King (field e1). There are 8 pawns on the second row.
The black pieces are arranged symmetrically with the white pieces, 7 and 8 horizontal lines.
The board should be placed so that field a1 was located in the lower left corner .
Example correct arrangement of the board and pieces:

Wrong arrangement of the board and figures:
In this case white figures are placed on 7 and 8 horizontal lines that wrong. As a matter of fact, the board is upside down .
One more example of incorrect positioning of the board and arrangement of pieces: The numbers of rows (horizontals) are located at the bottom. Accordingly, the letter designations of the verticals are on the side.
Also, a fairly common occurrence among beginner chess players is confusion in the relative position of the queen and king.
The rule is: the queen must occupy the square of her color . That is, - the white queen should be on a light field ( d1). Black - on dark ( d8)
Accordingly, the king is always near, to the right of the queen, on the field e1 (e8).
How to arrange shapes
I recommend following the rule from the first steps: start putting figures “from the center” : first king and queen, then bishops, knights, rooks, pawns. This sequence will allow you to better remember the value of the figures.
In addition, later, when arranging various non-original positions, it is also better to start with the king and so on. That way you're less likely to miss something.
Personally, I even sometimes I speak out loud starting to arrange the figures. For example: "White: the king is one, the queen de five ..." And so on.
It's easier, because the auditory channel of perception is also included.
Chess notation
The “coordinate system” of the chessboard was not invented by chance. It allows you to record parts, combinations, problems and etudes. And then play.
The sign system for recording a party is called chess notation . In short, all moves are reflected using symbols.
For example: 10.Nf3-g5
This entry means the following
: White's tenth move is made. Horse from the field f3 go to g5.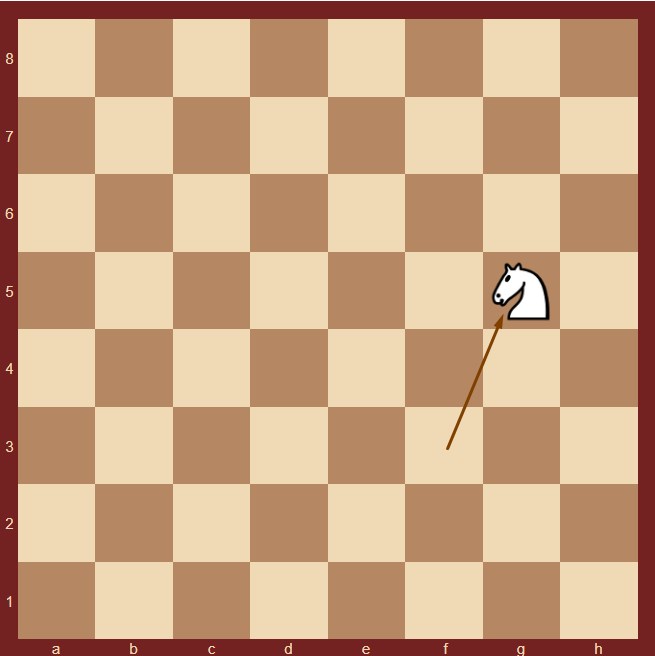
Black's move is indicated with an ellipsis after the move number. For example: 10….Na6-c5
There is a separate one for details on chess notation. We will not repeat.
I hope it's more or less clear. If you have any questions, the comments section is at your service.
Thank you for your interest in the article.
If you found it useful, please do the following:
- Share with your friends by clicking on the social media buttons.
- Write a comment (at the bottom of the page)
- Subscribe to blog updates (the form under the social network buttons) and receive articles in your mail.