Build a frame house with your own step-by-step instructions. How to inexpensively build a frame house with your own hands, photo report
Frame houses quickly became popular not only in our country. They are erected in a short time, do not require huge financial costs, have good performance characteristics, and are environmentally friendly.
If you are interested in the idea of building your own home, then this article is especially for you. We have prepared step-by-step instructions on how to build a frame house with your own hands.
It is clear that before starting construction, you need to buy a ready-made construction project, or do it yourself, and then coordinate it with local governments. We will assume that all the work has already been done - approval, selection of a construction site, its study, etc.
So, let’s build a frame house with our own hands!
1. Installation of the foundation
The foundation can be of any type: columnar, pile-screw, strip, etc.
In this article we will look at the process of building a frame house with a pile-screw foundation.
Pile-screw foundation
 This type of foundation is often erected where there is loose soil or “walking” soil.
The advantages of a pile-screw foundation include:
- Lack of special equipment for constructing piles
- Quick installation – a day is enough
- Huge selection of piles
- Good load-bearing capacity
- Low cost
- Possibility of carrying out work at any time of the year
The disadvantage of a pile-screw foundation is the impossibility of arranging a basement.
How many piles are needed and how to calculate correctly?
Yours should be even, with the correct shape of the blades.
Make your choice from the tables below.
Note: If the soil of the site is clayey, then carry out the work in good weather. Drill the ground at a right angle
Self-installation of piles
 If installation of large diameter piles is required, you will have to resort to the help of special equipment. Otherwise, you can do without it. This will make it easier to set the same level.
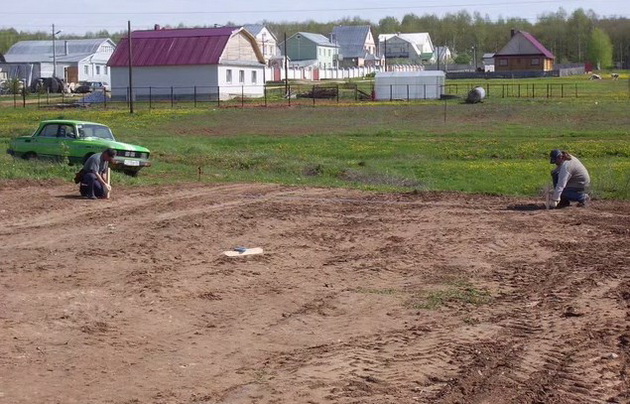
Before you screw in the piles, you need to mark and prepare the area. The surface under the foundation should be level to make it easier to level the piles.
After this, the perimeter is outlined, and reinforcement rods, no more than half a meter long, are installed in the corners. A rope or twine is stretched between them to determine the accuracy of the markings.
The next step is to install piles in the corners to a depth of at least half a meter (it depends on the type of soil). It's better to do the job together. One person will screw the pile, the second will hold the post upright. After the work is done, you need to continue marking the area between the piles, and then repeat the process. The step between piles is 0.7-1.2 meters.
The final stage is cutting the piles to the required level, subsequent concreting of the shafts and installation of the caps on them.
2. Harness
 The strapping is made from beams 150 by 150 mm, 200 by 200 mm, 200 by 250 mm.
Before laying the beams, the tops of the piles must be coated with mastic and two layers of roofing material must be placed on them. They will serve as waterproofing. The bars themselves are treated with an antiseptic.
The bars are installed on piles along the entire perimeter of the base. They are connected to each other in half a tree using nails 120 millimeters long. At the corners, the joints can be strengthened using metal corners secured with nails 50-60 millimeters long.
The strapping is fixed to the base using fastening screws. The beams are placed in the heads (in special grooves) and screwed.
It is necessary to lay a board on top of the strapping. It should cover the joints of the beams. This is where the frame racks will be mounted in the future. The board must also be treated with an antiseptic. The length of nails for fastening is 120 mm.
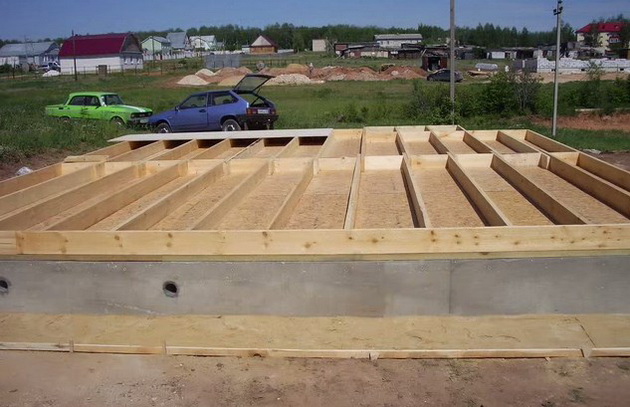
3. Construction of the subfloor
 For the logs, timber 150 by 100 mm is used. Step – 60 centimeters.
The logs are attached to the harness using metal corners. Boards are fastened to them with nails.
Insulation is laid between the joists, and a vapor barrier film is spread over it. The last layer is plywood, which is laid on the logs around the entire perimeter.
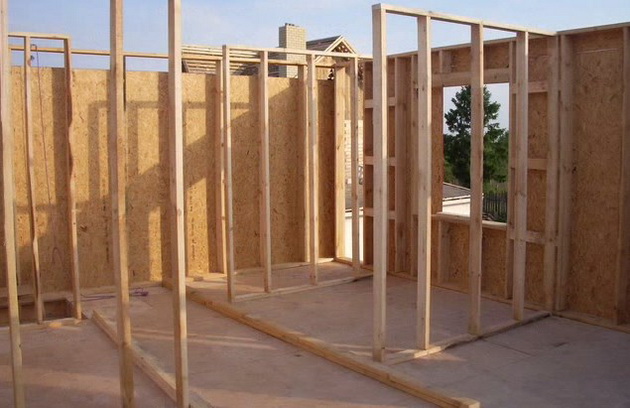
4. Frame installation
 For the frame, a board of 100, 150 and 200 mm by 50 mm is suitable.
First, the corner posts are installed. They are fixed using reinforced steel corners.
Top frame beam
In the corners, the bars must be secured using notches, in other places - with steel corners. The corners are fixed with self-tapping screws.
To give the structure strength, diagonal slopes are installed.
Installation of ceiling beams
Installation is done in three ways:
- By cutting method
- Perforated brackets
- Steel corners
You can combine several methods, for example, corners and the cutting method. The beams must rest on the frame beam. Fastening is done with self-tapping screws.
5. Installation of the rafter system
6. Exterior finishing
 For this purpose, you can use siding, simulator of timber, stone or any other material intended for this purpose. The order of execution is as follows:
- First, a sheathing of bars measuring 40 by 50 is installed. The fastening step is 60 centimeters. You can also use metal profiles
- The lathing is treated with an antiseptic and fire-resistant compound
- Next comes the installation of finishing material using a certain technology.
7. Insulation of the house
 After finishing the exterior finishing, it is necessary to insulate all parts of the house - roof, ceilings, floors, facades. The insulation is placed in cells between the bars.
A vapor barrier film is attached on top.
8. Interior decoration
 The house is ready! All that remains is to do the interior decoration.
There is no one to advise you here and you have the right to make it as you please.
In this article we told you step by step how to build a frame-panel house with your own hands. We hope the information received will be useful to you.
Photo report on the construction of a frame house with your own hands
In this section you will find photos of the construction of a frame house, which our reader built with his own hands on weekends.


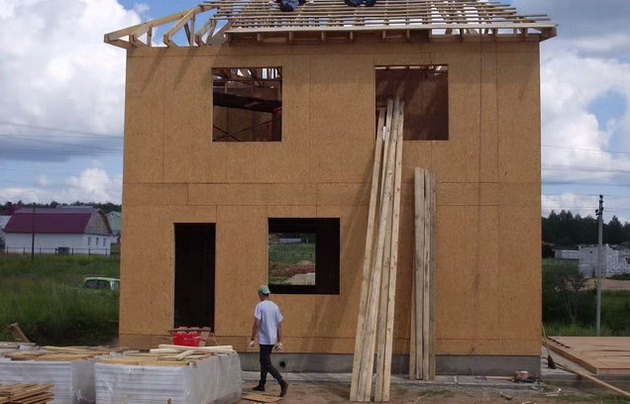
For me, it was a matter of principle to choose exactly the option when, with the least labor and material costs, you can quickly and efficiently build a full-fledged residential building for a family.
After studying several sources and many options, I decided to settle on the option, and took the standard project “Canadian - 1” as a basis.
I really liked this compact two-story house 7x7.5 m, and after making the necessary calculations, I decided that such a project was within my capabilities and means.
If there are a sufficient number of living rooms and utility rooms, it looks relatively small, and the cost of construction is several times less than when building a brick house of the same dimensions.
A typical project provides for the consumption of materials in the following sizes:
Edged boards 5x15 cm - 25m3;
Roofing board 2.5x15 cm - 3m3;
Polystyrene foam for insulation - 25m3;
Rolled insulation insulation - 5 rolls;
Polyurethane foam - 30 fl;
OSB - 200 sheets;
Roof waterproofing - 3 rolls;
Soft roof - area 70 m2;
cement, tar, solvent, antiseptic, anchor bolts.
According to the project, on the ground floor there is a living room with a kitchen and a large dining room, a bathroom and a small hall with a vestibule from the front door. The second floor consists of three living rooms, a small common hall and a fairly spacious bathroom. The project was also attracted by the fact that the garage has a common wall with the house, which saves materials and provides additional thermal insulation.

I chose a project, prepared the necessary materials for the first stage of work and began construction.
Before you build a house with your own hands, we lay the foundation
A properly installed foundation is the key to how long a house will last and how comfortable it will be to live in. Since my site is located on the bank of a river and the groundwater is high, in order to avoid moisture, I did not make a basement and decided to make a foundation according to TISE on concrete piles.
My goal was to build a house with my own hands cheaply, and therefore the option on poles suited me also because of its low cost.
For the piles, I used used asbestos-cement pipes with a diameter of 250 mm and a length of 2.5 m. I deepened the pipes into the ground by one and a half meters, so that a column 1 meter high emerged above the ground. I reinforced them with fiberglass reinforcement with a diameter of 16 mm, filled them with concrete mortar and secured No. 22 anchor bolts at the top of each column.
Within a month, I personally erected 24 pillars - the basis for the future house. The concrete in each column hardened within two weeks. This time was spent purchasing and delivering materials for tying the foundation.
As soon as the concrete had finally set, I started tying - I first selected grooves from the ends of the beam with a cross-section of 15 cm for better tying, and at the joints I deepened the sockets for fastening the anchor bolts.

According to my calculations, it took me a little more than 30,000 rubles to build this - the cost of the material.
In order to fix the frame as securely as possible when assembling the harness, I placed a wide washer under each nut - this way I tightened the nuts all the way without the risk of unnecessarily damaging the beams. As the work progressed, I simultaneously treated the entire structure with tar antiseptic and waterproofed it with construction tar.

In this form, the foundation easily survived the winter, and I was convinced that I had made the right choice.
To build a wooden house with your own hands, we begin to build the frame of the first floor and frame it
You can see from my step-by-step photos how to build a house with your own hands, without using heavy equipment, additional labor and unnecessary funds.
With the onset of the first fine spring days, I set about installing the walls of the first floor. The principle of constructing a frame dwelling is that the finished frame parts are installed in the proper place and secured there.
I assembled the structural elements piece by piece on a flat area, and then lifted them onto the foundation and alternately fastened them to the base and to each other. In addition, I assembled the technical openings for windows and doors separately and also lifted them onto the walls for fastening.
Since the structures are relatively small, I coped with this work practically alone, I just resorted to the help of my wife so that she would hold the structure while I was doing the fastenings.

Sheets of roofing material must be laid between the foundation and parts of the structure.
In a month I managed to put up three walls on the first floor.

When installing the structures, I ensured that the frame posts were spaced 60 cm apart from each other, since the standard width of the OSB sheet is 120 cm.
I adhered to the same principle when installing floor transfers.
It took me two more weekends to remove all the walls of the first floor - I really wanted to quickly build a house with my own hands.

Of course, thinking about how to build a beautiful house with my own hands, I studied a lot of reference material, including the book “Individual house “platform” - it inspired me to get creative!
Taking the “Canadian” project as a basis, I made a frame during construction in accordance with the provided assembly technology. And although I changed some things during the work at my own discretion, I did not change the basis of the project in order to avoid improper distribution of the load on the load-bearing structural elements.
As a result, this is the frame I got for the first floor:

Simultaneously with raising the walls of the first floor, I began to assemble the frame of the future interfloor staircase.
The next step in solving the problem of how to build a frame house with your own hands is the process of tying the first floor.
To do this, we lay two layers of insulation along all the upper edges of the structure and then lay a 5 cm thick board along the entire perimeter.

Our ceiling joists are also floor transfers for the second floor. Therefore, we lay them apart from each other at intervals of 60 cm, attaching them to the harness.
Work in good weather goes well, and the results are obvious.

Now I know for sure that anyone can build a wooden house with their own hands. This is a job in which the main thing is to comply with all the required standards and do everything with the utmost care - only then can you properly build a house with your own hands.
For those who are interested in this issue, my step-by-step photos will help you build a frame house with your own hands.
This photo of me shows that the first floor frame and floors are completely completed. This is the beautiful “platform” I ended up with.

Work doesn't always go quickly, and on the next weekend I was able to do little - the intense heat got in the way. But the staircase, which I installed anyway, served as additional support and added rigidity to the overall structure of the first floor.

Still, a lot has been accomplished in a relatively short period of time, considering that I worked almost alone.
By the way, since according to the design there should be a two-meter wide balcony-terrace above the southern side of the house, I set the ceiling joists above this part of the first floor to the required length so that they protrude 2 meters beyond the boundary of the wall structure.

The wooden parts in the right places were additionally fastened together with metal corners. To screw in the screws, I used an electric drill with a special mount for self-tapping screws.
As a result, the transfers of interfloor ceilings look like this:

Of course, it is difficult to calculate all construction costs in advance - there are many factors that influence changes in the final cost of the project. Moreover, you still need to solve the problem of how to build a beautiful house with your own hands, and not just put up a wooden box.
When building the foundation, frame of the first floor and floors, I spent about 80,000 rubles on materials.
The approximate amount I plan to spend to build a house made of wood with my own hands is 500 thousand rubles.
The next stage of completing the task of how to build a frame house with your own hands - we begin to build the second floor, and sheathe the structure with OSB sheets
It is very difficult to work in hot weather, especially at altitude. Therefore, construction is progressing slowly. I assemble the wall frame on the ground, then lift it and put it in place. If you work carefully during the assembly of structures, joining them at the fastening site does not present any difficulties.
The photo shows how the first wall of the second floor was installed:

On hot days it was impossible to work more than three to four hours, so in the middle of summer work slowed down a little. But as soon as the intense heat subsided, work continued at the same pace. At the same time as the side walls of the second floor, the end walls were also brought “under the roof”.
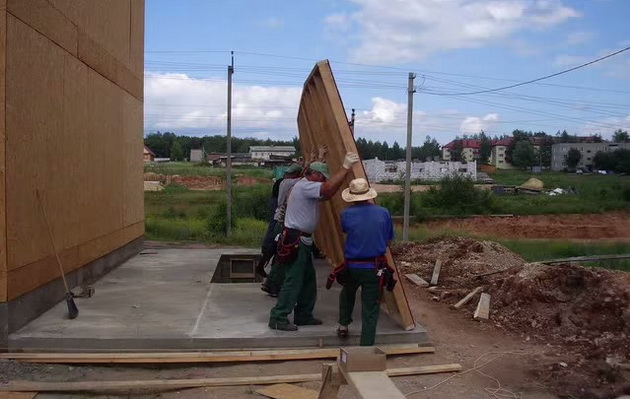
It was already difficult to work here alone to build a wooden house with your own hands, so he invited two assistants, and the heavy facade structures were lifted using ropes and inclined guides.
Along with the installation of the facade structures, they also made a screed along the ridge and starting rafters.

Having finished installing the wooden structures of the walls and ridge, I started covering the walls with panels - things went much more fun. First, I covered the corner parts of the walls with panels.

I tried to do the work of covering with OSB sheets in a few days - I didn’t want to take any risks and decided to protect the inside of the structures from the threat of getting wet during rains. You can see from my photos how I managed to build a house with my own hands almost alone.

How to build a house roof with your own hands?
This is exactly the question that confronted me as soon as I finished building the walls.
Before that, I had done almost all the main work myself, occasionally resorting to outside help when it was necessary to support part of the structure or lift heavy façade parts to the second floor.
And now, in order to solve the question of how to build the roof of a house with your own hands, when it came to lathing the roof, I had to call another assistant, since I am not very successful at working on the rafters alone. The work was much more fun together.
Just like the ceilings of the first floor, I put a 5 cm thick board on the rafters, and also installed the rafters at intervals of 60 cm, so that I could then lay the OSB sheet on a base of three boards.
My assistant and I installed a vapor barrier on top of the rafters, using 3 rolls of roof hydraulic membrane.

OSB sheets were laid on top of the vapor barrier material. They were lifted onto the roof in the same way as the façade frames.

One side of the roof has already been covered with OSB. There are small areas and one more slope left. Since autumn is approaching and the rains have become more frequent, I threw away all other things and began to work closely on the roof - in order to protect the frame from excessive wetting. The work is hard, but perseverance conquers everything, and a helper is very helpful.

At this stage, it took me 7 cubes of 150x50 boards to build; almost two - 200x50; and 65 sheets of OSB - for external cladding, without floors and partitions.
All the lumber has practically gone into use, only the smallest trimmings - no more than 20 cm, are stored for further use as fuel - on a fire or in a smokehouse. If you use materials sparingly and carefully, you can build a house with your own hands relatively cheaply.

But since this season I will not physically be able to cover the house with siding, so that strong and frequent rains do not spoil the material, I decided to treat the slabs with tar diluted in a solvent.
The house temporarily acquired a gloomy black appearance, but is now reliably protected from moisture and destruction.

How to build a wooden house with your own hands: insulation and sound insulation
When I had completed the exterior work, during rainy weather I did a little work on the interior - insulating and at the same time soundproofing the floors with foam plastic slabs.

The gaps between the joints and walls were foamed with polyurethane foam using a gun. From the bottom I hemmed OSB sheets to the floor slabs of the first floor using wood screws, having previously supported them with spacers. This is very important in order to properly build a house with your own hands - in this way I not only protected the internal structures from strong temperature changes, but also protected the foam from destruction by mice, which love to live in it.
The floor inside the room was covered separately in rooms, so as not to damage the foam in the ceilings.
Isolon was laid on top of the log on the floor and secured with a construction stapler, and on top - OSB sheets, which were laid on the floor in a checkerboard pattern. This is important, because when laying sheets joined at four corners, the floors begin to creak heavily.

Gradually, the inside of the house is transformed and takes on an attractive appearance. Here you can already get serious about the internal work on wall insulation.

The work for the construction season has been completed, I covered the window openings for the winter with OSB sheets and covered them with film, and mothballed the construction of the house until next spring.

So, I have completed the main work and my dream - to build a house out of wood with my own hands - is close to completion. In the winter, weather permitting, I will begin interior finishing work, and with the onset of spring, work will begin with renewed vigor.
I hope I explained in detail and proved with the help of photos that you can build a frame house with your own hands!
Perhaps some of you, after reading my article, will be inspired to build one, and the photos given here will help him with this.
With limited budgets, many people decide to build a house on their own. We will not dissuade you from such a decision. This is a truly bold step that will require a lot of effort and knowledge from you. It’s good if construction is not just a hobby for you, and you are familiar with most operations. But what if this is your first experience? Which technology to choose for construction? Where to begin? What elements of the house require special attention? Frame structures are perfect for building a house with your own hands. We will try to figure out how to build such a frame house with our own hands, step-by-step instructions will help you with this.
Why a frame house?
This is a structure whose walls are built on a wooden frame. The walls, floors and ceilings of such houses consist of heterogeneous materials, which experts also call “pie”.
Frame construction has many advantages, such as high energy efficiency, environmental friendliness of the construction process, and low weight. But why do we recommend this particular technology when building a house with our own hands?
- Firstly, if the question in favor of building on your own has arisen for financial reasons, then a frame house will help save you a lot of money. After all, such a building of a similar area and purpose will cost 35-40% less than a log house made of logs or timber and almost 2 times cheaper than a brick structure.
- Secondly, the light weight of the house will require a less complex foundation. Even if you pour a strip foundation, you can do all the work yourself. The low weight of the house as a whole also indicates the low weight of individual structures. If the frame is assembled on the construction site, you only need a pair of helping hands to install the building under the roof.
- Thirdly, the construction of such houses will only require a standard set of tools for carpentry work: a saw, a level, a hammer, a screwdriver or drill, and a construction stapler. In the case of work with some types of finishing, additional tools may be required, but we have already given you the basic set. Construction of a frame house will not require the use of heavy special equipment.
- Fourthly, even without special skills, but carefully following the instructions for installing each frame element, you will be able to build a reliable and cozy house for both summer and year-round use.
Construction of a frame house: step by step
Before starting construction, it should be mentioned that frame technology is conventionally divided into North American and Scandinavian types. At some stages of work, these types of frames are almost identical, and at others they require special attention.
A Finnish house is assembled on a frame made of timber. The walls are sheathed inside and outside with finishing or rough finishing materials. The wall is filled with mineral insulation.
A Canadian house is also built on a timber frame (sometimes without a frame). The key difference is the insulation used: these are organic insulation materials based on polystyrene. It is a mistake to say that a Canadian frame house is built only on the basis of SIP panels. This is just one of the options for constructing such frames.
So, you can start building a frame house step by step.
Design work
First of all, you should spend time drawing up a detailed project for your future home. It is important to discuss with each member of the household the elements of the house necessary for convenience and comfort. It is also necessary to draw up a project for the location of the building on your site.
Design work can be divided into several stages:
- Selection of a development site.
- Choosing the purpose of the future home and preliminary calculation of dimensions. It is necessary to decide whether this will be a country house or a place of permanent residence. It is necessary to calculate approximate financial capabilities. If you build a residential building with your own hands, its turnkey cost will be from 15,000 rubles. per 1 square meter (depending on technology, number of floors and finishing options).
- Selecting a project for construction. A lot of frame house projects can be found on the Internet. Most developer websites also indicate the cost of constructing a turnkey project. If you are satisfied with the indicated cost and the project as a whole, then you can take it into service. We do not recommend remodeling the project yourself without knowledge of construction. It is important to understand that the construction of a large house will require not only a design of the facade and layout of the building. Before construction begins, it is necessary to have a set of drawings for each element of the building and communications. It is important to have a project for the engineering systems of the house, because most of their elements are laid inside the walls, floor and ceiling at the stage of wall construction.
- Drawing up an estimate of the necessary materials and searching for suppliers. Continuous work on site will require a stable supply of materials. It is better to conclude the necessary supply agreements before starting work. This will allow you to avoid many problems.
In addition to working with the project and purchasing materials, we recommend conducting a geological survey of the soil. This is necessary for the correct choice of foundation type. It is also important to solve problems with sewerage and water supply. The installation of a septic tank is often carried out before other work begins. Water supply to a private home is often solved using a well; this also requires an inspection of the site by specialists. The location of the house may need to be repositioned.
So, you have in your hands a project and a clear drawing of all the elements of your house. The layout of your site has been marked out. Problems with the supply of materials were resolved. You can consider yourself ready to begin work on the site.
Foundation installation
Having a detailed design and estimate for materials, you can calculate the approximate weight of your structure. This is important for correct calculation of the foundation. The foundation is one of the most important stages of work; the service life of your home will depend on its reliability. Therefore, it is important to know the bearing capacity of soils. Depending on it and the total weight of the house, the required support area of the building is calculated. After this, it remains to choose the type of foundation: columnar, pile, strip, base on screw piles, monolithic slab. Let's consider the order of work on each of the options.
Columnar foundation
 Columnar foundations are used for one-story houses on hard soils. The foundation for the grillage is made of concrete pillars or asbestos-cement pipes.
Work order. The area is cleared, markings are made using twine and pegs in the places where the pillars are installed. Depending on the length of the pillar, holes are dug, at the bottom of which a sand cushion with a thickness of at least 15 cm is filled and compacted. Next, the pillars are installed with the sand cushion adjusted to install the pillars at one level. Now you can fill and compact the soil around the post. The grillage for a columnar foundation is usually the lower frame of a timber house. Before laying the timber, a layer of waterproofing is laid on each pillar: roofing felt or glassine.
Pile foundations
Pile foundations are conventionally divided into bored and reinforced concrete. In the case of work with factory-produced reinforced concrete piles, the installation procedure does not differ from the construction of a columnar foundation.
Procedure for working with bored piles. Preparatory work also includes clearing and marking the pile field. In places where piles are poured, holes are dug or holes with a diameter of at least 250 mm are drilled. Sand is also poured into the holes and primed. After this, formwork is installed from edged boards, plywood or roofing felt. Concrete is poured into which pre-connected reinforcement is immersed. The ends of the reinforcement rods usually protrude above the plane of the piles for subsequent fastening of the wooden grillage. In the case of installing a reinforced concrete grillage, the reinforcement of the horizontal grillage is tied to these pieces of reinforcement. Formwork is also installed under the grillage. Concrete is poured into the already connected reinforcement. A layer of waterproofing is also laid between the wooden grillage and the plane of the pile or between the concrete grillage and the mauerlat.

Foundation on screw piles
The foundation on screw piles is a young technology for constructing foundations; previously it was used only for military temporary buildings, the construction of piers and other above-water objects. The essence of the technology is to screw in special hollow pipes with blades at the end, which allows the construction of a foundation on any soil. There are screw piles of different diameters and lengths, which makes them possible to use for almost any building, especially frame houses.
Procedure for working with screw piles. We carry out the same site preparation and marking. To simplify the start of screwing, holes are dug in the places where the piles are installed, removing the turf. Next, using a special head for attaching the levers, these levers are installed and the pile is screwed in with constant control of its verticality. A metal platform is welded onto the base of the pile to easily secure the grillage. The grillage can be the bottom frame of a house made of timber or metal.
Strip foundation
A strip foundation involves pouring a reinforced concrete strip around the entire perimeter of the house and under all supporting structures. For frame houses, a shallow foundation with a base height of 200 mm is usually used.
Work order. After marking the foundation, a trench with a width of at least 250 mm is dug. Sand is poured and compacted at the bottom of the trench. Next, the formwork is mounted and pre-connected reinforcement is installed, which is responsible for the bending and fracture strength of the tape. Then the concrete is poured. After the final maturation of the concrete, a layer of waterproofing is laid and the mauerlat is laid.
Slab foundation
A monolithic reinforced slab is poured under the entire area of the house. Used only on extremely difficult floating soils.
Work order. A pit is dug according to the markings, and a sand cushion is filled. Reinforcement or metal mesh is laid, concrete is poured and holes for communications are filled.
As you have already noticed, after installing the foundation, a layer of waterproofing and the lower frame of the house are laid, which must be treated with deep-penetrating antiseptics.

Installation of the bottom trim, floor joists and subfloor
Another feature of frame structures is the installation of the floor before the construction of the walls. We have already laid the bottom frame of the timber house on the finished foundation. Now you need to install the floor beams. For this, a beam with a cross section of 50x150 or 50x200 mm is used. The logs can be sawed into the beam of the bottom frame, installed on top of the bottom frame using fastening angles, or mounted in the same plane with the bottom frame (vraspor) using special beam supports.
If the floor is insulated with mineral insulation, the logs are installed in increments of 1.5-2 cm smaller than the overall dimensions of the insulation. In the case of insulation with sheets of expanded polystyrene or extrusion - strictly a multiple of the overall size of the sheet. If the floor is covered with SIP floor panels, the step between the joists should be equal to the width of the panels, which should be joined strictly on the joist.
First, the outermost joists are installed. The level of the logs themselves and the plane between them is controlled. After the level is “caught”, the twine is pulled between the beginning and end of the log and diagonally between them. Intermediate logs are installed along this twine.
After installing the logs, it is necessary to install the subfloor, which serves as the basis for insulation. When installing floor panels, there is no need for a rough coating. The subfloor can be mounted on top of the joists - a board or sheet material (OSB, plywood, chipboard) is laid. In this case, another row of joists is installed on top of the subfloor across the primary floor beams.
Most often, the subfloor is installed between floor joists. To do this, a block with a cross section of 50x50 or 40x50 mm is fixed to the side surface of the log. It is covered with planks or sheet material. Regardless of the method of laying the subfloor, a vapor-permeable membrane is laid on top of it to remove dew point vapors from the thickness of the insulation (in the case of insulation with mineral insulation) or the joints are sealed when insulated with polystyrene foam.
Insulation of floors and laying floor coverings
Insulation can be laid between the joists (primary or secondary) in the finished base. In the case of mineral insulation, each layer is laid with a shift in the insulation joints to avoid cold bridges. When insulating with polystyrene, all joints are foamed. A layer of vapor barrier is laid on top of any insulation. After this, you can immediately install the finishing or rough flooring: solid or parquet boards, plywood, chipboard, OSB, etc.
Construction and insulation of walls
The walls have a key difference between Finnish and Canadian frame house building technology. Therefore, we will consider them separately.
Finnish technology
To build a frame, it is very important to have a strict drawing of each of the walls of the future house. Without this, it is impossible to strictly place all the elements of the frame and finishing (window and door openings, communication elements). Each rack and horizontal header (reinforcement of openings) must be located in its place. All frame elements of load-bearing and intermediate walls are secured to the floor and to each other using fastening angles and self-tapping screws. Installation begins with load-bearing racks, intermediate ones are installed between them in a strict plane, controlling their verticality.
After installing the frame, internal or external cladding is produced. There are a lot of options for this, and each has strict installation instructions. We will not consider each of them. It is only important to follow the correct “pie”: outer cladding - vapor-permeable membrane - frame with insulation - vapor barrier film - inner lining. Sometimes a counter-lattice with a thickness of at least 20 mm is laid between the outer skin and the membrane for better ventilation.

Canadian technology
In the case of building a Canadian house on a frame basis, no films are laid. Extrusion slabs are mounted between the beams, all gaps and joints are carefully sealed with polyurethane foam.
Separately, it is worth considering the installation of SIP panels. In this case, a skull block is sewn onto the finished floor covering in strict accordance with the panel layout drawing. The block has a cross-section that strictly corresponds to the groove on the underside of the panel. Polyurethane foam is applied to the surface of the block and the panels are installed. The installation of panels begins from one of the corners of the house, temporarily securing them with supports. The side surface of the panel is also pre-foamed to ensure a tight fit of each element. The final fastening is made when installing the top trim and ceiling beams.
In case of installation, finished walls are brought to the site and installed using lifting equipment. The walls are secured to each other with a top frame and ceiling beams.
Ceiling beams and ceiling insulation
The pitch and cross-section of the ceiling beams are selected according to the principle of floor joists. Ceiling joists are also installed according to the floor principle. The ceiling of the first floor serves as the basis for insulation. It is also important to follow the correct insulation “pie”.
For a house with a cold attic: first floor ceiling cladding - vapor barrier - ceiling beams with insulation - vapor-permeable membrane - attic flooring.
For interfloor coverings: first floor ceiling cladding – vapor barrier – ceiling beams with insulation – vapor barrier – second floor flooring.
Installation of rafters and roofing material
The roof is one of the most complex elements of a frame house. But if you have a detailed and clear drawing indicating the size and location of the tie rods, supports and rafter legs, you can completely carry out the installation with your own hands. Along the rafters, sheathing is made from edged boards or sheet materials, depending on the selected roofing material. Installation of the finishing roof must also be carried out in accordance with the instructions. We will not consider this technology for every roofing material.
Finishing work
After completing the roofing work, you can begin finishing. Frame houses have a high level of preparation for finishing, because often the walls inside and outside are already finished with finishing material, and most of the communications elements are already embedded in the walls.
One of the disadvantages of frame houses is the thermos effect. They do not have gas and vapor exchange with the environment, so it is very important to install ventilation: under the floor, in the walls and under the roofing material. You can find the rules for arranging ventilation for each type of frame frame on the Internet with detailed drawings of the location of each element.
Conclusion
Of course, it is impossible to build a frame house based only on this article. We have only given you direction to study the issue. You will need to sit for more than one hour reading literature, studying the experience of those people who have walked this path from beginning to end. But the very fact that such people exist indicates the possibility of implementing your project.
Frame houses are very popular among developers. This is due to the fact that they are built in a short time, require a minimum of money, have excellent performance characteristics and are environmentally friendly.
If someone has a desire to start building just such a house, then in this article you can get information on how to do it. Here everything is described in stages. At the same time, it is meant that all preparatory, and most importantly, organizational measures have been carried out and permission to build a house has been obtained. What does that require?
The foundation is chosen at will and can be columnar, pile-screw, strip, etc. This article discusses an example of building a frame house with a pile-screw type of foundation.

This type of foundation is suitable for those areas where there is loose or unstable soil. This type of foundation has a number of advantages, such as:
- There is no need to use special equipment to build it.
- The foundation is erected in a short time: one day is enough to install it.
- Huge selection of building materials (piles).
- The foundation has excellent load-bearing characteristics.
- This is a cheap foundation option compared to other types of foundations.
- The foundation can be installed at any time of the year.
On a note! The presence of a pile-screw foundation does not allow for a basement in the house. This is a significant drawback of this option.
How to calculate the number of piles?
Piles must have the correct geometric shape and high-quality blades. You can select suitable piles from the corresponding table.
Screw pile (pipe diameter) Installation step Application
219
3-10
Houses, piers, hangars
159
2-5
Likewise
133
2-5
Likewise
108
2-5
Heavy gates, piers, hangars, houses, fences
89
2-4
Can be used as additional piles, for houses, outbuildings
76
1-3
Light buildings, terraces, signs, traffic signs
59
0.5-2
Likewise
On a note! In conditions where the soil is clayey, work should be carried out in dry, non-rainy weather. The piles are installed strictly vertically.

If thick piles are used, you will have to use special equipment. If you choose piles of the optimal diameter, you can get by with your own efforts. In this case, it is much easier to decide on the same level of installation of piles.
To begin with, the necessary markings are carried out on the site and the site is prepared. It is desirable that it be horizontally level and could serve as a kind of guide to the depth of immersion of the piles.
The next stage is determining the perimeter of the future foundation. To do this, metal rods are hammered into its corners, after which a rope is pulled between them. It is necessary to check that the future foundation has right angles.
First of all, the piles are installed in the corners to a depth of at least 0.5 meters. Although it all depends on the type of soil. It is better to install the piles by two people: one screws them in, and the second controls the verticality. Having installed the piles at the corners of the building, they begin to install intermediate piles, which can be located at a distance of 0.7-1.2 meters from one another. All piles are screwed in to the required depth, after which they begin to level them, concreting and installing the caps on the piles.

For this operation, beams measuring 150x150 mm, 200x200 mm and 200x250 mm are suitable. Before laying the beams, the tops of the piles are coated with mastic and a couple of layers of roofing material are laid. This is the so-called waterproofing. The bars should be treated with an antiseptic.
The beams are mounted along the entire perimeter of the future building and connected to each other in half a tree using nails 120 mm long. All joints are reinforced with corners, which are fastened with nails 50-60 mm long.
The beams are attached to the base with screws; at the same time, they are placed in special heads and are well attracted by the screws.
A board is laid on top of the frame on the beams, which will cover the joints of the beams. The vertical posts of the future frame will be mounted on this board in the future. The board is nailed to the beam with nails 100-120 mm long.

The subfloor is mounted on logs measuring 100 by 150 mm, installed every 0.6 meters. The logs are connected to the frame using metal corners, after which a board is nailed on top of the logs.
Insulation is laid in the openings between the joists, and a vapor barrier film is spread on it. After this, everything is covered with plywood. Thick plywood is taken and it is attached to the joists. To ensure the floor is level, the logs must be installed in the same horizontal plane.

To install the frame, beams of the following sizes are taken: 100x50 mm, 150x50 mm, 200x50 mm. First of all, vertical posts are installed at the corners of the structure. They are fastened securely using reinforced metal corners. After this, proceed to the installation of the remaining racks, which are attached similarly to the corner racks. All racks are equipped with jibs that minimize loosening of the structure.

The upper beam is connected at the corners by means of cutting, and to other vertical posts using corners. For greater strength, diagonal slopes are installed.

Their installation can be done in three ways:
- Through cutting.
- Using perforated brackets.
- Using metal corners.
Alternatively, it is recommended to combine several methods at the same time. This may be the option of cutting down or the option of using corners. The beams are installed directly on the beam of the upper frame. Fastening can be done with self-tapping screws, but it is better to use nails, since they allow the wood to expand freely when humidity changes.

Installing a roof is a fairly labor-intensive operation that deserves to be described in a separate article.

For this purpose, a wide range of facing materials is available for sale, such as siding, timber simulator, artificial stone, etc. The work is carried out in the following order:
- At the first stage, a lathing made of wooden beams measuring 40x50 mm is installed. The sheathing pitch is 0.6 m. As an option, a CD-60 metal profile from plasterboard systems will be used.
- If the sheathing is made of wood, then it is advisable to cover it with an antiseptic and fire-resistant material.
- After the sheathing is ready, installation of the facing material begins.

During the work process, one should not forget about the insulation of a residential building. As a rule, everything is subject to insulation: floor, roof and walls. Don't forget about the vapor barrier film.

The building is almost ready, all that remains is to complete the interior decoration of the living space. There are many options here, especially since each room requires its own approach. And rooms such as the bathroom and kitchen are subject to exceptional types of finishing.
Photo report of building a frame house on your own
Here you can see step by step the construction of a frame house with your own hands on weekends.

Currently, in Russia they have gained increasing fame and popularity. Moreover, the choice of technology during construction does not matter much. Both technology and technology are used with equal regularity. When building a low-rise frame house, it is possible to use the most modern building materials and the latest achievements in industries quite effectively.
The need for the construction of such houses has recently grown very much, so many people decide to start building a frame house on their own. Because the technology for its construction is not too complicated.
When planning to build a good home for your family, firstly, determine its purpose. You need to clearly know what time of year the family will live in it, all year round or only in the spring-summer season. The method of insulating it will depend on this choice. Initially, a frame house is an elementary simple structure consisting of vertical posts and a certain number of horizontal strappings, which must be carefully and efficiently constructed. During the construction process, all detected voids are filled with special materials with low thermal conductivity. And then, when facing internal and external walls, different building materials are used.

Based on this, we conclude that the appropriate type of insulation will directly depend on the operating time of the house and the weather conditions under which the frame house will be built. Or are used as insulation - these are universal materials.
Work on the foundation
As a rule, a frame house is built no higher than 2 floors. Moreover, it is worth noting that the second floor is of the attic type. Therefore, there is no point in building deep foundations for such houses. The best way for this would be to build a prefabricated one from reinforced concrete blocks.
 When making the final calculation of the number and width of wall sections, you must take into account all possible mechanical loads on the floor of the building. Beams are usually installed in increments of 30 cm to 60 cm. The width of the boards is selected in accordance with the finishing material. When covering, a distance (20-30 cm) is required due to the plasticity of this material and its inability to withstand minor loads. Moreover, if you cover it with chipboard sheets, the distance can be increased to 35-60 cm.
When installing windows () when building a frame house with your own hands, it is necessary to comply with precise building codes. Firstly, the window area should occupy 18% of the total wall area. Secondly, in a house where you plan to live only in the spring and summer, frames with single glazing will be sufficient. When living all year round, use frames with double, or better yet, triple glazing.
The final stage of construction is the construction and installation of the frame. In addition to external beauty, the roof plays the role of distributing significant external loads. Here are the main elements of a load-bearing roof - rafters and rafter legs, they are divided into hanging and inclined, diagonal connections, ridge girder. At With When building a frame house with your own hands, sooner or later you will think about roofing material. Currently, the construction markets offer a wide range of necessary materials.
Let's summarize: building a frame house with your own hands is not an easy task! The main rule is that when assembling the structure, strictly follow the building codes and established rules. And then your frame house will delight you and your descendants.