DIY cake box. Crafts from plastic caps
A creative person can easily come up with and build a craft with his own hands from any available materials. Ordinary people can also easily make a masterpiece of their own if they wish, using certain Internet sites or master classes.
In our article today we will talk about crafts from cardboard boxes that you can make yourself or together with the kids.

Such games develop children's imagination, and the result will delight everyone.

For crafts, boxes of various sizes are suitable, from which it is easy to construct different objects: from large boxes - household items in the form of furniture, cars, airplanes, etc., from small boxes - photo frames, boxes, pencil utensils, etc.

Options for various crafts made from cardboard boxes are presented in the photo.
Original ideas
By making various crafts from boxes with their own hands, children develop fine motor skills, attention and imagination. If it is necessary to use cutting objects, adult assistance is required to avoid injury.

It is better to immediately distribute the responsibilities before work, the child does the simpler work, and you do the remaining, more complex work.

For crafts, you can take any cardboard boxes.

Egg trays were no exception. This is an ideal option for creativity. They make excellent animals, birds and inflorescences. The easiest way to make a chicken is in the form of a package for an egg.
Cockerel
To make them, take: an egg tray, paper scissors, acrylic paint, a brush, glue, felt cloth or multi-colored paper.

The work process is not complicated, you should do everything in order:
- cut out part of the tray (the cell with the protruding part);
- cut a cell in the shape of a rooster with a huge tail;
- paint it with acrylic colored paint, drawing the bird’s feathers, and leave to dry;
- cut out blanks from felt material or paper for a beard, comb and beak;
- fix these blanks with glue;
- make eyes, decorate with feathers.

The cockerel is ready!

Flower
Making a flower craft is a little more difficult. Materials needed: egg tray, PVA, paint, wire and scissors. These crafts can be made in different ways.

For example, cut a cell and along the folds inside the cell, cut out the petals that need to be twisted and inserted into each other; if you want, add additional petals.

The resulting inflorescences are attached to a wire or fixed near the surface to make a flower arrangement. A milk carton can also be used. For example, in the form of a bird feeder, well, toys or houses.
Cubes
Cubes are a favorite pastime for all children. It’s very easy to build it yourself. You will need: 1 liter milk bags with a square base, a paper knife, a measuring ruler, a colored marker, double-sided tape, pictures.

Let's start making cubes:
Note!

- wash and dry milk cartons;
- set aside 7 cm twice from the bottom of the bag along the edges and make marking lines with a marker;
- on one side, set aside another 1.5-2 cm from the mark upwards and cut off the entire remaining top;
- cut along the ribs to the mark at the bottom and assemble the cube like a simple box, the long side will be the lid;
- Stick various funny images, letters or photographs on the side faces.
- fold the cube in the usual way.

To attach images to the side faces of the cube, before gluing the main image, cover the cube with pieces of newspaper soaked in glue. Next, coat the finished craft with colorless acrylic varnish. If you place small objects inside the cube, you get a rattle.

Frame
A candy box makes a great photo frame, decorative box, etc. They are very sturdy and well shaped, sometimes with a hinged lid.

Cover the box with gift wrapping paper, lace or satin fabric, decorate with a composition using various little things, pins, bows, etc. and the box is ready.
Postcard
A flat box will be useful for creating a greeting card with a frame. To do this, in addition to the box itself, you will need:
- Greeting Cards,
- paper in bright or pastel colors,
- PVA glue,
- corrugated cardboard,
- stationery,
- ribbons, bows and other decorative things.

Trace the outline of the card over the lid of the box. Then step back 1-2 cm from the sides to the center of the outline, trace the resulting outline with a pencil and cut a window.

Note!

From corrugated cardboard paper, cut out pieces for finishing the interior and exterior. Secure the postcard on the opposite side of the hinged lid with tape so that it can be seen through the made window.

Attach a ribbon to it and the side and disguise the places where they are attached with corrugated cardboard parts on the side and a corresponding postcard on the inside of the lid.

Complete the design with various decorative elements. Place congratulatory words and a small present in the inside of the box.

Other crafts
You can also create crafts from matchboxes. Most often they make doll furniture, vehicles, boxes, etc.

Large cardboard boxes intended for household appliances easily make crafts in the form of children's household appliances, vehicles and forts.

Note!

Become a real architect and delight your child with a real castle or their own house. Moreover, your child will be proud of such a creation made by his beloved mom and dad.

The child himself will be able to invest a piece of his labor into the production process. Girls will be delighted to have their own miniature kitchen or dollhouse.

Crafts from boxes for children, made with love by parents, will leave unforgettable, vivid memories for the child for life.

Photos of crafts from boxes


You probably immediately throw them in the trash - the plastic packaging in which we bring home cakes, ready-made salads from the supermarket, cookies... But don’t rush to get rid of them. With this trick you can turn trash into an adorable masterpiece.
Need to:
- plastic box
- scissors
- hole puncher
- colored permanent markers
Let's start:
Take a clean package and cut out the bottom (flat part).
You can choose any picture at your discretion, the main thing is that it is easy to draw. For example, a character from everyone’s favorite cartoon about Winnie the Pooh. Keep in mind that at the end the figure will be reduced by about 70%, which means that the figure will need to be quite large to begin with. We copy the picture onto plastic.

Now we color the picture and use a hole punch to make a hole above the top of the picture. We cut along the contour, grabbing a small “loop” with a hole on top.

Place the plastic piece on baking paper and “bake” for 2-3 minutes at 165 °C. The heat will cause the plastic to shrink and curl, but don't worry, it will straighten out again in the end.

Once baked, the little plastic figurines will not only be smooth, but also thick and sturdy. Now you can use them to make such a charming bracelet.

Once again the whole process will be shown in the video:
Sets of such plastic blanks with drawings are even sold in some children's stores - children are delighted with this transformation. But why spend money if everything is at hand? You can choose any patterns, motifs and colors. Now what should have simply rotted in a landfill will be pleasing to the eye for a long time. Beautiful and environmentally friendly!
But also using plastic covers from them.
From absolutely waste material you can create a simulator for developing fine motor skills, organize a board game, create original wall clocks and panels, make flat and three-dimensional toys. Are you still throwing away plastic lids?
Animal and insect figures made from plastic caps
With children of primary school age, you can do mixed appliqué: glue several lids to cardboard and get creative with their decor. They make wonderful birds, pets, wild animals, fish, and insects.


If you string plastic caps onto fishing line, thread or wire, like beads, you can make three-dimensional figures of animals and insects. Now they are already able to move and it becomes interesting to play with them.


Flowers made from plastic lids
Bright plastic bottle caps can turn into the core of a magical flower. We glue them to cardboard in the same way and decorate them. If you glue not only the plastic cap itself, but also the neck of the bottle, then you can hide a secret for the child inside. For example, a butterfly or a bee. Then he will be interested in “working” with such objects.


Pictures made from plastic caps
If you have accumulated several bags of plastic lids, then you should move on to large-scale art projects and installations. The covers can be glued and nailed. The main thing, as always, lies in the brilliant idea.

Flat people made from plastic caps
Similar to making simple animal figurines, you can make silhouettes of various characters and flat dolls from caps. We fantasize and glue them onto a base made of cardboard or thick fabric, decorate and rejoice at the result!


Details from caps that match the color will add originality to the design, making it voluminous and interesting. These can be elements of the face, buttons on a suit, flowers, balls and much more. For example, like this funny clown!

Transforming robots made from plastic caps
It turns out that it’s easy and simple to please your boys with a creative robot. To do this, we string the lids onto a wire base and assemble all the parts together. Now our robot can move, different types of weapons, wheels or even a car, antennas can be attached to it, and unusual or completely ordinary tubes, boxes and cans can be used in its design.


Transport based on plastic covers
Traffic flows can be extensive and stationary if you choose to create traffic scenes on large format paper or cardboard. For such a project you will need: find a base from a large box, select the necessary decorations and cut them out from magazines and newspapers, draw the necessary objects yourself, glue everything onto the base, and then start making lids. To do this, we take a variety of lids: small ones for juices, medium ones for mineral water, large ones for canisters and five-liter plastic jars. Get to work!
Spending time playing with such a “simulator”, the baby will involuntarily train his fingers, opening and closing the lids, looking for the second picture under them.
Please note that the caps can be not only the core of a flower or the wheels of a car, but also a door or window hiding interesting details and photographs.


You can make fantastic cars from scrap materials. Almost anything is suitable for this: a toilet paper roll, a jar of yogurt, other containers, canisters, cardboard boxes of dairy products.


Other items from lids
Indeed, there are no limits to human imagination! It turns out that you can use plastic lids to create stylish watches, organize a game of checkers, make toy musical instruments, sweets, and even decorate a children's kitchen for games.


Sources of photographs in the selection: foto-tur.ru/?p=8773, womanadvice.ru, fotostrana.ru, subscription.ru, armama.ru, ayamama.ru, podelkilegko.ru, uckomp.ru, forgetfullino.blogspot.ru, boombob.ru, lestnica.info, cinesoft.ru, everything.kz, www.awd-auto.ru, handmadehelp.ru, dou98.zlatoust.me, thebestartt.com, mirfb.ru, boltayanozhkami.blogspot.ru/2012/ 09/pirozhnie-iz-probok.html, horoshaya-mama.ru/, stranamasterov.ru/, solium.ru, faberena.blogspot.ru/2012/07/ein-lernspielzeug-aus-den.html, morburybeverly.blogspot. ru/2012/12/blog-post_8408.html, photo-bazar.ru/?p=8855/, fotohomka.ru, handmade.jofo.ru, studon.ru, stranamam.ru, searchmasterclass.net, allriddles.ucoz. ru
From plastic bottles you can make many useful and original items for the interior or for the garden and cottage. In addition, by creating crafts from plastic bottles with our own hands, we contribute to preserving the purity of nature. It's no secret that the situation with sorting and recycling plastic is not the best in our country, and plastic takes more than 100 years to decompose! So, what can you make from plastic bottles?
1. DIY jewelry stands.
 You will need bottles of different sizes - 2l, 1l and 0.5l. Using scissors or a sharp knife, cut the bottom of each bottle 3-4 centimeters high. Then, in the center of each resulting “saucer”, drill a hole corresponding to a pre-prepared threaded rod.

It is better to place the saucers on the rod between two washers and two nuts. If you simply use a metal pin, a wooden knitting needle or something like that as a rod, then the saucers can be mounted on hot glue.

The bottom of a 2-liter bottle will act as the base of the stand, so simply turn the saucer over to stabilize the entire structure.

2. Boxes for pastries and cakes made of plastic bottles To.
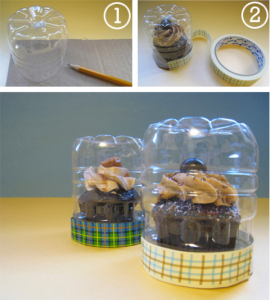
boxes for cupcakes and cakes made from plastic bottlesCakes and cupcakes tend to get airy, and it can be difficult to bring such beauty to guests safe and sound. Not scary! Make these crafts from plastic bottles with your own hands - boxes for sweets. A cardboard circle and half a bottle make a box for one cake, and two halves of a bottle can hold delicious macarons!

3. A small box - a do-it-yourself case made from plastic bottles.
Cut bottoms 5-7 cm high from two liter bottles. Manually sew a small zipper on the inside.


4. DIY organizers and stands made from plastic bottles
Plastic bottles provide enormous opportunities for organizing your workplace. From bottles you can make a variety of organizers for magazines and correspondence, tools and sewing accessories, stands for stationery and cosmetics, boxes - baskets for toys and other small things. We simply cut off the neck of the bottles, and then - at your discretion. A few simple options below will give you ideas.


5. DIY curtains made from plastic bottles.
Unusual DIY crafts from plastic bottles - curtains or light partitions for zoning space. Such curtains look like floating transparent flowers shimmering in the sun's rays. Interesting decor not only for the interior of the house, but also for the veranda or terrace in the country. A detailed master class with photographs can be viewed here.


1. DIY bird feeders and drinkers.
You won’t surprise anyone with such a craft made from bottles. In the surrounding parks and forests, as well as on balconies, you can see various feeders made from bottles and milk cartons everywhere, especially in winter. But perhaps you will still be interested in taking a look at what other feeders you can build with your own hands from plastic.


 DIY bird drinker made from a plastic bottle
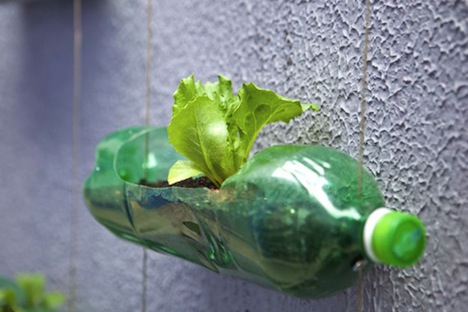
2. Vertical garden on the wall
Empty concrete walls of a house, garage or fence are just begging to be decorated. It would be a good idea to create a vertical garden made of plastic bottles with your own hands on bare lifeless walls!

You will need a couple dozen two-liter plastic bottles, scissors, rope (twine or wire) and two washers per bottle. The process is shown schematically in the figure:

For drainage, you can make a couple of holes in the bottom of a container - a bottle, and place small pebbles, sand or a special filler in front of the soil. And in such hanging gardens you can grow a whole garden: herbs, spices, flowers, berries and medicinal plants!
 3. Caps for seedlings.
Half a plastic bottle makes excellent seedling caps that will protect young sprouts from wind and bad weather.

4. Boat made from plastic bottles.
An extraordinary invention - a boat made of plastic bottles, which is practically in no way inferior to a factory model made of wood or rubber. If you would like to acquire such a boat almost free of charge to plow the nearby lake or river, you will find a master class here.


5. DIY flower beds made from plastic bottles
To decorate the garden and fence off flower beds or beds, you can use halves of plastic bottles. Moreover, seedlings can grow under the bottles. Even children can do such DIY garden crafts made from plastic crafts.


6. The nozzle for the hose is a waterer made from a plastic bottle.

A great garden idea for soft watering of plants in the garden. Take a plastic bottle and make many small holes in it. Then place the bottle on wheels, such as those from an old cart, toy stroller, or roller skates. Attach a hose to the neck and turn on the water. Small jets from the holes will water the plants like rain, and the wheels will allow the watering attachment to be mobile.
I have always considered myself an expert in matters of needlework. But when they asked me where Correx is sold in our city, I got to thinking. What kind of material is this, what is it for? Obviously not worth a penny! Thanks to the search engine for helping me figure out the issue. Now when you appear candy box I’m interested not only in its sweet contents.
Crafts from packaging
I think this material is just a godsend - I ate the candy, got inspired, and left the correction for needlework. It has many uses, ranging from simple pen holders to reuse in the kitchen.
This selection presents the best options on how to create DIY packaging crafts. Feel free to call the children, they can handle most of them on their own.
Original crafts

If you run out of candy in the box, no problem, we’ll make new ones! It's much easier than it seems. All you need to buy are chocolate chips and nuts for the topping. The amount of candy depends on the capacity of your mold.
If you can't find crumbs in the store, buy a few bars of quality chocolate or make the glaze yourself. You don't have to use white chocolate; you can just use black chocolate.
Preparation

As you can see, a lot can be made from recycled materials. Creation crafts made from plastic packaging will be a great activity for children of any age. The materials are not expensive, and the result will allow you to be proud of yourself.
Show this article to your friends; many probably did not know about such valuable material as correx.