How to make a wooden bed from inexpensive materials. DIY double bed Details and drawings for manufacturing
A solid wood bed is a high-quality, durable, environmentally friendly piece of furniture that provides a person with a comfortable and healthy sleep. To always feel good and be full of strength, you need to sleep on a comfortable bed both at home and during a trip to the country. But most summer residents consider it unjustified to purchase an expensive bed for seasonal housing.
Budget solution - self-assembled bed
However, it is not at all necessary to spend large sums of money to organize a comfortable bed. You can make a bed out of wood with your own hands, for this it is enough to have the necessary tools, materials, drawings. Before you start making furniture from oak boards or beams, you need to imagine what should happen upon completion of the work. It is advisable to draw up a drawing or select ready-made product schemes.
Finding ready-made drawings is an easier solution, but only relevant if a standard size mattress is placed on the bed. If the master has a mattress of unusual dimensions at his disposal, then the finished drawings will have to be adapted to the existing conditions. In any case, experts recommend that you first look at or purchase a mattress for a single, one-and-a-half or double bed, and then look for or draw up an appropriate drawing.
A do-it-yourself wooden bed can be made from natural wood (oak, pine), chipboard, plywood or furniture board. To work, the master will need:
- Materials: furniture board or several boards for the frame, a given number of pine or oak beams to form lamellas (log can also be made from plywood sheets), 4 beams or the same number of logs for making legs, wooden spikes and eyes or self-tapping screws and metal corners , as well as carpentry glue for connecting structural parts, varnish for coating the finished product.
- Tools: ruler, pencil, screwdriver with various attachments, electric jigsaw or chisel, grinder.
We assemble the basis of the product - its frame
Making a bed begins with determining its future dimensions. The average dimensions of a single bed are 100 cm wide and about 200 cm long. To make the frame, you can take several boards 25 cm wide and about 4 cm thick: 2 boards 200 cm long (for sidewalls) and 2 more boards 100 cm long (for ends).

Parts are connected in several ways. The choice of any of them depends on the preferences and level of training of the master:

- Making the bed yourself using eyelets and wooden spikes. This is a rather complicated method, but it provides a reliable and high-quality connection of elements. The connection of the boards should be made W-shaped. Nests can be hollowed out with a chisel or cut with a jigsaw. The grooves should be about 5 cm deep and about 2-3 cm wide. The groove angles should be aligned at 90 degrees. Then the prepared joints should be smeared with glue and assembled.

- Making a bed with a minimum of effort is possible when using self-tapping screws to connect structural parts. In this case, it is recommended to strengthen the frame with metal corners.
The manufacture of a one-and-a-half or double bed provides for the installation of additional longitudinal stiffeners from bars with a cross section of at least 5x5 cm.
Installing slats correctly
When the manufacture of the frame is completed, you need to proceed to the installation of lamellas (lag), it is on them that the mattress will subsequently be located. A person lying on the bed creates a load on the slats, and from the slats, it, in turn, passes to the frame and legs of the product.
To protect these structural elements from rapid wear, special support strips must be attached to the longitudinal beams. They must be strong enough to support the weight of a person. Therefore, for a single bed, planks are recommended to be made from 4x4 cm square bars.

The slats should be placed on both sides of the bed frame for giving, so for work you will need 2 beams 190 cm long. The slats should be attached to the body from the inside, using self-tapping screws. Self-tapping screws should be located at a distance of 15 cm from each other. To ensure that each lag lies in its intended place, bars of oak or other material can be attached to the supporting bar. What this design looks like, the drawing shows:

But making a bed is possible without grooves on the slats. If the plank has a flat surface, then home-made logs are simply installed at a given distance from each other and attached with self-tapping screws and corners.

You can also purchase ready-made lamellas with fasteners. Another simple and affordable way to make a solid base for placing a mattress is to lay a sheet of plywood or several fairly thick boards on the slats.
The next stage of work will be the manufacture of headboards for the bed. Usually the headboard is made higher than the side in the leg area. You can make a design from a furniture board, boards, logs or any other material. Here, a wide scope for imagination opens up before the master.
Finishing touch: attaching the legs
A conversation about how to make a wooden bed cannot do without discussing such an important issue as attaching the legs to the bed. It is allowed to manufacture these elements from bars or logs. The second option is perfect for a rustic-style interior, and the first will add the necessary rigidity to the structure. A compromise option involves turning the logs in the upper part (at the points of their connection with the frame) and maintaining their natural shape in the lower part. The recommended height of the legs is 25 cm, and their width should be at least 5x5 cm. You can attach the legs to the frame using self-tapping screws and metal corners.
Now it is fashionable to make furniture at home on your own, and every year the number of home craftsmen is increasing. Someone prefers to purchase blanks and assemble the necessary furniture from them, while someone does all the work on their own from start to finish. A homemade bed can be very simple or with intricate shapes and patterns. It's not just a matter of skill and availability of equipment - personal preferences and financial capabilities play an important role. In this article we will tell you how to make a bed with your own hands from various materials.
In order for the product to please and to be used for a long time, you need to approach the matter very responsibly, realizing the limits of your capabilities. It is necessary to choose a suitable model and, taking into account the material used, prepare a tool.
Required Tools
Depending on which material is selected, certain tools will be required to work with it.
For working with metal
- Electric welding machine.
- Bulgarian.
- File.
- Metal brush.
- Electric drill.
- Roulette.
To work with wood
- Electric jigsaw. If the product is made of boards, you can get by with a hacksaw for wood.
- Screwdriver.
- Electric drill.
- Roulette.
- Building corner.
- Pencil.
- Plane.
- Chisel.
- Grinder machine.
As for consumables, we will talk about this separately, considering this or that model.
Material selection
Bed materials:
- Metal corner.
- Profile or round pipe.
- An array of wood.
- Plywood.
The above materials can be used both individually and in combination. So, a metal bed can be equipped with wooden backs, and a plywood product is assembled on a frame made of timber. There can be many options, and you can figure it out in more detail by reading the article.
Location
The first step is to clearly determine what the dimensions of the future bed will be, taking into account its location. It is possible that you are modernizing the bedroom, changing its design, then you can move away from the usual bed placement patterns and find a new place for it. If so, here are some tips to help you.
- Do not install the bed with the headboard to the window opening, as if the window is open, there will be a draft, and the head can be blown out.
- If you place the bed with the headboard towards the doorway, then it will not be possible to see who enters the bedroom.
- It is better not to hang a chandelier over the bed. It can break loose and fall on a person lying in bed.
- In uninsulated houses, the outer walls are very cold, so it is better not to put the bed in such places.
- A shelf not securely nailed to the wall overhead can also cause a lot of trouble.
- In a narrow bedroom, a bed located in the center of the room will not allow you to move freely. In addition, this arrangement can cause discomfort.
- Many people leave a place for a laptop at the head of the bed. Note that this "time thief" will deprive you of many hours of good rest in this case.
It may seem that there is no room for a bed in the bedroom at all, but this is not so. We only gave recommendations, and you decide for yourself how relevant they are in your case.
Wooden bed

Don't let the apparent simplicity of the design fool you. You need to tune in to the fact that you have to work hard to make a bed out of solid wood. If you are determined, then there is every chance to do something original, while saving money. It is quite natural that it is not easy to decide on the design of the bed right away, so first look at some photos of wood products.
Photo of wooden beds


Having chosen the product you like, you can find a similar drawing on the Internet or draw it yourself, taking into account the dimensions of the room and personal preferences. Often, home craftsmen take a drawing of a bed and remake it for themselves, removing or adding something.
From array
If you are not going to sleep on boards, then when planning the size of the bed, you need to take into account the dimensions of the mattress. If it has not yet been purchased, then you need to take care of this in advance or find out the standard sizes on the selling sites and start from this data. If you plan to make a bed of non-standard sizes, it is important to know that the mattress will have to be made to order.
A custom-made mattress will cost a little more.
It is clear that in a relatively small article it will not be possible to describe the manufacture of several wooden beds, and we are not striving for this. Based on the example given, it will be possible to understand how to assemble a bed from an array.
Let's look at an example of making a wooden bed for a 200 × 160 cm mattress, if there is a minimum of tools - only the most necessary ones.
The actual dimensions of the mattress often differ from those declared by the manufacturer, and to a smaller extent. Having purchased a mattress, measure it, and then adjust the dimensions of the manufactured bed to fit it.
If there is no drawing with a bed suitable for the size of the mattress, then you can take any one you like as a basis, redoing it to fit your size. If the design is very simple, then you can draw a sketch yourself.
Let's say that after checking the dimensions of the mattress, it turned out that its length and width are one centimeter less than declared - 199 × 159 cm. You will need such material:
- Bar 50 × 40 mm, length 209 cm - 19 pcs.
- Planed board 22 × 100 mm, length 159.5 cm - 18 pcs.
- PVA glue (furniture).
- Self-tapping screws 41 and 65 mm.
Having a clear idea of the quantity and size of the required material, you can go to the store for it.
Making a frame
You can assemble the frame on the floor or on four stools.

So, we need to make a rectangle with internal dimensions of 200x160 cm, which corresponds to the dimensions of the mattress + 1 cm of tolerance. Each side of the frame will consist of three bars assembled into a single structure.
- Of 19 pcs. purchased timber 40 × 50 mm, you need to choose 4 pcs. the most even and with a minimum number of knots.
- For further work, you need to saw off the excess at a right angle. With sufficient skills, you can mark the beam, and then, using a building corner, draw a cut line. If you cannot cut evenly with a hacksaw along the line, then it is better to use a miter box.
- You should get 2 bars of 160 cm each and 2 bars of 208 cm each (internal size of the length of the bed 200 cm + 2 bars of 4 cm each).
- The cleanest side of the bars will be used as the front (top of the bed), so we will lay the bars down with this side.
- You will need 4 more bars with the same dimensions. You also need to cut 2 bars of 200 cm each, and 2 bars of 168 cm each (internal size of the width of the bed 160 cm + 2 bars of 4 cm each).
- For the frame to be strong, the corner joints must be overlapped, so for the second row, the bars of a different size are used, which we cut out last.
- Glue is applied to the bars of the first layer, and then the bars of the second row are laid and attracted with self-tapping screws. Excess glue must be removed immediately, otherwise it will interfere with the work on grinding the surface.
- Now the bars of the third row are attached in the same way.

- It is necessary to check that the corners of the bed are assembled at an angle of 90˚. To do this, measure the dimensions of the assembled frame diagonally - they should be the same.
- After the glue dries, you can continue to work.
- Since our mattress is 159 cm wide, this size is quite large - the boards we use can sag. To exclude this, in the center of the bed, from one back to the other, from below, you need to make a stiffener. For its manufacture, you will need 2 bars 2 m long each. They are also fastened together and installed in the same plane with the bottom of the bed. This is clearly visible in the photo.

The bed being made has 4 legs located at the corners, but for safety, you can set the fifth point of support in the center - then the base will definitely not bend.
- The legs will be made from two bars 40 × 50 mm, fastened to each other. Their height is selected according to the preference of the owner in such a way that they will be attached to the bottom two bars.
- Having glued and fixed the legs with screws, we wait until the glue dries, and only after that we turn the bed over to the position in which it will now be constantly located.

- To make the base for the mattress along the sidewalls of the bed frame, you need to fix the remaining beam 50 × 40 mm (or existing trimmings), since the boards will be attached to it. The lower edge of the upper beam of the frame will serve as a guide.
- The width of the inner part of our product is 160 cm, therefore, in order to avoid squeaking, the boards can be made 5 millimeters shorter - 159.5 cm (or a little less).

- After sanding the boards, you need to lay them on the frame so that they do not touch the sides of the walls of the frame, and fix them.
- Since the self-tapping screws will be screwed in from the edge of the board, holes will need to be drilled under them in each board, using a thin drill for this.
- As for the distance between the boards, we find it empirically. In our case, the length of the inner part of the bed is 200 cm. We retreat 5 mm from the edges. It remains 199 cm. Divide by 16 (the number of boards). 199/16 \u003d 12.44 cm. Round it up, and it turns out that you need to mark the support beam every 12.4 cm. Since the width of the board is 10 cm, the gap between them will be 2.4 cm, which completely suits us.

- If you need to get a greater distance between the boards, then you need to reduce their number and again perform the calculations according to the scheme we have given.
- Now we need to sand the whole structure. To do this, it is better to take the bed outside the room, as there will be a lot of dust.
- It is convenient to use a grinder or a drill with a nozzle on which an emery cloth is attached. After mechanized processing, you need to complete the process manually using fine-grained emery cloth.

- The bed must be primed and varnished in several steps, each layer is applied after the previous layer has dried. The job is best done with a spray gun. In extreme cases, you can use a brush, but it is important to understand that the appearance of the applied coating will not be the same as when using a spray gun.


You probably noticed that we still have 3 boards left. Of these, we will make the back, as in the photo.

The height of the backrest is 45 cm, and the width is 170 cm, but this does not matter, since it will not be integral with the bed - we will fix it on the wall at the level with the mattress.
Its manufacture is not at all difficult. Three boards are sawn off at 170 cm each. We make 11 boards of 45 cm each from scraps. If there are not enough boards of 45 cm each, then 2 boards of 40–42 cm can be screwed through one board. Just like the bed, the back needs to be given a presentable look by varnishing it.

The backrest can be hung on hooks, only in this case it will knock against the wall. More practical - rigidly fix the back to the wall. Now the wooden bed can be used.
Video: making a wooden bed
Chipboard bed: step by step instructions
The manufacture of structures from chipboard may seem very difficult, due to the nature of this material. If you cut, grind and glue the edge at home, then some difficulties arise, especially with cutting chipboard, as the decorative layer can be damaged. Many problems can be avoided if you make a drawing in advance and order the manufacture of parts in a furniture workshop. At home, it remains only to assemble the structure.
This time we will look at the process of making a small single bed with two drawers. Here is an example of cutting a standard chipboard sheet for one bed.

From the remnants of the stove, you can make shelves for books or something else that is needed on the farm.
So, we have a ready-made set of parts that need to be assembled to make a bed.

To do the job, you will need the following tool:
- screwdriver;
- drill (you can use a screwdriver instead);
- jigsaw;
- confirmation drill;
- bit extension;
- bits (cross and hex);
- mallet;
- pencil;
- ruler;
- awl;
- roulette.
You will also need consumables:
- Confirmations - 50 pcs.
- Stickers or plugs for confirmations - 50 pcs.
- Self-tapping screws 3.8 × 45 mm - 15 pcs.
- Self-tapping screws 3.5 × 30 mm - 30 pcs.
- Self-tapping screws 3.5 × 16 mm - 40 pcs.
- Furniture corner - 12 pcs.
- Linear roller - 8 pcs.
- Wide furniture handles - 2 pcs.
- Plastic legs - 12 pcs.
- Bar 20 × 45 mm (3 m) - 3 pcs.
Now let's start assembling.
Since a mattress of 200 × 70 cm will be used, we will adjust the existing slats to the width of the mattress, making them 70 cm long. As a result, there will be 12 of them.

On ten rails on one side, you need to fix the corners.

First, we will make boxes that can be pushed under the bed. Let's assemble the frame first. To do this, lay out the blanks in such a way that the part glued with the edge is at the top. When assembling, it is important not to confuse the sides. Well, if the edge is not glued from the end of the inner part, then you will not mix it up. If the edges of the parts are glued in a circle (which is wrong), then you need to try to fold the box without twisting it, and then attach the bottom. After making sure that everything matches, you can start assembling.
Stepping back from the lower (or upper) edge of about 3 cm, you need to drill a hole with a confirmation drill. This must be done carefully, as one awkward movement - the part will be damaged. The thickness of the laminated chipboard is 16 mm, so we retreat 8 mm from the edge of the workpiece, slightly core and drill a hole without the slightest deviation.
If you have never assembled furniture from chipboard, then first practice on the unused remnants of the sheet.

By connecting the parts, we get such a box.

In order to screw the bottom, eight confirmations are enough - 2 on each side. These drawers are not meant to hold very heavy items because the plastic casters are not designed for that.

It remains to attach the handle and install the rollers. One box is ready, now the second is going in the same sequence.

Putting the finished boxes aside, let's start assembling the bed. Since boxes will be installed on one side, you need to put together 3 parts, using 3 confirmations on each side.

As a result, we get such a "bench".

Now we will assemble a decorative box, thanks to which the mattress will be fixed. This part is not as high as the base of the bed, so 2 confirmations will be used on each side.


We put the resulting frame on the bed frame so that it does not interfere with pulling out the drawers, and connect them together from the inside with 3.5 × 30 mm self-tapping screws.

You need to nail the plastic legs.

Let's start making ribs. On the front of the frame, draw a line from one edge to the other along the height of the bed frame. Now we fix the bars with the corners screwed to them every 13 cm, so that their lower part is lined up.
Instead of ribbed boards, you can use a chipboard cut to size.

After that, it remains to fasten the bars to the opposite sidewall with 30 mm screws.

Having rolled up the boxes and laid the mattress, you can begin to use the bed.

As you can see, with the right approach, it will not be difficult to assemble a bed from chipboard at home. The design can be any size, as in the next video.
Video: making a podium double bed from chipboard
pallet bed
Beds made from pallets are in fashion right now. At first glance, it may seem that this kind of design would be appropriate only in some provincial dacha, but this is not so, because pallet beds can also be found in houses with a rather rich environment.
Let's move from words to deeds. Consider one of the options for assembling a pallet bed. How many will be needed? It all depends on the size and design of the manufactured product. So, a single bed with legs can be made from 2 pallets, and without legs - from 4. We used 8 pallets to make our double bed.

If possible, then you need to choose the most whole pallets. They need to be skinned.

All pallets should be painted with non-toxic wood paint. Since the tree is very hygroscopic, it is likely that the pallets will need to be opened with paint 2-3 times.

If there is such a desire, then you can open the blanks with varnish.

Having laid the first row of pallets, it is necessary to fasten them. If the wood is very strong, then holes are drilled under the screws.

Then the second row is laid.

All pallets are fastened together with metal plates, fixed with wood screws.


Thanks to this simple technology, you can make a pretty decent pallet bed.

You can also make a back from pallets.

From the remains of pallets, you can assemble some furniture and install it near the bed. In general - who likes what.
From plywood
You won’t surprise anyone with a plywood product, but you can make furniture from it at home. We will use sheets of the FSF brand, since not every plywood is suitable for making a bed.

Consider an example of making a bed for a spring mattress 1900 × 900 × 200 mm.
Materials for making a bed
The thickness of the plywood used can be 12, 15 or 18 mm. Thin sheets can be used when fastening plywood with screws. From 18 mm plywood, the bed will be more durable, but very heavy, so it is preferable to use sheets with a thickness of 15 mm - they are much stronger than standard chipboard.
- Plywood 2.44 × 1.22 m - 1 sheet.
- Beam 30 × 40 mm - 2 pcs. by 1.9 m.
- Beam 30 × 40 mm - 7 pcs. by 0.9 m.
- If the edges of the parts need to be pasted over, then buy a PVC edge. Its consumption will be no more than 8 p / m.
- Glue "Moment" - 1 tube.
- Screws 5×40 mm - 26 pcs.
- Screws 5×60 mm - 12 pcs.
- Screws 3×9 mm - 8 pcs.
- Thrust bearings - 4 pcs.
As for the tools, they are the same as for working with chipboard. Wood screws can be used instead of screws.
The side wall of the back of the bed has a large height. This is done so that the drawers that are pushed under the bed do not rest against the walls. If there are no boxes, then the side walls can be made the same.
Bed making
From the existing plywood sheet, you need to cut out the details corresponding to the drawing.

If desired, laminated plywood can be used. In this case, it is important to consider that it is very difficult to cut such a sheet at home without damaging the laminated coating. In addition, then the edges will necessarily need to be pasted over with a furniture edge.
To cut plywood, you need to use a file with a fine tooth, and drive the jigsaw slowly - so we get an even cut without chips. As a result, we should get parts of the following dimensions:
- Front back - 932 × 650 mm.
- Backrest - 932 × 500 mm.
- Front side panel - 1900 × 200 mm.
- The rear side panel is 1900 × 350 mm (if there are no cabinets, then we also make 1900 × 200 mm).
- The ends of all parts must be sanded. To do this, you can use a small wooden block wrapped with medium grit sandpaper.
- After that, we assemble the bed frame.
bed base

- The backrests are attached to the side rails with 5x40mm screws (2 for each front side and 3 for the back).
- Then we fasten the beam to the side rails of the bed using 5 × 40 mm screws (7 pcs per side). The head of the screws should be slightly recessed into the timber. If driven deeper, the screw will go through the plywood.
- We fix the crossbars from the timber on the horizontal bars with self-tapping screws 5 × 60 mm (1 for each point).
- With 5 × 40 mm screws, we fasten the bars to the backs from the inside (3 screws for each).
- At the last stage, we fasten the thrust bearings from below to the backs - 2 screws 3 × 9 mm for each.
- We install the bed, lay the mattress and use our product.
If instead of a spring mattress on the frame you use a soft one, then you need to cut the bottom out of plywood and screw it to the bars from above.
As you can see, there is nothing complicated in making a plywood bed.
metal
If you have some welding skills, then you can make a metal bed. We will not even consider the option of a bolted connection, since such a product will loosen very quickly.
Look at the photo of a collapsible metal bunk bed. Agree that she looks very presentable.

For its manufacture, the following materials were needed:
- Profile pipe 50 × 25 mm - 8 m.
- Profile pipe 40 × 40 mm - 8 m.
- Profile pipe 20 × 20 mm (or 15 × 15) - 40 m.
In addition to pipes, a metal primer and hammer paint were purchased.
One of the advantages of such a bed is the absence of bent parts, so a pipe bender is not needed to make it.
If you buy pipes, and not use those that have lain for several years in the garage, then do not opt for rusty ones, since then they will need to be cleaned for a long time.
Frame manufacturing
Since the bed is collapsible, its parts can be made in parts. Let's start with the backs.
- The base will be pipes 40 × 40 mm. We cut them into equal parts of 2 m each. If the ceilings are low, then they can be reduced to 185 cm.
- The width of our backs will be 90 cm, so we will cut off 8 identical segments of 82 cm (90-(4 + 4) = 82) from a 20 × 20 mm pipe, and 8 pipes of 30 cm each.
- So far we will use only half of the prepared material.
- On a flat plane, parallel to each other, you need to lay pipes-racks.
- Stepping back from the bottom 40 cm and from the edge 1 cm, a pipe 82 cm long is attached.
- It is necessary to check the correctness of the set angles with a building corner.
- After 95 cm, the second pipe is grabbed.
- We return to the first one, and on the tacks we assemble the grate - 2 pipes of 30 cm each and a cross member of 82 cm.
- We do the same with the second lattice.
- After checking the angles and alignment of the stuck parts, they can be welded thoroughly.
- The second back is made in the same way.
Now let's start making the shelves.
- We will also cut the profile pipe 50 × 25 mm into 4 equal parts of 2 m each.
- The width of the shelves will be 88 cm, so we need 26 pieces of pipe 20 × 20 mm, 83 cm each (88-(2.5 + 2.5) = 83).
- 2 pipes are laid on the edge parallel to each other.
- We mark 13 cm from the edges and grab one jumper at a time, placing them along the bottom edge.
- We lay out the remaining 11 jumpers every 14 cm and grab them.
- After checking, the shelf is scalded, and the second one is assembled in exactly the same way.
- To the shelf that will be installed at the top, it is necessary to weld a fence of the same height as the height of the lattice on the back. The pipe used for fencing must be bent, not welded at an angle. If there is no pipe bending machine, then it can be filled with sand and bent in a vice or between two supports. This pipe must be welded in the middle of the bed, as in the photo.

- In the same way, 3 more vertical racks are welded, but it will not be welded to the back, so you need to weld a small bar from the end.

The turn has come to assemble the structure together, for this we will use welding a little more.
Since our bed is collapsible, we will make universal fasteners for it.
- From a 20 × 20 mm pipe, 16 pieces of 10 cm must be cut off and welded to the backs at the junction.
- Each attachment point uses 2 tubes. They are inserted into the lattice pipe and cling to the back. If this is not done, then it will not be possible to assemble the bed, since the attachment points will not match.
- After checking the correct location of the part, we thoroughly weld the tubes to the back.

- With the help of a grinder, it is necessary to process the welding seams.
Assembly
- Now let's assemble the bed.
- In order for the collapsible parts to hold together securely, they will need to be secured with self-tapping screws (after final assembly).

It is also necessary to make a small ladder, the dimensions of which can be arbitrary.

- We attach it to the shelves with bolts and nuts.

- At the final stage of work, the entire structure is disassembled, degreased, primed and painted.
- After the paint has dried, the bed can be brought into the house and assembled.
- To close the ends of the pipes, specially designed plastic plugs are purchased for this purpose.

If the bed is made for children, then its length can be significantly reduced.
As you can see, at home you can make a beautiful and durable metal bed.
Production of decorative elements
If you want to do something original, then in the manufacture of a bed, instead of standard profile pipes, you can use forging elements.


Such parts are sold in specialized stores or made to order. Good results can be achieved using bent parts, and you can bend them yourself.


Bed legs
A person may have the wrong opinion that the legs of a metal bed will look rough. If you set a goal, then this element can also be made very attractive.

Video: making a metal bed with forging elements
Design choice
The wrong bed can cause a lot of inconvenience. Here are some tips from experts in the field:
- It is best if the bed is made of natural materials. When using chipboard, plywood, laminate and other materials with synthetic additives (glue, etc.), the products must be certified, intended for the manufacture of furniture.
- The size of the bed matters a lot. A single bed can be 100, 90 or 80 cm wide, and a double bed can be 200, 180 and 160 cm. If there are no restrictions on the size of the room, then you need to act on the principle - the more the better. The length of the bed must be 20 cm longer than the height of the person (minimum 10 cm).
- Structures made of chipboard (and laminated chipboard) are the most unreliable and brittle.
- The solid bottom of the bed does not allow the mattress to ventilate, but too little ribbing can cause the mattress to deform.
Since we are talking about a mattress, there are some nuances of choice here.
- The mattress should not be hard. It should be soft enough, but not too deformed under the weight of a person lying on it, so it must be selected individually. For a double bed, you can choose 2 mattresses of different elasticity. To make sure that the mattress suits you, you need to lie on it for 15-20 minutes before buying.
- If a hard mattress is purchased, then you can put a thick mattress topper on it, for the manufacture of which latex or memoryform is used (thickness from 3 to 10 cm). If you have not decided on the choice, then it is better to purchase a mattress with double-sided rigidity.
As for the design features of the bed, this is a matter of personal preference and convenience. In a small room, you can place a bed, under which there will be drawers, folding or pulling out from the podium. In a large room, you can give free rein to your imagination by making a wide bed.
Video: how to choose a bed in the bedroom
Single
A single bed is installed in cases where it is planned that only one person will sleep on it, whether it be a child or an adult. Also, 2 or more beds can be installed in one room, for example for two children. Be that as it may, you first need to decide which design is suitable, and then take up manufacturing. Photos of homemade single beds can help with this.
Photos of single beds


![]()


double bed
As a rule, married couples sleep together (at least for the first few years), and in order for this bed to be comfortable to sleep, you need to take care of its size and design. Look at the photo exhibition of double products.
Photos of double beds


![]()


bunk bed
Usually a double bed is made for children. It can be either a simple bed or a fairy-tale castle in which the child will fall asleep with pleasure. When choosing the design of this kind of children's bed, you need to think about both convenience and design.
Video: designing a baby bed
Photos of bunk beds


![]()
![]()


Drawings and diagrams: bed assembly


In the season of gardens and holidays, you want to spend more time outdoors near your favorite beds, spruce forest and river. But you have to spend time returning to an apartment under the roof of a city high-rise building, because in the garden house there is no comfortable beds , and your living room without a bedroom and a night bed is right next to the dining table. Do not despair!
It all depends on how and where you want to use it. A single bed will suffice for your teenage child. beds . If you are of a large physique, then a comfortable sleep will come only on the "one and a half".

Are you married? So, you need a double from solid wood.
If there is enough space, then equip a pull-out bed under the podium, and place a cozy seating area with a coffee table on top, to which steps lead. In a small room where every square meter is expensive, build podium bed.

Built-in drawers for storing bed linen, clothes and other things.
For bed linen, place a tall, narrow drawer with a top hinged lid at the head of the bed. It is convenient to store pillows and blankets in it during the day, and at night - a cape.Assemble a beautiful decorative back and nail it to the wall above the headboard. Place night lights on it.

This will give your bed an aristocratic chic and comfort.
Choose a material and decide on a price
The metal is too expensive, requires a specially equipped workshop, a welding machine, has a high specific gravity and does not retain heat well. Good furniture can be assembled at home from sawn timber that is quite affordable without overpaying for a well-known brand.

Building a wooden bed with your own hands will cost less than buying a finished one in a store.
How to make a wooden bed with your own hands
Best for beds wood of medium (from 550 to 760 kg/m³) and high density - over 760 kg/m³. It wears out less, but is harder to process.

Optimum in terms of strength and ease of processing is pine.
IMPORTANT! Spruce is not suitable for load-bearing elements and bed legs . It breaks down quickly under stress.
For the base frame, select boards or timber from dense wood - larch, birch. The legs can be made from bars, and the slats under the mattress from cheap pine boards 2 cm thick. Thin spruce boards 0.5 cm. Carefully check the material for knots, bumps and roughness.

The fewer such defects, the easier it is to process it with a grinder.
Check the curvature of workpieces in a simple and effective way.
- Raise it by one of the ends to eye level.
- The edges going from the near to the far end should be a straight line in perspective - their curvature will be immediately noticeable.
ATTENTION! Be sure to draw. Consider the size of your mattress. They may not match the ones below. Frame interior beds should be a little more. An allowance within 30 mm is allowed.

Immediately determine the presence and height of the legs.
Bed solid wood can be made without them by gluing cloth pads at the corners to protect the floor from scratches. For light single and "one and a half" heights, the optimal height will be 35-40 cm - you can vacuum and wash the floor or build a drawer for storing things and clothes.
ADVICE! Try to reinforce the joints with a furniture corner where possible.

Making a wooden bed with your own hands may not be the easiest solution, but the most profitable one.
Entry level bed
Under a mattress measuring 80x190 or 90x200 cm, build a simple single handmade wooden bed . It is suitable for an adult or teenager. For manufacturing you will need:
- B rus for four legs with a section of 50x50mm;
- D skewer 25x245 mm for side rails and footboard, 25x100 mm - for the manufacture of overlapping rails, 25x200 mm- for the headboard wall;
- B rus with a section of 50x25mm for the manufacture of support beams for floor slats;

Bed materials.
In addition to good lumber, get:
- Furniture corners or bed ties.
- TO fixing screws 60 mm;
- piping length 80 and a section diameter of 8 mm;
- With wood glue;
- M orilka or impregnation for wood;
- A acrylic water varnish.

Materials required for work.
During the assembly of this and other variants beds use tools:
- D relay and screwdriver;
- H small hand planer;
- R hand saw circular or furniture hacksaw;
- W bodice machine or grinder;
- H a few clamps;
- TO sources for applying glue, varnish and stain;
- R sliding joiner's square;
- WITH building level;
- M alka - a device for quickly marking cut corners;
- WITH dull - a tool for fast and accurate sawing of workpieces at an angle of 45 and 90 °;
- AND measuring tape.

Tools to help you get the job done.
Assemble the headboard first. From a bar with a section of 50x50 mm, cut out two legs up to 80 cm high. Drill 4-6 holes with a diameter of 8 mm and a depth of 30 mm in their upper part from the inside. From boards 25x200 mm, cut out two blanks 950 mm wide. From the ends, make holes up to 50 mm deep, matching those that you made on the legs.

Lubricate the parts with carpentry glue at the articulation points and fasten with dowels, carefully hammering with a mallet.
The footboard is made from boards 25x240x950 mm and two pieces of timber 400 mm high.

Fasten them in the same way.
The backs are fastened to the side walls 25x250x1900 mm with furniture corners or ties, aligned along the outer edge legs.
FOR YOUR INFORMATION! Ties will make it easy to disassemble the furniture when moving.
Along the lower edge of the right and left walls, using wood glue and clamps, support beams 25x50 mm are installed and long 190-200 cm. After drying, before removing the clamps, the beams are additionally screwed with self-tapping screws.

Assembling the side wall of the bed.
From boards 25x100 mm, make 12-14 cross rails long 95 cm. From the left and right ends, through holes with a diameter of 3 mm are drilled at a distance of 12 mm from the edge. Lay them across the support beams at a distance of 35-50 mm and tighten the screws.

Final assembly of the bed.
IMPORTANT! All parts must be sanded before assembly. With a sliding square, check the "straightness" of the corners between the side walls and the backs beds . Using a building level, control the horizontal arrangement of the frame structural elements.
Treat the rough surface with a grinder. The outer ribs of the backrests and other parts can be chamfered to prevent chipping of the wood and improve the appearance. For longer service life, treat wood stain and dry. Cover with acrylic varnish.

As you can see, making a wooden single bed is not at all difficult.
FOR YOUR INFORMATION! To end faces legs when moving, they did not scratch the floor, you can glue felt pads to them.
Single bed
There are differences in the design of the backs, and its longitudinal axis is reinforced with a jumper with a leg that prevents the mattress from sagging.

It is made under a mattress with dimensions of 140x200 cm.
The head of the lorry consists of a wall and two legs . Make a wall from 2-3 boards long 1400 mm and 25 mm thick, reaching the desired height (30-40 cm). The legs are made of timber 50x50x800 mm. Fastening wall elements and legs made with tongues 8x80 mm, carpentry glue and reinforced with long self-tapping screws from 65 mm.

The footboard is assembled in the same way.
Side rails of the bed - one and a half should be located on the same level with the lower boards of the backs and have the same height.For variety, change the design of the backs beds . The middle board of the wall can be replaced with short vertical inserts from the same boards fastened with tongues.

Corners can be cut at the outer edge of the top board.
To do this, using a special tool - malki - make markings with a pencil. Malka consists of a handle pressed against the edge boards , a narrow metal plate with a longitudinal cutout, and a mounting bolt that allows you to fix the plate by setting the desired angle and length of the cut. In such a simple way, you will quickly draw symmetrical cut lines on the left and right ends. To prevent the hacksaw from leaving the line, press a wooden guide bar along the marking with clamps.

To give an interesting look to the bed, before varnishing, you can limit yourself to applying stain only to the surface of the legs and backs.
How to make a wooden double bed
Two adults is a serious weight, which requires a more thorough approach in the choice of material and assembly method. Make a sleeping bed out of solid wood.

The basis is a standard double mattress measuring 200 by 160 cm.
You will need the following materials:
- B bar 50x50 mm for legs and bed frame, 3x3 cm - for support beams under the slats for the mattress;
- D oski 20x100 mm for the transverse flooring under the mattress;
- M metal furniture corner with a shelf width of 50 mm;
- With self-tapping screws 40 and 65 mm long.
From the tools you will need an electric jigsaw, equipped with a file with large and widely spaced teeth.
First, we assemble the frame for beds with internal dimensions of 210x170 cm and a height of at least 15-20 cm. To do this, glue three or four pieces of timber, tighten with clamps. After drying, we cut in such a way as to obtain two blanks for the side sides long 220 cm each and two for the backs - 180 cm each.

In the same way, we assemble a longitudinal jumper 10 cm high and 210 cm long.
When assembling, use a "lock" type connection. To do this, on short workpieces, use a jigsaw to cut a notch, removing a segment from the middle long 5 cm. On long blanks of the side walls beds , leave the "thorn" by sawing off the top and bottom of 5 cm.

Apply glue to the notches and spikes and connect them at a right angle, checking with a sliding square.
Attach the longitudinal jumper with additional support in the middle using a metal corner with a shelf width of 50 mm, aligning it with the lower edge of the frame. In the corners, attach legs from a beam up to 40 cm high. Fasten with glue and self-tapping screws.

For strength, secure the connections with clamps.
For greater reliability, make legs beds from a thicker bar. To give them an elegant look, chamfer the inside at a 45° angle using a miter box. Do not overdo it - the area of \u200b\u200bsupport should be sufficient to withstand a lot of weight. When mounting the legs, use long countersunk head bolts with washers and wood glue.

At the bottom of each corner, place triangular inserts that serve to prevent deformation of the structure.
Glue beams of 3x3x210 cm timber along the long side walls.

Their upper face must be in the same plane with the upper face of the jumper.
From boards 20x100 mm make slats long 170 cm. They are laid and fixed across the lintel and longitudinal support beams with an interval of 3 cm.

The first and last rails should be adjacent to the front and rear walls of the frame, the rest should be evenly distributed between them.
IMPORTANT! To prevent the slats from squeaking, make them shorter than the inner width of the frame by 1 cm.
After assembly is complete, carefully grind the surface with a grinder or drill with a special nozzle using medium to fine grit sandpaper.Cover with stain, and after drying - with water-based acrylic varnish in several layers.
For double bed you can make a wall headboard from 2-3 boards long 25x100x1800 mm and 10-12 boards 25x100x450 mm. The first row that will be in contact with the back will go short boards . On the wrong side, it is necessary to equip hidden fasteners. At the appropriate places of the headboard, fasten metal plates with self-tapping screws, the free lower edge of which will be inserted into the grooves of the tires when hung.

The most reliable solution would be to fix the rails for wall cabinets with dowels on the wall - according to the number of short boards.
If you do not like a hard headboard, assemble it with upholstery from the following layers:
- D JV or plywood 1cm;
- P orolon from 3 cm;
- In atin;
- ABOUT bib fabric with an interesting pattern;
From a piece of plywood or chipboard, cut out the base 45x180 cm.

Bevel the ribs and sand carefully so as not to tear the upholstery and batting.
From expanded polystyrene or foam rubber, cut a workpiece that matches in size and shape. Attach it to the chipboard and make several symmetrical holes for decorative buttons. Measure and cut the batting and upholstery to the shape of the blank with an allowance equal to the sum of the thicknesses of all the blanks, multiplied by two.

Make sure the holes are symmetrical.
Using glue or a special spray, glue the foam rubber to the base. Carefully spread the batting on the floor. Lay a piece of chipboard on it.

Bend the seamed edges, starting from the bottom, and nail to the chipboard with a furniture stapler.
Repeat this operation with upholstery. To prevent the fabric from wrinkling, iron it and tighten it properly using clamps screwed to the middle of the workpiece.
IMPORTANT! Don't skimp on stapler staples. Nobody will see them anyway.
Finally, sew on the sofa buttons. From the wrong side of the headboard, pierce the upholstery with a large "boot" needle and drag a thick coarse thread, thread it through the eye of the button and bring it back through the same hole.

Fix the ends of the thread with a stapler on the wrong side of the back.
Hang the upholstered headboard on the wall with the help of rails for wall cabinets.

A wooden bed with your own hands, made according to a personal project, will cost less than a purchased one.
Remember, the lack of extra money and the lack of living space are not an obstacle to the fulfillment of the desire to sleep comfortably.
VIDEO: Do-it-yourself wooden double bed.
The furniture market offers a large selection of beds, but you can make this element of the interior on your own.
The article describes how to make a double bed from available materials and components. Solid wood furniture can be inexpensive.
If you are a fan of the old fashioned style and at the same time have welding skills, you can make a bed for a country cottage, a private house or a city apartment from a profile pipe, and decorate the headboard with decorative forging elements. We will consider a more affordable and simple option for creating bedroom furniture, and we suggest that you make a wooden bed from materials that are absolutely safe for health. Below are the drawings of the simplest options, which even a novice master can easily handle.
Materials and tools
You will need:
- assembly diagram;
- sheet plywood;
- PVA glue;
- wooden beam;
- slats;
- self-tapping screws (70 pieces).
You will need glued pine timber with a smooth, flawless surface, 4 x 5 x 200 cm in size (14 pcs.). The size of the planed rails is 2 x 10 x 200 cm (20 pcs.). Before making a bed, you need to buy a sleeping mattress 160 x 200 cm, already make a base for it.

Assembling a double bed
The rectangular frame is assembled from beams. It is necessary to take three bars on each side, fasten them together in height. You will get an equilateral rectangle. If there is concern that the mattress will not fit, it is recommended to assemble the frame with an allowance of 1 cm on each side.
2 bars with a section of 4 x 5 cm, 162 cm long (ends) and the same parts 201 cm long (sides) are laid out on the floor, coated with PVA glue. Immediately after this, the second row of bars is laid on top. Then all the details are fixed with self-tapping screws. The crowns of the bed should not be skewed, they should turn out to be perfectly even.
At the corners, the parts are connected with metal ties. When tightening the self-tapping screws, the glue that did not have time to grab will appear through the holes outward, so the wood must be cleaned of its excess.

The assembled frame can be set aside, you can start creating an orthopedic slatted base from processed boards 2 cm thick. The slats must be reinforced with a stiffener, it must run in the center of the bed along its entire length. There should be at least 2-3 legs. It is also necessary to make 4 legs for the frame. In the future, they are installed in the corners, securely fixed with fasteners.
For a bed made of boards, you need a base made of slats or slats. Supports are made of wooden beams. The timber is cut into segments corresponding in length to each side of the bed. The support bars are attached at the level of the second row of the frame along the entire inner perimeter. The thickness of the supporting element is sufficient to ensure that the thin rack base is located on it firmly and reliably.

It is recommended to plan the length of the rails with the expectation that a deformation gap should form between them and the frame, preventing cracking of the natural material, excluding its creaking. It is better to mount the slats at a distance of 20-30 cm from each other. The step between them should be the same, a template may come in handy. The slats are fixed with self-tapping screws, which are twisted along the edges to the base and in the center to the stiffener. After that, a homemade bed should settle for several days until the glue dries completely.

Next, decorative processing is carried out. First, all parts are polished with a grinder or grinder, including a nozzle with a large grain. Then, with the help of fine-grained emery, fine grinding is carried out along the wood fibers.
After grinding and polishing, they get rid of the dust formed during the processing. In the room in which work with paint and varnish material will be carried out, it is necessary to do wet cleaning.

The furniture is covered with a primer designed to protect wood. Lacquer is applied on top in stages in 2-3 layers with an airbrush, providing a uniform coating.

You can also use a fine-bristled brush.
In the process of varnishing, the bed must be turned over, allowing each layer to dry.

Headboard Assembly
To work, you need a sheet of thick plywood. The result is a plywood element, which is not subject to a special mechanical load. Its strength is sufficient. You also need a dense upholstery fabric, foam rubber, synthetic winterizer, a furniture stapler with staples.
A rectangle of the required size is cut from the plywood sheet with a jigsaw. A layer of foam rubber of any thickness, similar in size, is laid on top of it. Foam rubber can be covered with synthetic winterizer. Then the headboard is pulled up with furniture upholstery fabric.
The piece of fabric should extend at least 15–20 cm onto the back wall.
When fixing the upholstery with a stapler, it is necessary to provide the fabric with a uniform stretch, without creases, ugly folds on the front surface. The headboard is attached to the wall or bed frame. In the first case, the part is equipped with special eyelets-loops. They are hung on self-tapping screws installed in the wall. If the headboard is fixed to the back of the bed, holes are made in its lower part, as in the base of the furniture. Screws are tightened in them, clamped with nuts.

According to the same scheme, a single bed can be equipped with a headboard. Figured headboards decorated using the carriage tie technique will look good. In this case, you will need a stencil, furniture buttons, decorative nails.
There are many types of carriage ties, if you wish, you can choose the one that will decorate the bed, emphasize the style of the room, make it more expressive.
The cost of furniture in stores is constantly growing and it is often impossible to get a dream bed. And if you can't buy it, you can make it. With modern materials and tools, a do-it-yourself wooden bed is an opportunity to get high-quality and inexpensive furniture. Who knows, what if after a homemade bed you want to do something else, and then the hobby can turn into a profitable business for the production of exclusive handmade furniture. Let's see how to make a bed out of wood, what you need for this, and what can come of it.
What you need to know
Do-it-yourself wooden beds are often made due to the impossibility of using standard solutions. It happens that there is a mattress, but standard beds from furniture factories are not suitable. Then they begin to look at the drawings on the Internet, look for diagrams, select materials.
A single or double bed is a design in a wide size range. If you make this furniture yourself, you should choose a sample that exactly fits your needs. But the first step is to define the parameters.
To determine the width, you need to lie on your back, close your fingers and spread your elbows in different directions. Then they measure the distance from the elbows and add another 10-15 cm on each side - this will be a comfort zone.
Length is the height of the tallest person. You need to add 30-40 cm to your height. As for the height, low models are in fashion today - the height is made no more than 50 cm.
It is necessary to take into account the weight - for a single bed, this is the mass of the user, for two, the mass of two people is taken into account. Another 15% must be added to the mass. The weight of the load will help determine what materials to purchase to make a wooden bed with your own hands.
Features of the selection of materials
A wooden beam is chosen for the bed frame - any other options are not suitable here. Metal can also be used, but you need a welding machine and skills to work with it. A wooden bed is much simpler in manufacturing technology, wood is easier to process. And wood is much more spectacular than metal in appearance - take a look at a sample of a bed made of solid wood (photo below).

Backs and sides are easier and more affordable to make from chipboard or MDF. Adhesives are often used for assembly - when working with MDF, the most common PVA glue or "Joiner" is suitable - it is completely similar to PVA in properties.
Making construction parts from MDF with your own hands will cost much more. And from this material it is difficult to make a carved back.

The bottom for the bed is better to make rack - it is much better than plywood. You can make rails yourself. But if you need the bed to have orthopedic properties, then it is recommended to use ready-made slats. These parts are glued from wood in several layers, and their shape is slightly convex.

Fasteners
To make a wooden bed with your own hands, one way or another, you will have to fasten various parts together. Depending on the type of construction, various fasteners may be needed. The most commonly used phosphated screws. They have a rougher surface, due to which their setting with glue will be better. The diameter of such a self-tapping screw is 5-6 mm. The length is selected according to the sum of the thicknesses of the parts to be joined, while 10 mm is subtracted from this figure.

You may also need metal corners. It is desirable that these parts have a rounded wide stiffener. There should be no burrs, spots, ripples on the surface and edges of the corners - all these are signs that the metal will be pulled.

To get more reliable fasteners, it is imperative to use a clamp - this will help ensure the tight connection of the two parts. Among the advantages of the process of making a bed from solid wood with your own hands at home, there are no time limits, which makes it possible to use glue and self-tapping screws together with a clamp, thereby ensuring high bond strength. Fasteners made in this way are reliable.

Double bed
A homemade bed or factory bed is a frame consisting of two headboards, a headboard and a footboard. The scheme provides for sidewalls - kings. Inside the bed consists of a bar frame - this is one solid piece with backs and drawers.

The double model is additionally equipped with longitudinal elements to increase rigidity - these are the so-called spars. The frame is then covered with flooring - you can use plywood or boards. In the flooring, slots should be taken into account for ventilation of the mattress.

So. How to make a wooden bed with your own hands? If you follow the technology, then at home you can build a comfortable bed.
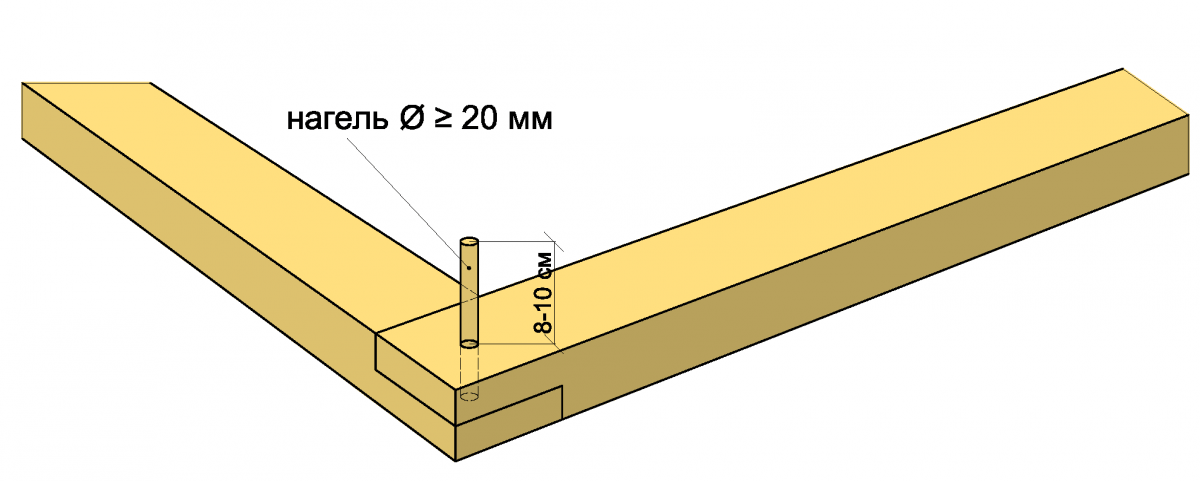
Nagels and corners
Among the most important parts for fastening the structure, metal corners are distinguished. With their help, you can fasten the bars. Connect the elements in these places and by means of dowels. These are wooden nails. In the case of pins it is necessary that the holes under them match very exactly.

Back
The back can be any. The upper part of it too, depending on the idea and taste. The transverse part is a beam measuring 50 × 50, fixed with glue and self-tapping screws. For MDF, PVA is used, and for laminated chipboard "Moment". In the center, cutouts are made for the spars - the dimensions of the cutout are depth - 25 mm, width - 40 mm. The distance between the cutouts is 50 or 40 mm.
The wood (back) should be between 24 mm and 40 mm thick. If MDF or laminate is used, then choose a smaller value, if the back is homemade from a set of planed boards, then a larger one.
If you look at the figure below, then the length of the beam (A) directly depends on the size and method of laying the mattress. If it is laid in a lodgment, then the length of the timber must be made wider than the mattress by 6-10 mm. If the mattress will be laid on a sunbed, then the width of the beam is the width of the mattress minus two thicknesses of the tsarg board and minus 10 mm.

The total width of the backrest (B) should be equal to at least the width of the mattress, plus double the thickness of the tsarg is added to this. Another option is the width of the mattress with an additional 10 cm. If the footboard is too wide, this will significantly impair the comfort of the furniture. Carving is suitable as a decorative finish on the back.
Tsargi
The drawer is a T-shaped beam made of fifty-fifty timber and a wooden board of 40 or slightly less mm. Assembly is done with glue and screws. As for the length, both the timber and the board should be the same length. You can make a drawer board with your own hands; an edged board with a width of 150-200 mm is perfect. It should be pretreated with stains and paints.

To save money, the legs can be made according to the tsarg principle. In this case, it is better to trim the legs somehow. These did will be noticeable immediately. The leg of the bed should be both for the sake of the overall design and for the convenience of cleaning.

Assembly
If you look at the photos on the bed with your own hands, then they do not differ from the store ones and in some ways even better. But a lot depends on the quality of the assembly - you need not just to build a structure, but to achieve the ideal. This is an instruction on how to make a bed yourself:
1. Let the bed with your own hands made of wood already with legs. The backs are installed vertically and supported by drawers or other fixtures. The drawers are superimposed and you need to accurately verify whether everything is rectangular - they measure the diagonals, check the evenness of the corners.
2. Mark points for dowels connecting the sides with the backs. Then the tsargs are removed and holes are drilled in them. The structure is assembled, the holes on the backs are selected and proceed to the complete assembly of the base - the dowels are driven into the grooves, the connection is lubricated with glue. For reliability of connection the bed is wrapped with a dense rope. It is better to put strong cardboard under the corners.

3. Then the coils of the rope are moved apart on the width of the tsargo board and pieces of wood or pipes are slipped in the middle on all sides. This is done for better rope tension and better gluing of all joints. In this form, do-it-yourself solid wood beds should stand from 2 to 4 days.

4. Then they make the flooring. It is better to fix it either with glue or nails. Two nails are needed on the edge. In the case of a slatted bottom, it is necessary to distribute special holders along the frame.
On video: wooden bed making
Conclusion
Now you know how to make a bed with your own hands. In fact, even with a certain minimum experience with wood, the manufacturing process does not take much time. See how do-it-yourself wooden beds look like photos can be found both on the Internet and in specialized magazines. They are simple and elegant. This is a good way to unleash your full potential. Handmade furniture is in good demand, and on this basis you can build a successful business. The cost of such furniture, if it is of high quality, is quite impressive.