Flowers made of thin crepe paper. Crepe paper - description and features, application for making crafts, flowers and sterilization
A bright beautiful bouquet will be a wonderful gift. Festive tables are decorated with floral arrangements. They are used to decorate various events. Such products can be made with your own hands. They will not wither over time and will delight others with their impeccable appearance for a long time.
To create an interesting composition, consider a photo of flowers made of corrugated paper. Experienced craftswomen offer different options for the manufacture and arrangement of plant elements.

The structure of corrugated paper allows you to create three-dimensional compositions. The material holds its shape well and is suitable for decorating bouquets. It will take very little time to create your own unique flower.

Materials and tools
To begin the creative process, purchase corrugated paper. It is inexpensive and easy to purchase in a store. Corrugated material is produced in a wide range of colors.


You can buy single-color options or rolls with a soft transition of shades. They open up almost unlimited possibilities for bringing interesting ideas into reality.

To make flowers you need the following materials:
- corrugated paper;
- cardboard;
- wire;
- glue;
- cotton wool;
- paperclips;
- threads.

If you plan to make bouquets with sweets, then purchase sweets in advance, which will become an important component of the product.

To work, you will need the following tools:
- scissors;
- a simple pencil;
- pliers;
- silicone gun.

To produce beautiful flowers, live plants are carefully observed. Each has its own structural features, which are taken into account during manufacturing. To get large flowers from corrugated paper, increase the standard pattern to the desired size.

The technology for performing the work is no different from the usual procedure for making flowers. But for a bouquet of large plants you will need more materials. They will become a magnificent interior decoration for a celebration.

Corrugated paper rose
The Queen of Flowers always looks great in a single copy and in bouquets. This delicate flower is easy to make yourself.

Step-by-step instruction:
- Petals and leaves are drawn on cardboard. To do this, you can use ready-made patterns or remove them from a real rose.
- Small indentations are made in the petal blanks with your fingers to give the elements the desired shape.
- The length of the leg is chosen at the request of the craftswoman; for this, the wire is carefully cut off with pliers.
- Prepare small pieces of wire of smaller diameter on which the green leaves will be attached.
- The end of the wire is bent with pliers to form a bud. For this, cotton wool is used, or the middle of the flower is simply wrapped in paper.
- One by one, they begin to glue the petals to the core, starting with the smallest part. To securely fasten the elements, a strong matching thread is used.
- The flower is ready. Now you need to take a small strip of corrugated paper. It is wound around the stem, on which pre-prepared leaves are attached. This is the final stage of assembly.
- Petals and leaves are carefully straightened.


If you make several flowers, they are collected into a bouquet. There is an easier way to make a rose. It only takes 15 minutes for one flower.

A strip 10 cm wide is cut out of long paper. The edge of the workpiece is made uneven by pinching it with your fingers along the entire length. After this operation, the strip is folded into a bud, which is attached to the wire with a thread. You can create an amazing composition in just 1 hour.

Beginning craftswomen are concerned with the question of how to make flowers from corrugated paper. To do this, you need to prepare materials and tools, be patient and get to work. If you follow the instructions exactly, you can get excellent results.

Corrugated paper peony
For a luxurious peony you will need paper of different shades. A strip is cut from each roll. The size of the element depends on its distance from the core. The dark color is located closer to the center, after which there is a transition to lighter shades. The resulting elements are folded like an accordion; they should all have the same width.


The edge of each component is shaped into a petal. The middle parts of the resulting blanks are connected and laid according to size. All components are rewound with thread and a flower is formed.

Corrugated paper tulips
Take a template and cut out the petals. The tip of each of them is curled and the base is shaped into a cup. Then they begin to form a bud; glue is used to perform this operation.


The elements are wound alternately to the core. After this operation, a strip of green paper is wrapped around the stem. The cut leaves are attached to the stem.
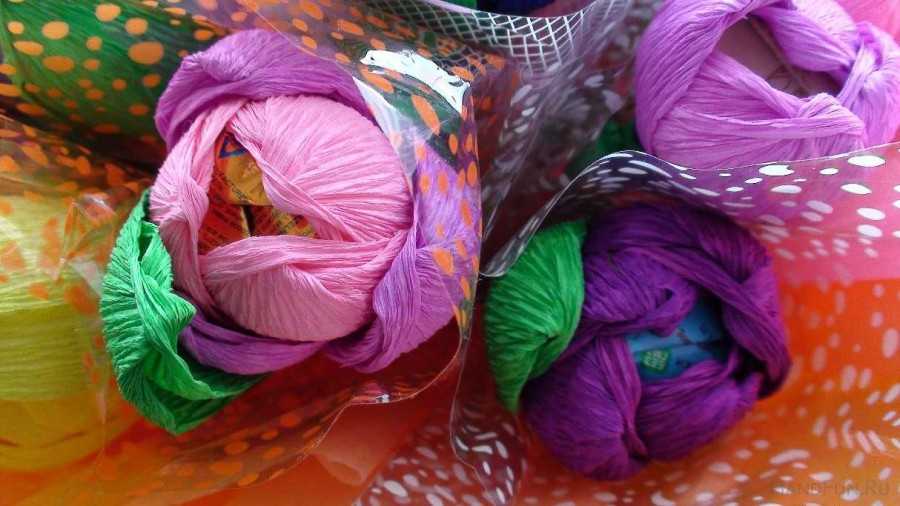
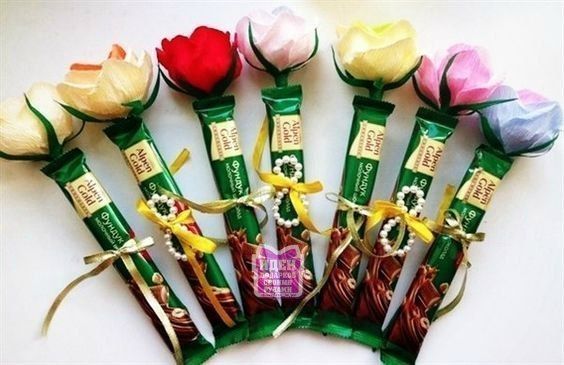
Corrugated paper flowers with candies
A rectangle is cut out of paper, folded in half, and the edges are cut off on one side with scissors. Candy is placed in such a blank. The material in the center is slightly stretched by hand. On one side, the edge is fixed with an elastic band. Wire is used as a stem and is attached to the base of the flower. To do this, you can use a silicone gun.


Cut out the petals. They need to be shaped by stretching the middle and twisting the edges of the workpiece. For a lush flower, more petals are cut out. They are attached to the bud with threads and glue. This fixation ensures a reliable connection of all components. You can also use rubber bands for this.

Leaves are cut out of green paper and attached to the base. The stem is wrapped in green paper. A bouquet of flowers will be a great holiday gift. Small bows will give the composition a festive look; they are attached with skewers. Such a surprise will definitely be appreciated.


It’s not difficult to find ready-made stencils; you can make them yourself. Don't worry if the elements turn out different. In nature, no two leaves are exactly alike. To speed up the process of cutting out parts, fold the paper several times.

You can achieve a natural color of the petal by applying a darker paint to the base with a brush. Using a variety of shades in one flower will give it a natural look.

The patterns are sorted and put into separate envelopes, which are signed. When you need a specific element again, you won't need to start the process by developing a template.

Conclusion
Amazing holiday compositions and unusual gifts are made from corrugated paper. Simple flowers will help decorate the table and complement the interior.

An unusual option will turn out if you use different plants. Bright poppies, delicate cornflowers and daisies are combined into a field bouquet. Multi-colored asters are complemented with greenery to give the composition a finished look.


Bouquets made of corrugated paper and sweets are especially popular. Those with a sweet tooth will love them. You can collect any flower. It is only important to choose the right shape, size and number of petals.

To create flowers, you do not need to attend expensive courses or purchase sets of tools. The manufacturing technology is simple and understandable even for novice craftswomen. Working with such material will bring pleasure to adults and children.

Photos of corrugated paper flowers


Crepe paper is often confused with corrugated paper. But here it should be understood that there is a big, fundamental difference. What are the differences? Corrugated paper is a generally broader concept that relates not to the type of material, but to its condition.
Any material in general, and paper in particular, can be corrugated. In addition, corrugated paper is quite rough, its folds are much rougher than crepe paper. There is a separate name for the name of a thin paper material that is uneven in texture - crepe paper.
Crepe paper- this is a separate type of special paper, which is intended for creative crafts, creating air applications, etc. This material is very thin, has folds (corrugated surface). Despite its thinness, this paper is particularly durable and rigid. This material opens up a lot of scope for creativity, such as creating flowers from crepe paper. Despite the folds, it practically does not stretch and therefore keeps its shape perfectly.
It doesn't take much effort or skill to create a beautiful flower out of crepe paper. This material is usually produced in white or light shades and is intended for creating crafts with a special effect that creates the impression of weightlessness. The name “crepe” itself comes from the Greek “crepe” and means “airy, windy, gust of wind.”
 DIY crepe paper flowers are one of the most popular types of activities and crafts performed by modern handicrafts. It is from crepe paper that such lush bouquets of flowers are created that little different from the real ones, especially at a distance. Thanks to this material, you can repeat the outlines of any flower, even the most lush rose.
Gallery: flowers made of crepe paper (25 photos)


Crepe paper roses. Step by step mk
Magic roses are one of the most beautiful flowers. Do-it-yourself crepe paper roses will allow your living flowers to not die prematurely, completely replicate their beautiful appearance, and save a lot of money.
Rose with lace edge
 In this case, the main difficulty is the need to skillfully fold the edge of the crepe paper, straightening its folds. You also need to ensure that the folds are even. Now you need to twist the strip so that the existing layers are pressed tightly against each other. At the end of the work, you need to secure the product with thread and trim off the excess.
simple rosette
 Do you need to quickly make a rose in just a few minutes? Then this option is definitely for you!
Cut out a circle. Draw a spiral on it with a pencil. Roll the rose along it, taking the longest link of the spiral as the beginning (take the central part of the cutting as the base).
big rose
 To create a large flower, one of the main advantages of crepe paper comes in handy - to keep its shape. This will allow you to quickly complete even a giant rose. We proceed as follows:

Of course, the craft doesn’t have to be completely huge. Here the individual case decides. DIY crepe paper roses give a lot of scope for creativity and imagination.
Twisted or compressed colored paper rose
The principle of its creation is similar to cutting a rose in a spiral. There is only one subtlety here: triangles in size, which are obtained by twisting along the entire length of the product, must be completely identical. If you can withstand this condition, then you will get a very cute and neat flower. If you allow unevenness, you will end up with a “torn”, tousled rose.
 Roses made from crepe paper, if they are made with great care, differ from real ones in only one way: they have no smell. In all other respects, they almost completely replicate natural flowers in their outlines.
You can also create other flowers and crafts from crepe paper.
Tulip: master class on creating
A tulip made from crepe paper is a particularly popular craft among crafters. This is not surprising, since the tulip turns out to be visually almost indistinguishable from the real thing.
Let's conduct a small master class on how to make this flower with your own hands.
To make a tulip, we will need the following materials:

The preparatory phase has been completed. Let's start creating the flower itself. To do this, we perform the following actions:

Various crepe paper flowers
The question “how to make a flower from crepe paper” will be almost completely covered below - we will tell you the general scheme for creating flowers from crepe paper with your own hands. Having understood the basic techniques and principles, you will be able to independently figure out how to create any flower.

Aster
To create an aster from crepe paper, cut out circles from the canvas:
- 2 large;
- 2 medium;
- 1 small.

Calendula
The flower that should be obtained using this technology most closely resembles a packaging bow. To create it we perform the following steps:
- cut out an even, neat square of paper (you can choose the size yourself, the size of the resulting flower will depend on it);
- make cuts 1 cm wide on it, not reaching the center of the square by about 0.5 cm, there should be several blanks;
- put them on top of each other;
- in the center we tie it together with wire or thread;
- Now is the important step: straighten the petals in such a way as to get the flower itself, and the more layers there are, the more magnificent the product will be.
Calla
To create a calla lily flower (or its likeness), you need to do the following:

Such flowers are well suited for postcards, packaging, and as an independent gift in the form of a bouquet.
Bell
The master class on creating this flower from crepe paper is the most elementary in complexity.

This is done in several steps:
- We cut out the workpiece at a right angle: you should get a triangle, the hypotenuse of which is in the form of teeth;
- Now we glue the legs together;
- We turn the leaves outward.
For added freshness and persuasiveness, create several stamens. These should be elongated threads with small seals along the edges. They need to be glued inside the bell.
If you make a bouquet of bells, it will look very cute together with a postcard for March 8th or simply be a touching addition to a birthday present.
Lilies of the valley

Crepe paper lilies of the valley will not be a complete resemblance to these amazing flowers. But those who receive such a gift will understand what exactly they were given.
To create lilies of the valley (1 flower) do the following:

The layers of the product should be applied as tightly as possible so that the green part is not visible from underneath.
DIY crepe paper crafts- the best way to please your loved ones, save labor costs and finances, and at the same time provide your loved ones with beautiful bouquets and handmade products for a long time.
Crepe paper flowers: photo


Paper flowers are not only pleasant to see, but also to make with your own hands. In addition, they have a couple of advantages over their natural counterparts - they are much more affordable and durable. By the way, having learned how to make flowers with your own hands, you will never be at a loss if you suddenly need:
- Wrap gifts;
- Decorate the house for the holiday;
- Festive;
- Make props for a photo shoot;
- Make gifts for loved ones, friends, colleagues or the child’s teachers/caregivers;
- ...or just update the interior.
From this material you will learn how to make flowers with your own hands from corrugated, colored or tissue paper (tish). You will find 4 step-by-step master classes with pictures and templates, as well as a selection of 70 beautiful photos and useful videos.
Application ideas
Later we will tell you about techniques for making flowers from paper, but first we suggest you be inspired by photo examples of their use.
- Bouquets of paper flowers can not only be placed in vases, but also “planted” in cute flowerpots. To do this, they must first be stuck into a base of polystyrene foam or floral foam. Next, the base should be decorated with dry moss or small pebbles.
- Paper flowers in vases, pots or just buds without stems will decorate March 8, Easter, Valentine's Day or a wedding.

Paper flowers in silence


- How to design napkins for a festive table setting? Simply place small flowers on top or arrange them into rings with colorful buds.


- And here is another attribute for a festive table decoration - holders for guest cards.

- You can decorate your house for a holiday or just like that with garlands or cascades of flowers.


To make such a garland of flowers with your own hands, use ribbon petal blanks (see MK No. 1 below, step 3) and skip the steps of making the stem and pistil
- Take a sheet of cardboard or canvas on a stretcher, glue the buds to it and frame it. Voila, the panel is ready! You can hang it on the wall or give it to a friend.


- You can order a beautiful photo zone from the masters, or you can set aside a couple of days and make it yourself, saving a lot. The second master class provides instructions on how to make large flowers with your own hands.


Photo zone with flowers for a child's birthday
- Large paper flowers can also be made for a photo shoot.

- Crepe paper flowers make luxurious wreaths. They can be used as an attribute for a themed party and also for a photo shoot.

- Even the simplest gift packaging will become elegant if you decorate it with homemade paper buds (see master class No. 1 and No. 4). In this selection of photo examples you can get a couple of original ideas.

Master class No. 1 - Flowers made of corrugated paper (basic instructions)
DIY flowers made from corrugated paper can look surprisingly lifelike. Although at some stages of their manufacture you will have to tinker a little, even a beginner can cope with the craft the very first time.
This selection of photos shows examples of paper flowers that you can make yourself by following our step-by-step master class.

For work you will need:
- Corrugated paper of the desired shade (for buds);
- Green crepe paper (for stems, leaves, sepals) and/or crepe paper tape;
- Floral wire (wire wrapped in green, sold in craft stores, on Aliexpress) or wooden skewer/wire/newspaper tube/knitting needle;
- Scissors;
- Glue (hot glue gun is best);
- Pencil.
Master Class
Although almost any flowers can be made from corrugated (creped) paper - from roses to tulips - the principle of their manufacture is approximately the same. The main difficulty is to make the right petals: give them the desired shape, volume, size, choose the color of the paper, guess the quantity.
- By following our master class, you will master the basic skills of making flowers from corrugated paper and will be able to make roses, peonies, tulips, lilies, daisies, chrysanthemums and dahlias.
Step 1. So first we need to make the stem. If you use floral wire, then simply cut it to the required length: a stem about 30 cm long is suitable for making a bouquet, and for, say, a boutonniere, 15 cm is enough.
- If you don’t have special wire, it doesn’t matter. An excellent stem can be made from a wooden skewer, any flexible wire or newspaper rolled into a thin tube using a knitting needle/skewer. At the last stage, your improvised stem needs to be wrapped in green corrugated paper (we'll talk about this below).
Step 2. Since the pistils and stamens of all flowers are different, and sometimes there are none at all, there are many techniques for making the “cores” of artificial flowers.
- To make a chamomile or daisy, you will need the core of a bud in the form of a yellow button. Poke a ball of cotton wool onto the stem, then wrap it in a couple of yellow squares cut from corrugated paper, wrap the base of the “button” with green corrugated tape and finally secure the tape with glue.
- To make a rose core, you need to cut out a 9x9 cm square from colored corrugated paper, fold it into a triangle, then connect the two corners of the triangle to its vertex. Next, wrap the resulting torch-shaped blank to the top of the stem with green corrugated tape and secure it with glue.
The following photo illustrates blanks for making cores of different colors.

- Do you want to give a bouquet of flowers as a sweet gift (see photo below)? Use candy for the center! To do this, simply plant it on the top of the stem and secure it with tape/paper tape.

Step 3. Let's start making petals and forming a bud. This stage is the most important, so it should be given more attention. Depending on what kind of flower you want to make, choose one of two working methods.
Single petal method (suitable for roses, peonies, lilies and other flowers with a small number of petals)
As the name suggests, the method involves forming a bud one by one, petal by petal.
- The first step is to draw and cut out a template of the desired shape and size (see templates below).
- Then the corrugated paper is folded several times, a template is applied to it, the outline of the template is outlined with a pencil, and then cut out with scissors. As a result, you will end up with several blanks at once. Repeat the procedure several times to get the desired number of petals.

These templates will help you navigate the sizes, shapes and number of petals. Keep in mind that the length of rose, peony and tulip petals should be approximately 9-11 cm, and lily - 13.5-15.5 cm
- Next, all the petals need to be given volume and bend: stretch a little and bend inward/outward, if necessary, wrap the ends with a toothpick/skewer (for example, for a rose). To understand exactly what shape the petals need to be given, just look at a photo of a real flower and experiment a little.

Corrugated paper easily stretches, curls and takes the desired shape

To make a peony, you will need to make 35 petals and a stem with a button. How to make petals: based on the photo, cut out the petals of the desired shape, then stretch them slightly and bend them inward, gather the base of the petals a little. The central petals need to be glued lower, and the rest – higher. When the flower is ready, slightly tuck the tips of the petals inward

To make a rose, use 5 small and 7 large petals (see template above). Round the petals just below the middle, and twist the upper edges onto a skewer/toothpick outward. Attach the small petals to the core first, and then the larger ones.

To make a lily, use 5 petals (see template above) and a pistil with stamens from red and white corrugated paper. Fold the petals in half lengthwise to form pleats, then unfold them. Give the petals a bend by turning them outward at their widest point.

Tulips made from corrugated paper are the easiest to make. You only need six petals, they need to be slightly rounded and the ends pleated
- When all the petals are ready, start gluing them one by one to the stem, and then on top of each other, keeping a checkerboard pattern. A hot glue gun is best for this purpose. If there are not too many petals, then instead of glue you can use the same green corrugated paper tape (see photo).

Tape method (suitable for daisies, daisies, carnations and other “layered” flowers)
The difference between this technique is that the petals are cut out not individually, but from a strip of corrugated paper, when the workpiece becomes like a fringe. In this case, the petals acquire volume and bending (sometimes several layers at a time) only after the fringe is attached to the stem.
- Cut a strip of corrugated paper to the desired length and width, then fold it in several layers and cut out the petals of the desired shape (see template below).


- Wrap the resulting fringe tightly around the pestle and secure it with green corrugated tape, tape or glue. If there are too many layers, then to prevent the bud from slipping out of your hands, the fringe should be cut into several parts.


The central petals of the chrysanthemum need to be wound around the pistil quite tightly, the rest - looser and slightly higher

The carnation is made from three stripes (see template). The first strip just needs to be tightly gathered into a bundle and secured with tape/tape. The second and third strips need to be wrapped around it, holding and aligning the lower part of the bud. Next, the bud is fixed with corrugated tape or glue. Finally, pull the petals outward to give the carnation a rounded shape.

To make a dahlia, start winding the blank just below the pistil, but then wind the petals, rising higher and higher. Shape the petals into a round shape, curl the tips inwards slightly and finally pinch the tip of each petal to form a fold.
- Give the petals a bend if necessary.

- Now that the flower is almost ready, it needs to be supplemented with sepals and leaves on the stem. To do this, you need to cut out leaf blanks in the appropriate quantity, shape and size (refer to the photo or templates) and simply glue them in the right places.

- The sepals are glued under the bud, then they are given a bend and volume.
- To make leaves for some types of flowers, such as tulips or lilies, you just need to cut out the blanks and glue them to the stem. However, some flowers have leaves with stalks and they need to be done a little differently. Cut out the leaves (with a small margin for attaching), then glue them to a small piece of wire, wrap the wire in green paper, then glue the cutting to the stem. If desired, paper leaves can be replaced with artificial ones.

- Hurray, your corrugated paper flower is almost ready! All that remains is to wrap the entire stem with a strip/ribbon of green corrugation, starting with the sepals and simultaneously wrapping around the place where the leaves are attached. At the beginning and at the end of the stem, the winding must be fixed with glue.
- To make your handmade flowers even more realistic and last longer, cover them with melted beeswax and let them dry.

The following video tutorial will help you better understand how to make flowers from corrugated paper with your own hands.
Master class No. 2 - Large rose made of corrugated paper
Large hand-made flowers are good for decorating photo zones, ceilings and walls at special occasions (for example, at a wedding or birthday). They can also become spectacular props for a photo shoot.

For work you will need:
- A roll of corrugated paper of the desired color 50×200 cm (1 roll/1 flower);
- A roll of green corrugated paper (for the stem and sepals);
- A4 paper (you can use office paper);
- Hot glue gun;
- Scissors.
How to make large paper flowers:
Step 1. First we will make the stem. Take a sheet of white A4 paper, place a pencil on the corner, then roll the paper into a tube.

Step 2: Unroll the crepe paper roll completely. First fold it in half, then double it again, then fold it again... is it a rectangle? Now fold it in half to make a square measuring approximately 25x25cm.

Step 3. Cut the folded paper into a square at all folds using scissors. You will get two identical stacks of square sheets, from which we will then cut out the petals.

Step. 4. Fold each stack in half. From the first rectangular stack, cut out a half-heart shape, as shown in the diagram below. From the second stack, cut the same shape, but smaller.

Unfold the stacks to make petals like this.

Step 5. Twist the ends of the petal with a pencil or pen, and stretch the petal itself a little and bend it inward.

Step 6. Give the petal an even more rounded shape by making two folds at its bottom and securing them with hot glue.

Step 7. Let's start forming the bud. Roll one of the small petals around the stem quite tightly.

Step 8: Start gluing on the remaining small petals, following a staggered pattern. When the small petals run out, continue to grow the bud with larger petals. In total, your rose will “overgrow” 15 petals (+1 petal in the center of the bud).

Step 9. Fold a square sheet of green corrugated paper (25x25 cm) diagonally to form a triangle, then fold the triangle in half 2 more times. From the resulting multi-layered triangle, starting from the fold line (!), cut out the shape as in the picture below. When you straighten the cut out piece, you will get a quatrefoil.

Step 10. Make a small cross-shaped cut in the center of the quatrefoil (see picture above), through the resulting hole, put it on the stem up to the bud, then glue the leaves with hot glue.

Step 11. Hurray, our big rose is almost ready. All that remains is to wrap the stem in green paper. To do this, you need to roll it into a roll, then cut off an approximately 2-centimeter wide piece from the edge (that is, the same as if you cut a piece from a roll). Now unravel the resulting tape and wrap it around the stem, securing the upper and lower ends with glue.


From the following video you will learn how to make large flowers from paper with your own hands.
Master class No. 3 - Hyacinths made of colored paper (suitable for children's creativity)
These hyacinths look like they were made by a quilling expert. In fact, even a child can make such paper flowers with his own hands! Making the first hyacinth will take some time, but you will spend no more than 5 minutes on each subsequent flower.

To make such a bouquet of flowers with your own hands, you will need a little more than half an hour.
To make paper flowers you will need:
- Colored paper or not too thick cardboard (for buds);
- Green paper (for stems);
- Scissors;
- Ruler;
- Pencil;
- Glue stick;
- Knitting needle or wooden skewer.
Master Class
Step 1. Cut a strip of approximately 21 x 2.5 cm. If you are using A4 colored paper/cardboard, then you just need to cut the sheet crosswise.

Step 2. Stepping back 1 cm from the top edge, draw a line along the strip with a pencil using a ruler. Next, using scissors, cut your workpiece into strips approximately 5-7 mm wide, not reaching the previously drawn line. You will end up with something like a fringed ribbon. Try to cut the paper into even strips parallel to each other, but don’t worry about mistakes, because they won’t be noticeable when folded.

Step 3. Using a knitting needle or wooden skewer, carefully roll each strip into a log until it stops. Make sure the pencil line is on the back of the paper.


Step 4. Now let's work on the stem. From green paper (cardboard will not work!), cut out a strip 21x2.5 cm.

- By the way, if you want to save time, just use green straws as stems.
Step 5. Twist one corner of your strip diagonally, then lightly go over the entire strip with a glue stick (see photo) and finally roll the entire strip into a thin tube.

When you're finished it will look something like this:

Step 6. Now it's time to roll the bud and glue it to the stem. To do this, take the bud blank (a strip with curls) again and lubricate its base from the wrong side with glue.

Step 7. Hurray, your first paper flower is almost ready, all that remains is to add leaves to the stem. To do this, cut out a piece of green paper about 2.5 x 8 cm and fold it lengthwise into an accordion about 1 cm wide.

Assemble the accordion and, stepping back about 1.5 cm from the bottom edge, give it a leaf shape using scissors.

When unfolded, your workpiece should have 3-4 leaves and look something like the photo.

Step 8. Apply glue to the bottom of the leaves and place its corner about 5 cm below the bud and at an angle, as shown in the photo below. Next, wrap the workpiece tightly around the stem.


Well, that's all, the hyacinth is ready! Repeat the process using different shades of paper to make a paper flower bouquet.


DIY paper flower bouquet
Master class No. 4 - Paper roses (express method)
This master class will come in handy when you need to make flowers with your own hands super-quickly, easily, on a budget and in large quantities.

For work you will need:
- Any pretty paper (even book pages will do);
- Green paper for leaves;
- Glue (thermal glue is best);
- Scissors;
- Pencil.
- Wooden skewers (needed if you want to make a bouquet).
How to make paper roses:
Step 1. Cut out a square piece of paper approximately 12x12cm.
Step 2: Draw a circle on your square and then draw a spiral inside it. It doesn’t have to be perfect for the roses to have texture. If you wish, you can make it completely wavy, then the rose will have pronounced petals.
Step 3: Cut out your circle, then cut along the spiral line. As a result, you will get something like a spring.

Step 4: Take the outer end of your “spring”, roll it into a log (loosely), then begin to twist the entire ribbon around it. Hold the flower from below to prevent the paper from unraveling.
Step 5. When you reach the base (the inside of the blank), glue the bud to it with enough glue. Voila, the first flower is ready!
Step 6. If desired, the rose can be supplemented with leaves. They are cut out into any shape and glued.
Step 7. If you want to make a bouquet, then glue the buds onto skewers or a newspaper/paper tube. It is advisable to wrap the stems in green paper tape.

Here are a few more ideas for making flowers with your own hands, which you can implement with the help of our master class.

Wedding garland of flowers made of colored paper and book pages


adding...
Rating: 4.2/ 5 (58 votes cast)
Want to do something creative and wonderful with your child? Try making your own crepe paper crafts! Crepe paper is so bright and unusual that your child will definitely love it. This is crinkled paper that stretches well and has increased absorbency. Crepe paper is also called crepe paper. Today, a huge amount of crepe paper is produced in different colors.
 By making crafts from crepe paper, the child will develop fine motor skills, motor coordination and imagination, and will receive aesthetic pleasure from creating beauty. Girls will especially enjoy this activity, because crafts made from crepe paper can be flowers, and most importantly, dresses and outfits for dolls. And the bright color of the crepe paper will only highlight the beauty of the outfit.
let's consider how to make a craft from crepe paper– a rose, even a whole bouquet of roses.


Take cotton swabs, wrap one end with paper, and cut out petals and leaves. First we need small single petals, and then larger ones. To make the petals look beautiful and natural, grab the ends with your fingers and stretch. We secure the petals with thread, adding to the required amount. In total, you will need, depending on the size of the rose, from 15 to 25 petals. After we have a rose, add more green leaves to it. Make several roses and create a bouquet or composition with them.


Another master class on creating a flower ball, crafts from crepe paper. Take a cardboard jar, such as a potato chip jar, and line it with crepe paper. Next, roll a ball out of regular toilet paper and glue it to the jar.


Cut out 5 yellow and one lilac flowers from crepe paper. Next, using the trimming technique, insert the pencil into the center of the flower and twist it around.


Glue the flower to the ball and repeat the procedure with the remaining ones. We glue the lilac flower last, ending it with the sharpened side of the pencil.


We continue this way until the entire ball is covered with flowers.


There are just so many compositions you can make! Give free rein to your imagination and you will come up with many wonderful crafts made from crepe paper.
And for dessert, for inspiration, look at what crafts people make from crepe paper. Photo + video.


Corrugated paper flowers are typically used to decorate gifts. But if you decorate a photo frame, wall clock with them, make a panel or an elegant one, then they will decorate the interior and bring lightness to it. Before you learn how to create flowers from corrugated paper with your own hands, you need to understand what material is suitable for this and what else is needed to make the craft look like a real plant.
Getting to know the material
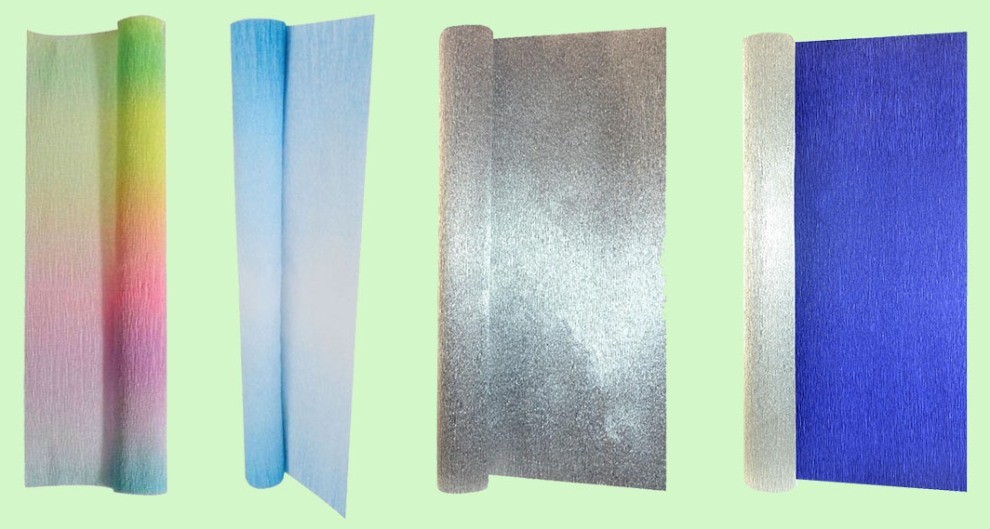
Corrugated paper is also called crepe or crepe paper. The only difference is that gaufrer is a French name, and crepe is an English name. In Russian there is also an analogue - reaper, pressed paper. There are several options for corrugated paper on sale, but the main classification is divided according to the density of the sheets:
Paper for creativity and gift wrapping: density 30–50 g, small folds, the height of which is not regulated. It is not suitable for floristry because it does not stretch well, tears and gets wet from the glue.

Floral paper is used for packaging flowers and sweet designs. Its density is in the range of 120–180 g. Deep folds provide the necessary amount of stretch to create realistic colors.

Corrugated cardboard has a high density and is only suitable for making gift boxes.

Please note that the craft paper label says “fine crepe” on the packaging. The floral paper is marked with the inscription “crepe extra”, and the sheets themselves have transverse textured stripes.

Folds on floral paper are called flutes, which are divided into three types:
- E-flute up to 1.6 mm high – for making small flowers;
- B-flute up to 3.2 mm high – for life-size paper flowers;
- A-flute up to 4.8 mm high – for packaging.
The color palette includes not only plain paper, but also metallized double-sided paper, with gradient and rainbow colors.
We will also need auxiliary materials for creativity:
- Type tape, which is used as colored tape to decorate the base of the flower and stem;
- Scissors and stationery knife;
- PVA glue (thick), heat gun;
- Threads for attaching petals, sheets;
- Floral and regular wire;
- Wooden sticks for stems;
- Styrofoam balls or candies for the center of the flower.
And also: ribbons, frames, baskets, vases and even cups and saucers - the decor is limited only by the imagination of the master.
Basic techniques and secrets of creating flowers from corrugated paper
Master florists have come up with hundreds of ways to make flowers from corrugated paper with their own hands. However, there are basic techniques that, by combining and transforming, can achieve almost perfect resemblance to the original.
Stem
Please note that the stem for any type of flower is created according to the same principle:
- The base is floral wire, a wooden stick or a paper tube.
- You need to attach the stem to the head of the flower at the initial stage (it is threaded through the layers of paper that form the petals) or the flower is collected directly on the stem.
- The stem can be decorated either with a thin strip of corrugated paper with glue or green tape.
- To make it look more like a real branch, you need to cut out the leaves and attach them to the stem, masking the junction with tape.
How to easily roll a thin paper tube is explained in this video:
Stamens

Use a ready-made strip of corrugated paper in two or more colors, or you can cut it out from a sheet yourself. The layers are ground down.
Gathering should be done immediately - then you will not be able to pull out the thread without damaging the paper.
Then the workpiece is wound in a spiral around a rod or attached to a surface, and the collected waves create volume.
They are also made for this ball by twisting.

But in this case, a strip of corrugated paper is folded in half and then rolled into a roll. To prevent the flower from falling apart during assembly, it must be glued as the roll increases. Finally, use your fingers to carefully straighten the curls, forming an open rose. The base is a foam ball onto which the roses are glued.
Flowers made from corrugated paper using a similar technique are shown in a master class on creating a rose with an original curled edge:
This technique is popular for making chrysanthemums, daisies, daisies, carnations and other flowers with many small petals. The base is a long strip with cut fringe or cut rounded petals. For example, this charming rose.

Flowers from individual petals
These delicate flowers are made without a base, by joining individual petals cut out according to a template.
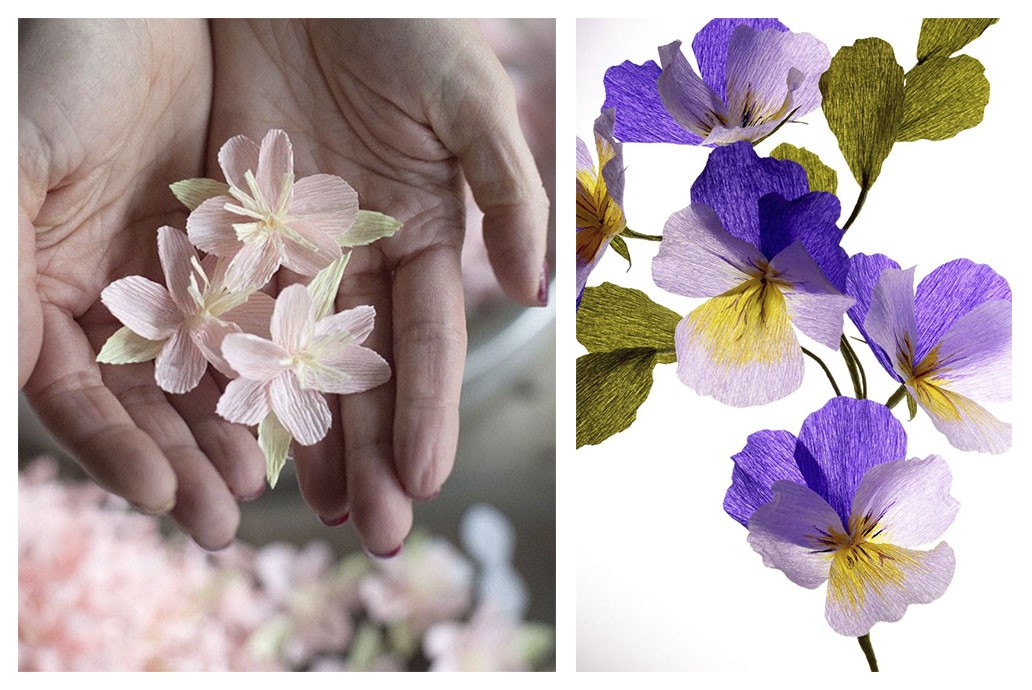
For sakura flowers you will need:
- three long rectangular strips with rounded edges for petals,
- one long rectangular strip with pointed edges for leaves,
- for the core, a short strip with transverse cuts.
The petal and leaf blanks should be folded in half, mark the center and straighten the edges, forming a bend. Assembly is carried out using glue by simply connecting the blanks one on top of the other, and a twisted core is attached to the center of the resulting flower.
Blanks for pansies are cut out of multi-colored paper; if desired, the middle can be tinted and veins drawn. The assembly of the flower is carried out by connecting the petals to each other also with glue or thread. Floral wire would be appropriate here as a stem.
This chamomile is collected using a similar technology, but to make a bouquet, a stick is used as a base.
To make this tulip as similar as possible to the real one, it was necessary to create a core using a special technology.

Flowers on a fixed basis
There are many varieties of flowers that are made using this technique: chamomile, but the most common is the English rose.

The peculiarity is that the petals are wound onto a base - a foam or paper ball, which can be replaced with a small round candy.
MASTER CLASS ON THE TOPIC
It is precisely on this principle that this
1. Cut strips of corrugated paper approximately 6 cm wide and 10 cm long. Colors can be combined at your discretion: a delicate milky core and rich yellow, orange or red outer petals.
2. Fold the blanks like an accordion along the width of the petal, rounding the edges.

3. Using your fingers, slightly straighten the corrugations, forming a wavy edge, then use toothpicks to wrap the petals, giving a natural shape.

4. The petal blank should be stretched, giving it a semicircular shape - this will facilitate the formation of the flower.
5. We wrap the base of the flower in a rectangular strip without cuts, pulling the corrugations so that the paper tightly envelops the ball or candy. We fix it with a drop of glue and tighten the bottom with thread.
6. We lay all subsequent petals overlapping in a circle, tightening them with thread. At the end of the work, we decorate the assembly site with a sepal of green or any other color in accordance with the intended composition.

Advice. If you want to make a bouquet on stems, then sticks should be glued with hot glue to the base of the flower - a ball or candy - before the flower begins to form.
Here is a slightly simplified, but no less spectacular version of this flower.

Master Svetlana Bormotova proposed a simple technique that turns an ordinary rose into an exquisite flower:

This decorative artichoke is also created on a fixed base. An incredibly beautiful decorative element!

You may not immediately guess that there is a candy hidden in the graceful daffodil - you will definitely be sorry to disturb such grace:

Original compositions and examples of decor creation
Traditional decoration - bouquets in a vase. You can collect a bouquet of daisies, roses, tulips, and for experienced florists it will not be difficult to create a gladiolus branch:
If you love indoor flowers, but don’t have time to grow them, then a corrugated paper orchid flower is just what you need. This is difficult work that requires certain skills, but the result is worth it.
You can decorate a room not only with bouquets of paper flowers. For example, for indoor wedding ceremonies, you can create a photo zone using paper flowers. They are attached to a perforated wall using a wire bent into a hook.

Using the techniques described, you can create a topiary. The base is a foam ball, which is covered with corrugated paper petals.

This “cool magazine” harmoniously combines the warmth of the created bouquet and the sweet filling of the box. This gift will definitely be remembered for a long time!

Your guests will immediately pay attention to the decorations decorating the interior, but will not immediately understand how this cup does not fall...

With a little patience and effort, you will create elegant decorations for your room, make a celebration unforgettable, or just give your loved ones an unconventionally decorated simple gift.
Master classes from the unique master Lia Griffith
Lia Griffith makes incredibly beautiful flowers from crepe paper! Her step-by-step master classes are accessible and understandable, despite the fact that they are presented in English.


Inspiration and beautiful flowers!
Categories