Pressing mechanism of plastic windows from the hinge side. How to adjust plastic windows
A plastic window, even the highest quality and correctly installed, requires periodic maintenance. It can last for several years without any problems, but over time it may feel friction when opening or closing. The second problem is that there is air blowing from under the seal, and the third is that the handle turns with force. All these breakdowns are not complicated and can be easily fixed, and it is not at all necessary to call a specialist: adjusting plastic windows yourself is a matter of minutes. All you need to do is tighten or loosen a few screws. The main thing is to know where and how. More on this in photo and video format.
Winter and summer mode
Most often, plastic windows need to be adjusted for the new season: in winter, complete tightness is desirable, and in summer, you can let in a little fresh air. This is achieved by adjusting the sash pressure density. It's easy to do it yourself. Once you figure it out, you’ll be surprised how simple everything is...
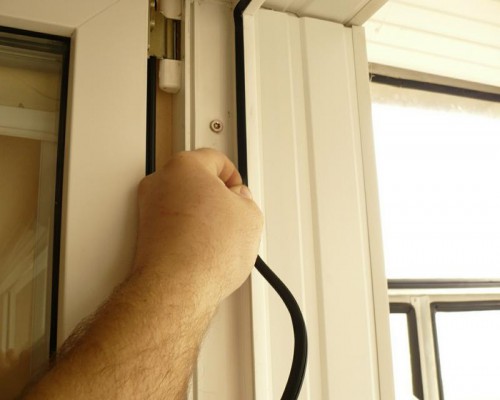
The window sash is pressed to the frame using pins. These are movable metal protrusions on the side surface of the sash. When the handle is turned, they move behind the mating metal plates mounted on the frame. In order to be able to adjust the tightness of the fit of the sash and frame, they have an eccentric - either they themselves are made of an oval shape, or in the center of the round protrusion there is an adjustment with an offset center. By changing the position of the trunnions (see photo), you change the degree of pressure, that is, eliminate the draft from under the sash.

As you can see, the shapes of the locking protrusions can be different. Various tools can be used to adjust them. If your window has eccentrics like those in the picture on the left - oval-shaped protrusions - change their position using pliers: clamp it and turn it in the desired direction.
If the locking tab is round, as in the picture on the left, it can be slotted for a screwdriver or hex key. After examining them, you will easily understand which tool you need: a regular screwdriver or a No. 4 hexagon. Insert a key or screwdriver into the slot and also turn it to the desired position.
Place all the protrusions in the same position. Please note that they are not only on one side of the sash - the outer one, but also on the inner side (at least one, but there is one), and can also be at the top and bottom. Set all the existing locking lugs in the same position, otherwise the frame will warp and there will be blowing from under it.

When adjusting the fittings of plastic windows, remember that weak pressure corresponds to the summer mode of closing plastic windows, standard or strong pressure corresponds to the winter mode. If you carry out maintenance work in winter, first set it to the standard position and check if there is airflow. It is not recommended to immediately pinch the rubber bands on new PVC windows. In this position, the rubber seal installed around the perimeter is strongly pressed. Because of this, over time it loses elasticity. A normal seal has a 15-year warranty, but still... If the pressure is immediately set to maximum, the rubber will deteriorate faster. As a result, once again setting the winter position on the plastic windows, you will find that it is still blowing from under the sash, and the rubber is all cracked. This means it's time to change the seal. This is also not very difficult, but it takes more time, and you still need to buy tires.
So: the winter and summer positions of plastic windows are set by changing the position of the locking lugs - trunnions. Everything is explained in detail in the video below. After viewing, adjusting plastic windows yourself will finally cease to be a problem.
How to adjust a window so it doesn't blow
Sometimes, plastic windows, even after moving the trunnions to the position of strong pressure, are not airtight - there is a blow from under the sash and replacing the rubber does not help. This usually happens when the house shrinks. In this case, they say that the window sags. When this happens, contact between the locking lug and the strike plate is lost. When you turn the handle, the protrusion-trunnion should go behind the plate, pressing the sash. If this does not happen and drafts occur, the heat is blown out of the room.

Where are the trunnions (pressing lugs) usually located?
When a plastic window sag, the adjustment is different: you need to move the sash so that those protrusions that do not reach the plates catch on them.
First you need to decide which of the trunnions do not reach the locking plates. This is done mechanically. First, inspect the sash, remember where the protrusions are. Close the window. Grasp the sash frame where the trunnions are installed and pull it towards you.

If there is contact, the frame remains motionless, if not, it moves. So you check in which places there is no contact and determine in which direction the sash needs to be moved. This is done by adjusting the lower and upper loops.
Bottom Hinge Adjustment
If the PVC window somewhere below does not close, we will move the sash using the lower hinge. There are two adjustments: one in the horizontal plane - moves closer to the hinge or further from it, and the second - in the vertical - raises or lowers the sash a couple of millimeters.
To move the lower part of the sash closer or further to the hinge, it is opened. At the bottom of the sang there is an adjustment hole for a hex key (sometimes for an asterisk).

A hexagon is inserted into it, turning it clockwise brings the lower corner closer to the loop, and turning it counterclockwise moves it away. Move the sash a little and try to close/open it. Once the result is achieved, stop. If the resource is turned all the way, but there is no result, return everything to its original position: this is the wrong adjustment.
This screw can be used to correct the situation if, when closing the window, the sash touches the frame at the bottom. By bringing it a little closer to the loop, you will eliminate this problem.
There is a second adjustment screw on the bottom hinge. To get to it, you need to place the sash for ventilation and remove the decorative trim. It can be easily removed, you just need to pull the bottom edge towards you a little (1-2 mm) and pull it up. After removing the protective cap, you will see a recess in the upper part. A 4 mm hexagon is inserted into it. Turning it clockwise raises the sash slightly, turning it counterclockwise lowers it.

We talk in detail about how to remove the decorative cover on the hinge, how and how to adjust the bottom hinge on a PVC window in the following video.
Adjusting the top hinge
If the top corner of a plastic window does not close, you need to move it. To do this, open the window at least 90°. You can do less, but it will be inconvenient to work. There is a hinge at the top of the sash. It differs in design from the bottom one, but it also has a hole for a hexagon.

The adjustment screw is on the side. By rotating it, we move the sash further from the hinge (if the trunnions farthest from the hinge do not close) or closer to the hinge. One thing - there must be a gap of several millimeters between the sash and the hinge: it is necessary for the tilt and turn mechanism to fit there. Therefore, turn the key half a turn and check how the window opens/closes.
Sometimes this adjustment does not help. Then it is required press the top corner against the frame. There is another screw for this - on the tilt and turn mechanism. To have access to this screw, you will have to open the window in two positions at once. To do this, open the sash and press the lock. It usually comes in two designs - in the form of a locking loop or a tongue (see photo below).

The blocker is retracted all the way, holding it, the handle is turned for ventilation, the upper edge of the sash is pulled slightly towards you, and the rotating mechanism is opened. A device that holds the sash open. On one of the plates there is a protrusion for the same hex key. By turning it, you can adjust the tightness of the upper corner of the sash. It is necessary if the upper corner of the plastic window does not close.

You can watch the video again to see how to adjust plastic windows yourself. Explanations to the point, accessible and without unnecessary words.
The plastic window does not close
Sometimes the geometry of the window opening changes so much that even moving the sash to the maximum, we do not get the desired result: the plastic window does not close. What to do in this case? If there is an adjustment on the mating part, as in options a and b in the photo, try to get by with a little damage - tighten it further here. The principle is the same: insert the hex key and rotate it clockwise, pushing it to the maximum.
If a few millimeters are missing not in depth, but sideways, then will have to be installed under the mating part of the lining. They are cut from a piece of white plastic. The maximum thickness is 3-4 mm. First, unscrew the screws and remove the stops. Two gaskets are cut out: one is installed from below, the second from the side. As a result, the stop moves 3 mm deeper into the sash.

They are first installed on the desired place of the lining, on them there is a stop, which is screwed with a self-tapping screw. Protruding pieces of plastic are cut off with a sharp knife. Check whether the window closes or not.
If this does not help, there is another way: move the sash frame. It is quite flexible and can be moved about 5mm. The procedure is as follows:

If you look closely, you can see that the frame is slightly curved. The main thing is that the window now closes. In 99% of cases this is enough. If you are unlucky and all these tricks do not produce results, you need to remove the slopes and also bend the frame.
You can watch all the steps described above in the video.
Adjusting and replacing handles
A fairly common problem: the handle is difficult to turn. If the problem is not eliminated in time, due to excessive efforts, it breaks, leaving a short stump with which you definitely can’t do anything.
First, how to make the handle close again easily. The locking mechanisms must first be cleaned and lubricated. First, accumulated dust and dirt are removed, wiped dry, then all moving parts are lubricated. You need to use pure oils, without alkalis and acids. The best option is machine oil, you can use any analogue or modern product from a spray can.

Having lubricated all the rubbing and moving parts, open/close the sash several times and turn it on its hinges. Everything should move smoothly, without jerking.
If there are still problems, most likely during the process of adjustments or changes in the geometry of the window, the blocker has shifted. It should fit easily into the mating part and press tightly against the frame. Then the handle turns easily. Move the sash and try again.
Now about how to change the handle. The fastener on which it is held is hidden under a decorative overlay. If you look closely, you will see that there is a thin lid. You grab it with your fingers or pry it with your nails, pull it slightly toward you and turn it to one side. Two bolts open. They are unscrewed, the handle is removed, and a new one is put in its place.

We looked at the most common problems and how to fix them. Now not only is adjusting plastic windows not a problem for you, you can also do minor repairs yourself. You can also carry out maintenance yourself (lubrication once a year).
High-quality plastic windows from a trusted manufacturer, installed in compliance with all the subtleties of technology by good craftsmen, can last for many years without causing any trouble to the owners. But suddenly it began to blow from somewhere, the handle broke, the seal cracked, or the handle simply jammed. In such situations, plastic window repairs are needed. Don’t panic and immediately look for a repairman; many breakdowns can be fixed on your own in just a few minutes.
Do-it-yourself adjustment of plastic windows
If the window sash suddenly becomes warped: it sags downwards or is positioned unevenly in the horizontal plane, adjusting its position will not be difficult. You must have a hex key set to “4”.
Adjusting the sash position “up and down”

The position of the sash in the vertical plane is adjusted by the lower hinge. To raise or lower the sash, open the window and remove the decorative trim from the bottom hinge. Then insert the hex key into the adjustment groove, which is located on top. Turn clockwise - the sash rises, counterclockwise - the sash lowers.
Adjusting the sash position “right - left”

The “right - left” position of the lower part of the sash is adjusted using the lower hinge. In the same way, remove the decorative trim and insert the key into the adjustment groove, which is located below. Turn clockwise - the sash moves to the left, counterclockwise - the sash moves to the right.

The “right - left” position of the upper part of the sash is regulated by an element located on the top of the sash itself. To have access to it, we open the sash wide, from above, on the side closest to the hinges, we see the slot in which the element is located. Using a hex key, turn it - the sash moves left or right.
Important! The position of the shutters can only be adjusted when they are open.
Adjusting the sash to press against the frame
Most often, plastic windows do not have vents, so the only way to freshen the air in the room in winter is to put the sash in the “ventilation” mode. For very severe frosts, the gap formed may be too large - all the heat will blow out through it. There is a need to reduce it, at least temporarily. Or another problem arises: there is a lot of blowing coming from under the seal. In this case, adjustment and repair of plastic windows may be necessary.

The pressure of the upper part of the sash to the frame is adjusted by a mechanism on the upper sash. To have access to it, we open the sash in two positions at once: “open” and “ventilation”. If the lock is activated, preventing you from opening two positions at once, press in its tab located on the handle mechanism. When the sash is open, we see scissors from above that support the sash. There is an adjusting element at the top or bottom of them; we turn it using a hexagon. The sash will be pulled closer to the frame. Then we return the sash to its original position.
Blowing from under the seal can be eliminated by pressing the sash against the frame. If this does not help, repair of plastic windows (PVC) will be required. The sash pressure can be adjusted using the locking mechanism. trunnions And strikers, which are used to open and close the window. When the handle is turned, the trunnions engage the strikers. Either one or the other can be adjusted depending on the fittings.

Trunnions are located on the sash and are round or oval elements. If they have a hexagonal groove, then they are controlled by a key, and if not, you need to use pliers. We rotate the trunnions so that they become closer to the seal. We repeat this procedure for all trunnions that are located around the perimeter of the sash. Make sure that the pressure is even.
Do-it-yourself plastic window repair
For new plastic windows, repairs and maintenance are covered under warranty only if the warranty is provided by the manufacturer or installer. The average warranty period is 2 years. If the breakdown occurs after this period, you will have to carry out paid repairs. Below is information that will allow you to save money and not call a plastic window repair specialist for trifles.
Installing a new handle and opening limiter
If the handle suddenly breaks, cracks or becomes loose, or you want to install an opening limiter or a new handle-lock so that a child cannot open the window, you do not have to contact special companies. It is enough to buy a new handle at a hardware store and replace the old one with a new one yourself.

Turn the decorative plate at the base of the handle 90°. We see two screws, top and bottom, that secure the handle. Unscrew them with a regular screwdriver and remove them. We remove the old handle. We install the new handle and fasten it with the same screws. If we want to install an opening limiter, then before installing the new handle, we install the ventilation control plate (“comb”) into the base of the handle. Then we put the handle on, screw it on and turn the plate back to cover the screws.
As you can see, everything is quite simple. If possible, it is better to do this work yourself, since the prices for such repairs of plastic windows are the same as for new handles. Those. the cost of a new handle = the cost of installing it. Why pay more?
The handle is stuck in the “open” position, the window sash does not close: disabling the lock
Don't be alarmed if the handle is stuck in the open position. Most likely, the blocker was activated. It is installed on most fittings for a good purpose - so as not to accidentally break the window. When the handle is turned to the tilt or tilt position, the lock is activated to prevent the handle from turning. But there are times when it works at the wrong time. Most often this happens if the handle is moved too quickly from one position to another. To disable the blocker, you need to determine the brand of the hardware.
Accessories "AUBI": The sash must be in a vertical position. If it’s a tilt-and-turn type, the lock on the top hinge will also prevent the handle from turning. In the area of the handle we find a metal plate with a spring. We press it against the seal with our fingers and turn the handle.

Fittings “Roto”, “GU”, “Winkhaus”, “Maco”: under the handle we find a metal tongue, it should stick out at an angle to the frame. We press on the tongue so that it is in a position parallel to the sash, and turn the handle.

If this does not work, you need to check whether the lock is in contact with the response mechanism on the frame. There are cases of thermal expansion, then the blocker can slip past. To eliminate this, open the window and find a counter element on the frame to which the blocker should cling. Then we unscrew the screws that secure it and place something between the frame and the counter element, for example, a plastic pad. This way we will ensure that the blocker on the sash engages with the counter element on the frame.
The handle turns with difficulty or does not turn completely: hardware repair
Problems with the handle may be caused by sagging sash or dried grease in the fittings. First, we look visually to see if there is sagging. If there is one, adjust the sash in a vertical position, as already described above. If you don’t notice anything like that, then it’s still a matter of lubrication. The fact is that the fittings system for a plastic window is very complex. Control, in fact, using only one handle is ensured by a large number of transmission mechanisms. Their high-quality work is guaranteed by cleanliness and good lubrication. Therefore, we buy either a universal penetrating lubricant or a special lubricant for plastic window fittings and lubricate all moving elements of the fittings. If the handle still doesn’t move well, then you should call a technician.
The sash opened simultaneously in swing and tilt modes

We don’t panic, it’s clear that the sash is heavy, but still... We switch it to the rotary mode, i.e. Place it vertically so that the top loop is pressed.

At the same time, the sash remains open. We move the handle to the horizontal position (“open”). If the blocker does not allow it, disable it, as already described above. Then close the sash and turn the handle down. To check, we slowly turn the knobs to different positions, it works - everything is fine.
Blowing from under the seal: pressing the sash to the frame
First of all, we try to cope on our own, pressing the sash more tightly to the frame. To do this, follow the clamping instructions as described above. We pay attention to the position of the trunnions and strikers, whether they correspond to each other.

Perhaps the trunnions do not extend beyond the mating parts. In this case, it is necessary to rearrange the slats: unscrew the screws securing them and rearrange them a little lower. If nothing helps, everything is still blowing, then the reason is different. Contact a specialist.
Blowing from the hinge side, arched the profile: installation of straightening plates

If it is blowing from the side of the hinges, you can press the sash in this place to the frame. There is a hole on the bottom loop, insert the nozzle into it and turn it.

On the top hinge, the tightening mechanism is located on the scissors, as it is adjusted as described above.
If the profile is bent in an arc, there may be several reasons for such an ailment. The first is poor-quality installation: the frame is stretched by anchors, and the middle clamp does not work. The second is that the straightening plates fell or were not installed at production (defective). They must be installed in the middle of the sash between the double-glazed window and the profile. If your windows are under warranty, do not carry out repairs yourself, contact the company, they are obliged to fix the defect free of charge. If the warranty period has long passed, then we install these plates ourselves. As a material, we use any available plastic, with a width no less than the thickness of the double-glazed window.

We take a metal spatula, place it in the joint between the bead and the profile, lightly hit it and disconnect the bead. Below we see straightening plates installed between the frame and the sash. We cover the metal part of the spatula with a plastic stand so as not to damage the glass unit. Use a spatula to move the glass unit back 3 - 5 mm. We install the plates and return the glass unit to its place.
Important! Plastic plates should not rest against the glass part of the glass unit, otherwise the glass may crack.
Old plastic windows: hardware repair
Over time, the window fittings become clogged with dust and dirt and cease to function normally. And there are cases that during repairs the windows are open, and the whitewash clogs all the transmission mechanisms - the new windows stop working. You will have to completely go through the fittings. You can order this work from professionals. Such repairs of plastic windows in Moscow will cost from 1,200 rubles. for one leaf. Or you can try to do it yourself.
Remove the sash from its hinges. Remove the decorative trims from the top and bottom hinges. We knock out the axle from the top loop: first we hit it from above, and then remove it from below using pliers. Someone else must support the sash at this time, since it is heavy. We remove the sash from the bottom hinge and place it on the table. Remove the handle (see above). Along the perimeter of the entire sash, unscrew all the screws securing the fittings. We take out the mechanism of their special groove. We place the fittings on a table covered with film. We wash the entire mechanism with a brush, dipping it into the rinsing bath.

After thorough washing, dry the mechanism with air. You can use a bicycle pump. We buy a special lubricant for plastic window fittings and lubricate all transmission elements and rubbing parts.
Carefully put the accessories back on. We fasten it with screws. Install the handle. Lubricate the hinges and hang the sash. If everything works well, we've just saved RUB 1,200.
Replacing the seal on plastic windows
The average service life of the seal is 5 - 10 years. If you can see with the naked eye that it is out of order and worn out, it’s time to replace it. First of all, we buy a new one. German will last 10 - 15 years. Turkish - 5 years. When purchasing, we check along the entire length to ensure there are no defects.
We take out the old seal and groove. Clean and rinse the groove thoroughly. Lubricate the groove with glue along the entire perimeter. We insert the seal into it slowly and carefully - we must not allow the cord to stretch or shrink.
Replacing double glazing in a plastic window
A broken double-glazed window is another nuisance. If you are not confident in your abilities, it is better to contact specialists. In any case, we will need to order a new double-glazed window.
We remove the old glass unit. Using a metal spatula and a rubber mallet, remove all the glazing beads. We insert the spatula into the joint between the frame and the glass unit, lightly hit it and remove the glazing beads. When all the glazing beads are removed, we take out the double-glazed window - together, it’s heavy. Carefully lay it on the floor. We measure all parameters: height, width, thickness. We inform the manufacturer of the dimensions and wait for new double-glazed windows.
We install straightening plates at the bottom - if the sash is blind, in the corners with an indentation of 10 cm - if the sash is opening. We insert a new double-glazed window. Let's make sure its geometry is correct. If necessary, add more straightening plates. Then we install the glazing beads. The new window is ready.
Important! Replacing a double-glazed window in a wooden window uses a different technology using more serious tools, so you should not try to do it yourself.
In this article, we examined only those breakdowns that you can try to fix yourself. If something more serious has happened, or you can’t do it yourself, contact special companies.
Repair of plastic windows: video instructions
When making your windows, after some time drafts will appear, or the sash will begin to cling to the frame when opened or will begin to close poorly. All this means that windows need to be adjusted. This procedure is also performed when transferring them to the winter or summer position. To adjust metal-plastic windows, you only need a hex key.
Adjusting window sashes.
In order to adjust the window sashes, you need to figure out where to move them. Take a simple pencil and trace the entire perimeter of the sash. Then open the window and measure the distance from the line to the profile edge, as shown in Figure 1. This size should be between 6 and 8 mm. A smaller distance can cause drafts, a larger distance will cause the sash to cling to the window frame.
Picture 1
Sash height adjustment.
Adjusting plastic windows in height is not difficult. To do this, use a wrench to rotate the adjusting screw at the top of the lower canopy. Rotating clockwise will raise the sash. Accordingly, on the contrary, in order to lower the sash a little, you should turn it counterclockwise. Figure 2.
 Figure 2
Adjustment of the upper part of the sash along the plane of the window.
This type of adjustment is carried out by rotating the adjustment screw on the upper canopy. In this case, the sash moves further from the hinge or closer. If you need to pull the sash closer, you should rotate it counterclockwise. And accordingly vice versa. Figure 3.
 Figure 3
 Adjustment of the lower part of the sash along the plane of the window.
This adjustment of plastic windows is identical to that described above, only now you should pay attention to the bottom hinge. Rotating clockwise will move the sash away from the canopy and vice versa. Rotating counterclockwise will pull the sash towards the hinge. Figure 4.
 Figure 4
Converting windows to winter and summer modes.
This type of adjustment is quite complex, so it is best to entrust it to specialists. But if for some reason it is not possible to invite a traffic controller, then you can do this work yourself.
The force with which the plastic window sash is pressed is adjusted with a 4 mm hex key. In the winter season, a stronger pressure is required; in the summer, you can loosen the force a little. This allows you to additionally ventilate the room and relieve internal stress in the sealing gum.
The adjustment is performed by rotating the eccentrics of the clamps, which are located around the perimeter of the sash. They have special sockets for hex keys. To switch the window to winter operating mode, the eccentrics are set so that the larger radius is on the side of the room in the closed position of the sash. In this case, the pressure will be stronger. Figure 5.
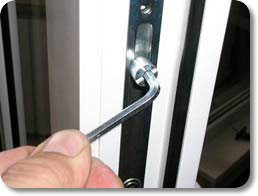 Figure 5
Switching a plastic window to summer mode is carried out in a similar way. Only the eccentrics should be installed in a position where the smaller radius faces the room when the sash is closed. In this position, the pressure is slightly weaker and a micro-ventilation effect occurs. Figure 5.
As you can see, there is nothing complicated in this procedure. Now it will become clear to everyone how to regulate plastic windows. But you should perform the work very carefully and remember each step so that, if necessary, you can return everything to its original position.
Today I want to talk about how adjust PVC windows. Here you will find both general adjustment instructions, as well as a description of the main problems and ways to eliminate them. I hope that this instruction will help you adjust the fittings of plastic windows yourself.
General information about adjusting plastic windows:
- Adjustment carried out with a 4 mm hex key (No. 4).
- Horizontal adjustment (↔) carried out using the lower and upper loops. For this purpose, there are hexagon holes in the hinges. To get to adjustments top hinge, the window needs to be opened.

By rotating the hexagon clockwise, the sash is attracted to the hinge - the bottom of the window opposite the hinge rises, respectively, rotating counterclockwise, the sash moves away from the hinge and the bottom of the window opposite the hinge is lowered.
Adjustment using the bottom hinge can be done both when the window is closed from the outside, and from the inside when the window is open. Adjustment occurs similarly to the top loop.


With these adjustments you can eliminate the bevel or move the frame, stroke adjustments±2 mm.
- Vertical adjustment (↓) occurs using the bottom loop to get to regulatory hexagon, you need to remove the lower hinge cap.


When rotated clockwise, the window rises, counterclockwise – it lowers. Move adjustments±2 mm.
- Adjusting the sash pressure carried out by eccentrics located around the entire perimeter of the window.

When the handle is turned, the eccentrics move behind special pressure pads located along the perimeter of the frame.

To press the window more tightly to the frame, you need to rotate the eccentric clockwise, to loosen it, counterclockwise.
There should be a mark on the eccentric, by which you can determine the degree of clamping; if it is directed towards the street, then the clamping is weakened, respectively, if the risk is towards the window seal, then the window is pressed harder against the frame.


There are eccentrics that are rotated with a wrench (pliers).
The pressure can also be carried out by plates that are located on the window sash.

On the hinge side there is also a clamping mechanism that regulated hexagon, the more the tongue located on the window sash is extended, the stronger the window is pressed against the frame and vice versa. To pull out the tongue, you need to rotate the hexagon counterclockwise (for a window whose hinges are located on the left, if the hinges are on the right, then you need to rotate it clockwise).


The clamp can be regulate depending on the time of year, in summer - weaken, in winter - strengthen. The stronger the pressure, the faster the seal will wear out. Move adjustments±0.8 mm.
- Adjusting the hinge pressure. Depending on the fittings you can regulate pressing only the top or both loops. For adjustments To press down on the bottom hinge, remove the cap and rotate the bolt located perpendicular to the plane of the window.
Adjustment The top hinge is pressed only on flaps. To get to adjustments you need to open the window and then turn the handle to ventilation mode. It is necessary to hold the window, because it will only be held on the bottom loop.

In this position, it will be possible to reach the hexagon, which is responsible for pressing the upper sash.

There may be a lock on your window that only allows the sash to be tilted in the closed position. They come in two types, in the form of a lever and a clip:


To tilt an open window, you need to press the lock and at the same time turn the handle to the ventilation mode.


The main problems that can be eliminated by adjusting PVC window fittings:
- The bottom of the sash touches the frame. This occurs due to sagging of the window sash and is eliminated by lifting it. This can be done: with a vertical regulator, or one of the horizontal ones.
- The middle part of the sash touches the frame. The problem may arise due to the horizontal (vertical) displacement of the sash. It can be eliminated by uniformly moving the sash in the desired direction using horizontal (vertical) regulators.
- Blowing from under the seal is eliminated sash pressure adjustment.
- Adjusting a loose handle. Rotate the plate at the base of the handle 90° and tighten the screws with a screwdriver.

Even high-quality PVC windows lose their functionality over time and require maintenance. Adjusting the pressure of plastic windows will avoid many problems. The process of adjusting the clamp is not complicated and, if desired, you can handle it yourself, the main thing is to know where and how to tighten or loosen the fastening.
The active use of metal-plastic windows has led to the need to introduce several useful functions into their design and thereby increase user comfort. The window can be opened completely, the sash can be tilted, or it can be set for micro-ventilation. Some designs also include adjustment of the door pressure density depending on the season. Using these necessary functions over time leads to loosening and warping of the sash, breakage of fittings and difficulties with opening/closing the window. When may technical intervention in a window structure be necessary:
- when closing, the sash catches the frame;
- loose fit of the sash to the frame and the appearance of a draft;
- distortion of the structure due to window subsidence;
- it is necessary to “switch” the window from winter to summer mode and vice versa.
In addition to temporary window wear, adjustment of the window sash pressure may be necessary due to poor installation. If the installation was carried out by specialists and the window is still under warranty, then it is better to call a specialist.
General principles for adjusting the pressure of plastic windows
Adjustment of sashes for plastic windows is possible in three directions: vertically, horizontally and from below. By performing simple manipulations, you can achieve the desired position of the door in the frame and achieve the optimal degree of pressing of the seals around the perimeter of the frame.
Depending on the manufacturer, the hidden elements of the fittings and its appearance may be different, but despite this, the general principle of adjustment is the same for all designs. It is important to adhere to certain rules in your work, otherwise you can only make things worse and the window will have to be replaced completely.
When setting a window to summer or winter mode, you need to rely on the type of pressing eccentrics (special elements responsible for the tightness of the sash closing). Trunnions (eccentrics) are set to one of three modes: weak, medium and strong. Depending on which one is chosen, the clamping force will depend. Weak - would be appropriate in the summer to ensure air circulation. Strong - will not allow cold air from the street to penetrate into the room in winter. In order to make it clear in which direction to direct the rotating element, most trunnions have a special mark - a marker. If it looks inside the room, it means the window is set for winter, if the mark is directed towards the street - summer.
Types of pressure adjustment for PVC windows
There are two options for adjusting windows - along the horizontal and vertical axis. Which one is appropriate depends on the nature of the problem. You can adjust only the top or bottom loop and everything will work stably. But there are also cases when you have to spend several hours balancing the window sash in the correct position. To make adjustments, you need to reach the top or bottom hinge. On them you will find special holes for hexagons.
Horizontal adjustment
On the horizontal side, the sash needs adjustment if the frame is beveled in height. Because of this, the window may not close or may not function as intended. This situation can be caused by shrinkage of the structure, improper use of the window, or loosening of the fittings.
The horizontal pressure is adjusted using the upper or lower loops. The process is carried out by moving closer to the loop or further from it. By making clockwise adjustments in the top hinge with the door open, you can strengthen the pressure and raise the bottom of the window. To achieve the opposite result, i.e., to lower the bottom of the sash and loosen the pressure, you need to perform counterclockwise manipulations.
The lower hinge is adjusted indoors when the window is open, and outside when it is closed. The steps are similar to those carried out with the top loop.
The process of horizontal adjustment at the bottom will allow you to change the position of the frame by 2 mm or eliminate the bevel, which caused the door to rub against the frame when closing.
Vertical adjustment
Adjusting the sash vertically allows you to raise or lower it by a couple of millimeters. Manipulations are performed in the lower hinged loop. To begin with, the decorative cap of the hinge opens, under which the hole for the hexagon is hidden. Calibrating clockwise will raise the sash, moving in the opposite direction will lower it.
Necessary tools for adjusting the pressure of plastic window hinges
To carry out adjustment work for pressing plastic windows, you need to have a set of tools on hand. Depending on the accessories you will need:
- set of hexagons;
- flat and Phillips screwdriver;
- pliers;
- a set of "stars".

With the help of these simple devices, it is possible to solve not only the pressing of window sashes, but also to adjust distortions and problems in the fittings.
Technology for adjusting the pressure of plastic windows
Adjusting the pressure of plastic windows is carried out for various reasons and is carried out in several directions. This adjustment can correct almost all problems related to the functionality of window units. The procedure technology is the same for any PVC structure. Differences can only be in the type of fittings.
Usually a specialist is invited to carry out the work, but if you stock up on some knowledge, you can solve the problem yourself. To determine whether adjustment is needed, you can hold a burning candle or match to the closed door. If there is a draft, the flame will fluctuate and you need to tighten the pressure.
How to understand where a hidden window clamp is needed? If you open the window, you can see three eccentrics at the end of the door. They serve as elements to strengthen or weaken the pressure. How they need to be controlled is detailed in the instructions from the manufacturer of plastic window structures.
Changing the pressure in the winter-summer direction is necessary a couple of times a year, when the season changes. In summer it is desirable to have natural air circulation, in winter it is necessary to ensure complete tightness. This is achieved by changing the pressure density of the window sash. For these purposes, the door has special movable metal protrusions - trunnions, which in turn are equipped with an eccentric. By changing the position of the trunnions, you change the intensity of the pressure, that is, the thermal insulation of the window increases or decreases. Weak density corresponds to the summer season, standard and strong density corresponds to the winter season. In new PVC windows, the default pressure is most often set to medium pressure, so before switching to the winter period it is recommended to check whether there is ventilation. If it is missing, it is not recommended to touch the trunnions, otherwise you can squeeze the seal and over time it will lose its elasticity.

Trunnions come in various types. Depending on this, the tool for the job is selected. The protruding oval elements are adjusted using pliers. If the trunnions are round and have a slot in the center, then the pressure is adjusted with a hexagon.
When adjusting the window in winter-summer modes, make sure that all the pins are in the same position. It needs to be changed not only on the outer sash, but also on the inner one. The centers can be located on the inner sash, also on the bottom and top.
Getting rid of drafts
Adjusting the window pressure in order to get rid of blowing can occur due to the skew of the window structure. Such a nuisance occurs as a result of shrinkage of the house. The window sags, the contact of the locking protrusion with the counter plate is lost. Here the adjustment process is slightly different. The sash needs to be moved to the side so that those trunnions that do not reach the plates catch on them.
First, determine which of the metal protrusions do not reach the locking plates. The sash is examined and the places where there are protrusions are remembered. The window closes. Holding the door frame with your hand where the trunnions are installed, you need to pull it towards you. If there are no problems, the frame remains motionless; if there is, it will move. In this way, it is checked in which places there is no contact, and it is determined how to adjust the pressure of the plastic window: with an offset to the left or to the right. Adjustments are made on the lower and upper hinges.
When working with clamping mechanisms, the main thing is not to overdo it. Don't over-tighten the screws or you risk damaging them. The first adjustment of the window sash pressure should be minimal so as not to bend the sealing rubber. In the future, the clamping force is gradually increased, since regular cycles of opening and closing the window lead to wear of the sealing elements.