Do-it-yourself canopy: how to quickly build a beautiful and reliable canopy from scrap materials. How to build a canopy with your own hands - materials, roofing, tips and photo examples. Poles for a canopy made of boards.
When landscaping your summer cottage or the area near a private house, you should pay attention to one of the most popular types of small architectural structures - wooden canopies. Next, we will look at why it is made of wood and what the most popular designs of these wooden sheds are.
Wood is a warm and light natural material, beautiful and durable. Among supporters of metal and stone structures, there is a widespread belief that wood is quickly damaged by mold, moisture, and ultraviolet rays, and therefore the material is not practical. Such consequences are very likely, but these problems are easily solved by treating with various impregnating, antiseptic and protective compounds. Colored wood-protective impregnations can also give wood noble shades of valuable species.
Speaking about wooden canopies, it seems like a simple structure, without artistic and decorative elements. Currently, this is not the case; you can buy a wooden canopy with openwork slats or carved pillars.
The roof in two levels in the Japanese style looks very unusual and original. The supports of the canopy can be covered with a pergola, which will allow the canopy to fit into almost any style of landscape design of a private house or summer cottage. For example, slanting pergolas for eco-style, country or Mediterranean style, smooth pergolas are perfect for the sophisticated East.
What materials for a wooden canopy is better to use
The price of wooden canopies depends on the materials used. The following are the most commonly used in our production:
- Type of wood: pine, larch. The supporting frame posts are made of laminated veneer lumber or solid wood with a section of 35x90, 70x90, 90x90, 140x140 or 200x200 mm.
- The joist system is an antiseptic-treated timber with a cross-section of 50x100, 100x150 or 50x150 mm.
- For the flooring, deck or tongue and groove boards made of pine or larch with a thickness of 28, 35 mm, as well as wood-polymer composite (WPC) are used.
- The walls are sheathed with 12.5 mm eurolining, 16 mm imitation timber, 28 mm block house or decorative pergola (10x40mm slats).
- Rafter system: rafters 3 5x90 mm, 35x140 mm with a step of at least 0.8 m.
- The roof is hemmed with a solid roofing deck made of 16 mm timber imitation
All materials are chamber-dried spruce, pine, larch, humidity does not exceed 10-12% - this is a very important point. It is not worth buying a wooden canopy cheaply, because most likely it will be made from raw boards, which will subsequently lead to deformation of the entire structure.
Types of roof and roofing materials
The choice of roofing material directly depends on the type of roof:
- single slope;
- gable;
- hipped;
- six-slope;
- eight slope;
- flat;
- Japanese-style two-level.
After the type of roof is selected, the roofing material is selected:
- Rolled double-layer fused roofing, suitable for a pitched or flat roof.
- Flexible bitumen shingles, an excellent option for roofs of complex shape.
- Ondulin, environmentally friendly and safe - for gable and pitched roofs.
Types of canopies and application
Wooden canopies can be used as:
- Canopy to protect the car from external influences
- Drovnik
- Protection of tools and equipment
- Gazebo for relaxation and barbecue
- Frame for greenhouses, conservatories
- Extension to a house, bathhouse, garage
- Gallery from the gate or gate to the entrance to the house
- Veranda
- Sun and weather protection for children's playgrounds
Foundation
Before you buy a wooden canopy, you should think about what you plan to install it on.
Types of foundation:
- The pile-screw foundation is very popular, among its advantages we note: speed of installation (just one day), reliability (warranty for about 7 years) and, importantly, such a foundation will not be expensive.
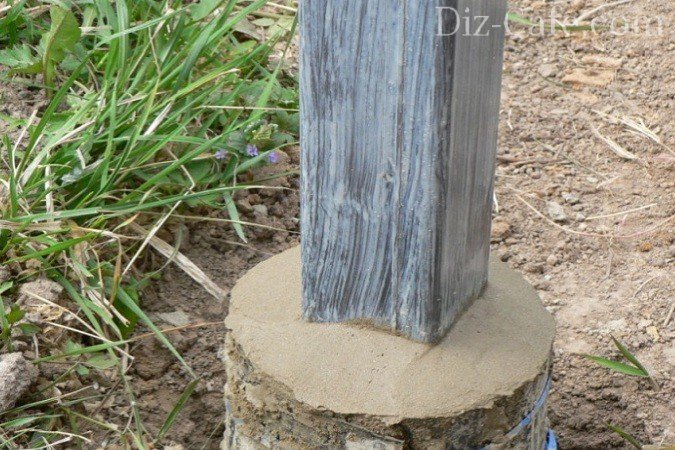
- Also, a wooden canopy can be installed on a concrete platform, the arrangement process is more labor-intensive and lengthy (7-10 days), the support pillars in this case will be attached to anchor bolts.
- On sand concrete blocks 200x200x400 mm, you can install structures such as a firewood shed or a gazebo-canopy.
Turnkey wooden sheds for every taste and budget
- In our company's assortment you will find a wide variety of wooden canopies from economy to premium class, which will suit any landscape and design.
- Our own design department with qualified specialists can modify an already finished one or create a new individual project according to all the wishes of the customer.
- Painting and fire/bioprotective impregnation are carried out in the production workshop.
- We will make the foundation most suitable for the structure and landscape.
- We use only high-quality materials
- Delivery and installation is carried out by our specialists, we can also send it using the most convenient transport company for you and provide assembly instructions.
A year after building the house, I wanted to attach a canopy to its front wall. So that it is functional, but at the same time very simple in design. What was required from the canopy? The most important thing is that thanks to it I wanted to get an additional place for summer relaxation, protected from sunlight and rain. For outdoor gatherings, so you can have lunch in the courtyard and relax on a sun lounger. According to the project, the canopy was supposed to be a kind of replacement for an open gazebo, but with a simpler design. So that during construction a minimum of material resources and physical effort is spent.
Within 2 weeks the plan was implemented. Based on the acquired practical skills and knowledge, I would like to bring to your attention a report on the construction of the simplest classic canopy attached to a house.
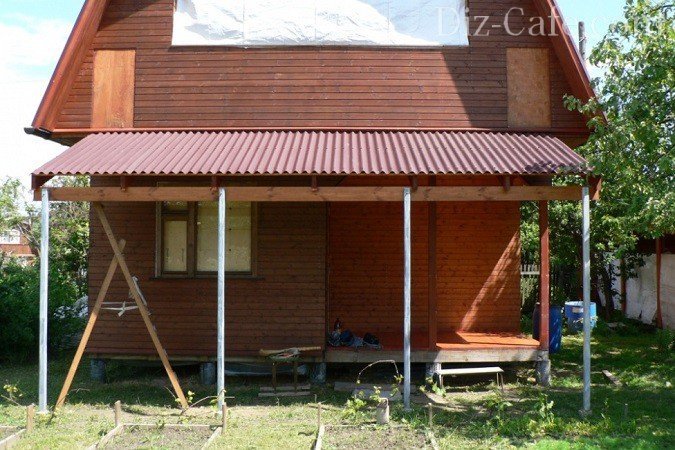
The design chosen was standard for this type of canopy. This is simply a roof truss system on supports. The dimensions of the canopy in plan are 1.8 x 6 m, the height to the roof is 2.4 m. On one side, metal pillars (4 pieces along the facade) are used as a supporting element, on the other, a board screwed to the wall of the house. The roof covering is Ondura sheets (analogous to Ondulin, with larger sheet sizes). It is planned to install lattice bars between the pillars so that you can sit in the shade under a canopy, enjoying nature and fresh air, even in the midday heat.
So, I’ll start the story about how this idea was realized. I hope I can clearly describe the whole process.
Step #1 – installation of metal poles
I started by installing metal pillars, that is, the vertical posts of the canopy, which will support the roof truss system. There are only 4 of them, they run along the facade, at a distance of 1.8 m from the wall. According to the plan, the length of the canopy is 6 m (along the entire length of the facade of the house), so the pitch of the racks is 1.8 m (taking into account the roof extensions on both sides of the racks).
For the racks, 4 steel pipes of 60x60x3 mm square section with a length of 3.9 m were purchased. They will be buried 1.5 m into the ground (below the freezing level), 2.4 m will remain on top. This will be the height of the canopy.
First, I marked with pegs the places where the posts should be installed - strictly at a distance of 1.8 m from the wall. I measured everything and calculated the horizontal lines. Then I took a drill with a 150 mm nozzle and drilled 4 holes 1.5 m deep.
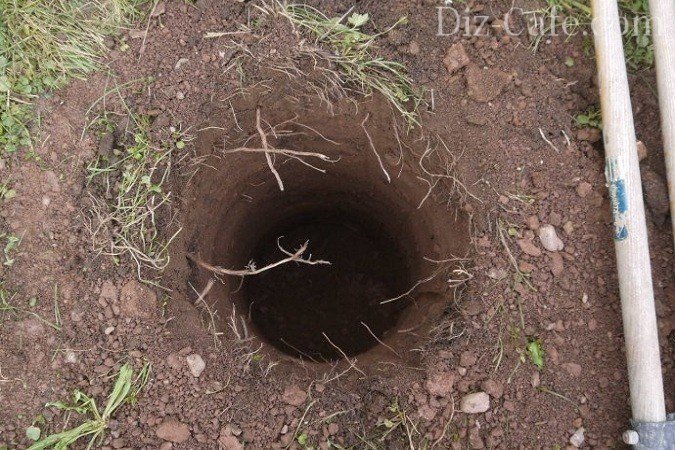
According to the planned program, a concrete pile foundation will be poured under the racks. This is done as follows: each rack is installed in a pit into which concrete is poured. The result is reinforced piles holding the posts.
It is not advisable to pour concrete directly into drilled holes. It is necessary to make insulation, which will simultaneously serve as formwork. To do this, I decided to use roofing felt sleeves - sections of roofing felt rolled into a cylinder. The length of the sleeves should be such that the concrete piles protrude 10 cm above ground level. For a pit 1.5 m deep, at the bottom of which a 10 cm sand cushion will be poured, sleeves 1.5 m long are required. The diameter of the sleeves is 140 mm.
Concrete poured into roofing felt sleeves holds metal posts
I cut pieces of roofing felt, rolled them into sleeves and fastened them with tape (you can use a stapler). Next, a 10 cm layer of sand was poured into the bottom of each hole and a sleeve was inserted there. The concrete formwork is ready.
Metal stands were installed in the sleeves. First - the two outer ones, I aligned them vertically and height (2.4 m), pulled a cord between them and placed two intermediate posts along it. After which I poured concrete into the sleeves (from the ready-made mixture, just added water and that’s it - very convenient).

I allowed 3 days for the concrete to set and cure. It is not advisable to load the racks during this time, so I started preparing the wooden parts - support boards and rafters.
Material on how to build a terrace will also be useful:
Step #2 – making the roof
The roof structure includes 2 support boards on which the rafters and the entire roof structure will be supported. One of the boards is mounted on the wall, the other on posts. Rafters are laid on top of the support boards, in the transverse direction.
The boards were taken with a section of 150x50 mm, 6 m long. Since the canopy was originally planned as a solid but inexpensive structure, I bought unplaned boards. I planed and sanded them myself, which took some time. But I was confident in the result and smoothed the surface to the highest standard.
The rafters will be laid in the grooves of the support boards. Another headache - you need to cut the grooves, and at the angle of the rafters. To determine the angle and insertion locations, we had to perform a test installation of the boards. I screwed such a board to the wall with 140x8 mm wood grouse, and to the metal posts with 8 mm studs using washers and nuts.

Now that the support boards are in place, a small tool was used, with the help of which I determined the angle of inclination of the rafters. After which the boards were removed and grooves for the rafters were cut into them, taking into account a known angle.
The rafters are also made of boards 150x50 mm, 2 m long. There were 7 rafters in total. Their installation step on the support boards is 1 m.
After fitting the rafters to the grooves, all parts were painted with Holz Lazur JOBI glazing compound in teak color.
Then everything was installed. Support boards - as during preliminary fastening, that is, with the help of wood grouse and pins. The rafters were laid on top, in the grooves of the boards, and hammered in with nails. Each groove required 2 nails driven through the rafters obliquely, towards each other.

For the sheathing under Ondura we used 100x25 mm boards, 6 m long - 7 pieces. I screwed them across the rafters with self-tapping screws.

Ondura sheets are laid on the sheathing and nailed with rough nails with plastic caps to match the color of the flooring. In fact, the roof is already ready, now you don’t have to worry about rain and arrange a place under a canopy. For example, bring a garden table and chairs there.
Canopy covered with sheets of Euro slate Ondura
The ends of the rafters remained open, which is not very good in terms of decorativeness. And there was nowhere to attach the drain. Therefore, to complete the roof, I screwed a 6 m long frontal board - clapboard - to the ends of the rafters.
The front board covers the ends of the rafters and creates support for the gutter
The next stage is fixing the drain. Two 3-meter drains are mounted on the front board. The drainage from the roof goes into a watering pipe through which the grapes will be watered.
Step #3 – pouring the foundation for the mini-wall
To prevent water from getting under the canopy during rain, I decided to make a low brick retaining wall between the posts. It requires a strip foundation, which I made using standard technology. I dug a trench between the supports using the bayonet of a shovel and set out the formwork from the boards. I poured a 10 cm sand cushion at the bottom of the trench. And on top of it I placed 2 reinforcement bars on supports to fasten (reinforce) the foundation.
I was afraid to do it without reinforcement, you never know, it might crack and fall apart. Then he mixed the concrete and poured it into the trench. It was necessary to wait until the concrete set and hardened, so I decided to return to the supporting wall later. And now - to decorate your building.
Step # 4 - installing overlays on poles and trellises
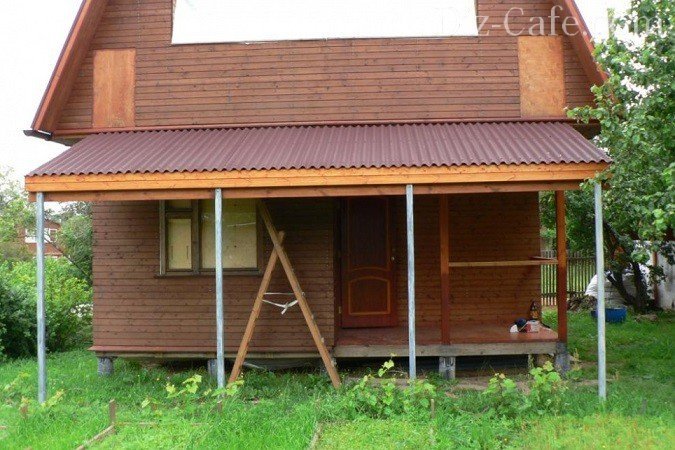
It's time to look at the canopy with a critical eye. The metal racks of the canopy were a little out of the general composition. I decided to decorate and ennoble them by sewing them with wooden overlays. Just for this, I have a few boards of 100x25 mm left. I secured them on top of the metal posts using pieces of M8 studs, washers and nuts. There was space left between the overlays (on the side where the trellis was installed), so I inserted a 45x20 mm rail there. The slats formed protrusions; the horizontal elements of the trellis will be attached to them.

The turn of fastening the trellis has come. I chose a lattice pattern for them with a carved hole in the center. This hole allowed me to use not only long slats for the trellis, but also trimmings. We can say that it turned out to be waste-free production. And this pattern looks more interesting than standard monotonous squares.
The slats for the trellises were made by longitudinally dissolving the 100x25mm boards I had. The board was broken into three parts, the resulting slats were polished. The final section of the rails (after grinding) is 30x20 mm.
I made the trellises without a frame; the slats are attached only to the vertical protrusions of the posts. At first, I set up horizontal slats, screwing them to the protrusions with self-tapping screws. Then, on top of them, he fixed vertical slats. It turned out a decorative lattice, near which the wife planted grapes. Now it is already winding along the trellis with might and main and almost blocked the wall of the structure. The shade protects from the midday heat. This is very useful, since the canopy is located on the south side of the house and without a canopy it was almost impossible to rest here during the day due to the abnormal heat.
Material on how to attach a veranda to the house will also be useful:

Trellis are assembled from slats directly “on site”

Step #5 - building a retaining wall
The last stage is the construction of a retaining wall. The strip foundation under it has already frozen, work can begin. For waterproofing, I glued 2 layers of roofing felt to the foundation tape, coating each layer with mastic. On top, along the roofing felt, I built a level retaining wall, 3 bricks high.
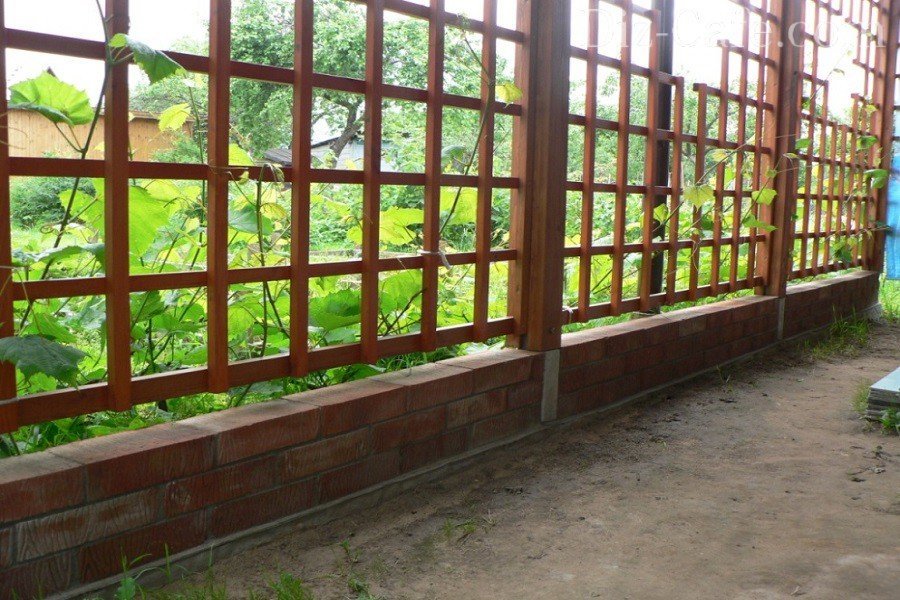
The retaining wall will not allow raindrops and water to fall onto the area under the canopy during irrigation.
Now there will be less dirt when watering and raining. And the canopy looks much nicer this way.

That's probably all. The shed was built. I implemented the entire project alone, but I did not notice any difficulties in the process. Subsequently, the area under the canopy was covered with paving slabs. We can say that I got a covered terrace or an open gazebo - call it as you like. Although by design, this is an ordinary canopy on poles, the construction of which took quite a bit of time.
Very often, owners of private buildings attach a canopy to their house in order to take advantage of all its practical advantages, as well as to make their property look attractive. The only drawback of such an area is that it cannot be used in winter (perhaps an attached winter garden would be more suitable for you), but the rest of the time it will be pleasant to relax here, enjoy fresh air, relax with your family and receive guests.
Today we will look at options on how to properly build a canopy in the yard at minimal cost and in a short time.
Purpose and design features
Serving a variety of functions, a beautiful yard canopy can be designed in a variety of ways. The classification of such extensions is carried out taking into account the following factors.
Based on this feature, canopies are divided into:
- single- and double-slope inclined types;
- multifaceted and straight. The first include pyramids, original arcs, graceful domes, exotic arches, and polygons.
Location
This feature distinguishes between a free-standing landscape element and a canopy attached to the house in front of the entrance or representing a continuation of the terrace.
Material
Here you can highlight popular options for stone and wooden extensions. Sometimes polycarbonate or a combined technique is used for installation.
For a long time, metal tile and slate components were used for roofing, but now almost everyone prefers polycarbonate. Such demand for this material is due to its flexibility and ease of installation, resistance to mechanical stress and the vagaries of weather. When constructing a canopy near a house using polycarbonate, it is very easy to cut this material into parts of any shape. To perform such an operation, it is enough to have a stationery knife or jigsaw.
It will not be difficult to attach sheets to a wide variety of bases made of wood, plastic or metal. Polyurethane glue perfectly holds polycarbonate parts together.
So from what to make the original canopy to the house at the lowest cost? Consider the two most popular methods.
Canopy with slate on a metal frame base
If you read the instructions, building an object adjacent to the house is not as difficult as it sometimes seems. First of all, you should pay attention to the fact that we are using all the free space in front of the house. We determine the size of the territory used and the volume of necessary materials.
In our case, we will consider the option of working on an area of 6.5 square meters. m.
Tools and materials
To carry out the entire range of activities, you will need to purchase:
- Profile pipe with parameters 40x40x1.5 mm. 3 pipes 6 m long are required.
- We will prepare a pipe of 80x40x2 mm in the same quantity and the same length.
- Binding material – 2 bags of cement.
- Edged boards - 9 pieces of 6 meters each with dimensions 40x150 mm.
- Slate of eight-wave modification 1.15x1.75 m in the amount of 20 sheets.
- 50 pieces of slate nails.
- About a cubic meter of sand and crushed stone.
- 2 kg of primer for metal.
- A bayonet shovel and a rake, a brush.
A set of high-quality tools will make the process of constructing a canopy along the house pleasant and easy. To do this you will need a set of certain equipment:
- reliable welding machine;
- 1 pack of electrodes with a diameter of 3 mm;
- face shield;
- convenient hammer;
- 4 pieces of cutting discs for metal with a diameter of 125 mm and one for grinding. Disc thickness – from 1.6 to 2 mm;
- Bulgarian.
The canopy of the designated area will be simple in design due to the lack of dimensional parts.
Installation work
How to properly make a canopy for your house with your own hands and get the desired result in a short time? The solution to this problem is achieved by strictly observing the sequence of all stages of the production process:
- A beautiful canopy for a wall always begins with a simple but very important process - marking for future supporting components and checking the identity of the distances between opposite corners of the perimeter, checking the required dimensions. Taking into account the selected dimensions of the pipes, we dig holes under the supports. The dimensions of the holes are one and a half bayonet widths and 0.6-0.9 meters deep. To ensure water drainage from the roof, we calculate the slope with parameters of 10 cm per linear meter of the roof. For our option, we plan the upper racks to be 3.3 m long, and the lower ones will be 2.7 m long.
- Square flanges are welded onto the supporting elements of the canopies near the house. A support element at the bottom and a platform for welding plugs and rafter components at the top will provide protection against subsidence. In addition, plugs on the 80x40x2 pipe will prevent the appearance of internal rust. Cleaned and primed welding application areas are covered with paint.
- Before installation, check the dimensions and fill the supporting units with cement mortar. After giving the material a day to harden, we lay rafter pipes 80x40 mm. In this case, a slight exit beyond the perimeter of the rack is required for welding.
- How to further build a canopy to the house using only your own strength? First, you need to lay out the entire board and slate so that the sheet at the bottom has an outlet of roofing material within 150-200 mm, and each lower roofing element overlaps the upper one by 100-120 mm. We cut the issue of boards on the sides to the same length, approximately 5-15 cm. After this, we calculate, not forgetting the need to overlap one wave, the length of the slate row. Connecting boards using nailing and subsequent welding on the inside remains the most affordable option. You can attach the board and screws. A hole is drilled at the connection point and a pot is made for screwing.
Construction of a canopy made of wood
This method is very popular due to the minimal cost of improvement. Let's look at how to properly make a beautiful canopy for your house.
Design stage
To avoid problems during the work, it is important to take the development stage of the canopy project with full responsibility.
It is necessary to take into account the characteristics of the facade and foundation of a permanent structure. It is important to take into account such climatic factors as the wind rose, the amount of snow cover in this zone, and access to a certain part of the world. You need to clarify in advance the design of the canopy in the yard, the shape and dimensions of the structure. An extension made from this material will look perfect and be conveniently mounted above the porch.
Careful determination of the parameters of a clean roof is mandatory for easy and quick installation.
Arrangement of racks and rafters
One of the important stages in the construction of wooden canopies for a house is the choice of construction material. Any option will do, but try to use pine if possible. The wood for this type of construction is distinguished by good durability, low weight and pleasant appearance.
A cross-section of 75x75 mm or more is recommended. The material is carefully inspected to ensure that there is no bark. The part installed in the ground is covered with agents that prevent rotting. The main rule during installation is to maintain the placement parameters of about 100 cm between the pillars and arrange them in a certain order so that the roof in the side parts has 50-100 mm of protrusion, and in the front - up to 200.
Half-meter wells are prepared along a common straight line while simultaneously checking suspended diagonals. A level is used to maintain the strict verticality of the racks. For reliable fixation, auxiliary bars are used. After completion of the work, these elements can be easily removed.
During construction, the internal space of the recesses is filled with concrete mortar or crushed stone. The method of using crushed stone looks more economical.
Trimming with a bevel according to the angle of inclination of the plane is done in the upper part of the pillars. This will allow the rafters to lie tightly on the ends of the beam.
The minimum height of the racks at the bottom of the slope is 1800 mm. Below this parameter is allowed when planning in this part of the rack or table.
Bars 150x50 mm, called rafters, are needed for mounting the system. The indicated dimensions are optimal for a span with parameters of 6 meters, if the design weight and slope of the canopy adjacent to the house are correctly calculated.
The distance between the rafters is 1 meter. You can attach the canopy to the wall or support board with one side of the rafters, and the other rests on the posts. For fixing, self-tapping screws or steel corners are taken.
Final stage
How to make the roof of the canopy to the house with your own hands? To do this, it is important to equip the crate strictly at right angles. 900 mm between the axes of the elements is a mandatory requirement for installing 30x160 mm edged boards. It is important that it is located at the joint areas and in the center of the slate or metal tiles.
We begin laying the covering. 11 self-tapping screws will be required for each sheet for screwing. Special pads provide a secure fit. Rows with 100 mm overlapping each other are laid starting from the bottom of the structure. Cutting is conveniently performed with a diamond-coated wheel installed in the grinder.
Now you have a wonderful extension! Now you can take care of the beautiful design and arrangement for a pleasant stay.


The article will tell you how to make a canopy for your house with your own hands quickly and cheaply. You will learn what materials can be used and how to develop a drawing of a future structure. Below we will describe the most popular options for creating a gazebo and design, how to properly build the gazebo itself and solve some problems when creating it. Read the advice of experts, and you will be able to make a gazebo near your home yourself or properly supervise the process of its creation by qualified craftsmen.

Design
To figure out how to make a canopy, you first need to develop a project for the future construction, which takes into account the following parameters:
- site and structure;
- annual precipitation, wind and snow loads;
- purpose and dimensions of the building.
The project allows you to select the optimal solution and materials. A drawing and determination of the dimensions of the building help to correctly purchase materials and determine the required financial costs. If a carport is created for a car, then the passage of the car with a load must be taken into account.
A canopy attached to any building has a number of features. The height will be limited by the roof of the building. Such a solution excludes the creation of a full-fledged arch. In most cases, it is possible to make only a small structure, since there is usually not enough space near the house.

Basic moments
There are several ways to make a canopy in the courtyard of a private house with your own hands correctly, quickly, and so that it lasts as long as possible? To obtain the best result, it is necessary to take into account a number of important parameters.
Canopy
The shape of the canopy can be arched (good characteristics, the elements must be identical to each other), gable (has all the characteristics of a roof for a house) and single-pitch (the simplest and most reliable option).
Purpose
The canopy can be used to protect:
- woodpiles, tools, boards and other similar materials;
- play area/relaxation area for adults;
- terraces, swimming pools;
- greenhouses, greenhouses;
- grill / barbecue;
- entrance group, car.
Construction type
The design itself comes in several types:
- closed - openings are closed with various materials, there are windows;
- semi-closed - there are side parapets, a stationary roof;
- open - light roof and several supports.

Drawing
Verandas, canopies, gazebos: you can find out tips on how to build cheaply and beautifully below.
Supports
Basically, supports are made of wood or metal, but the most stable structure is obtained when using concrete elements. The holes for the supports should be below the freezing point of the soil, about about a meter, but in the northern regions more may be required. Sand is poured into the bottom, compacted, concrete is poured and a support is placed. It must be leveled and then the hole must be completely filled. You can make formwork on top so that the concrete level is higher than ground level.

It is not recommended to immerse wooden supports in the ground, even when using moisture-proof materials. Concrete supports with a depth of at least 50 cm are made for them; they act as original piles. Reinforcement is laid in the concrete and timber is attached. It is also possible to install supports made of stone building materials on the foundation. Metal/wood is used for rafters. This option requires quite a lot of time to set up. Another method is asbestos-cement pipes: durable, not afraid of constant moisture or strong daily temperature fluctuations, and easy to install.
Frame
Mounted from wood/metal. It is easier to work with wooden elements. Connected with self-tapping screws or bolts. When using laminated veneer lumber and dry boards, a wooden canopy can last for many years. Metal elements are mainly welded. A combination of both types of materials is less commonly used. When arranging a high and wide canopy, it is better to choose semi-arched or triangular shapes.

On our website you can get acquainted with the most popular ones - from construction companies presented at the exhibition of houses "Low-Rise Country".
The supports are placed at intervals of at least 1.2 m; for a structure attached to the wall, two supports are enough. It is not advisable to frequently lay a profile or beam under polycarbonate; for tiles, it is the opposite. Supports, racks and rafters are often made from profiles of different thicknesses, depending on the purpose of the structural elements. This applies equally to timber. The pillars must be strictly vertical.
Wall support
How to make a canopy for a house? It is necessary to remember that canopies can be single-pitched, flat or with a bend. Fastening is carried out by inserting the rafters under the roof or to the wall using the selected fasteners. If there is a lot of snow in winter, the racks should have a rigid fastening. If the area under the canopy will be concreted before the canopy is built, then openings for the posts must be immediately made and water drainage must be considered, and the wood must be treated with protective agents.

Slope
The optimal slope is considered to be 50 degrees; snow practically does not accumulate. A slope of less than 7 degrees is considered horizontal. If it is not possible to make the required slope under the roof of the house, then the material is laid on top of the roof. We need to think about the right drainage. You can also set up a separate structure near the house.
Preparatory work
The first thing that needs to be done is to mark the designated area, remove all debris and plants, level it, add sand and gravel. When arranging heavy structures, you will need to prepare a foundation.
Recesses are made under the supports, so you can immediately lay the electricity cable. Depending on the weight of the frame and roof, the spacing of the supports is determined. The posts are concreted in the pits; if there is water nearby, then their ends must first be primed and waterproofed.

Materials
Having figured out how to make a canopy with your own hands, having prepared the project and the site, you need to purchase materials.
The following material options are used:
- Slate - used in several types. Fiber cement– durable, withstands heavy loads, rarely used in domestic construction. Asbestos-cement– corrugated/flat sheets are very popular when creating roofs for houses, outbuildings, and fences.

On our website you can find contacts of construction companies that provide gazebos, canopies and others. You can communicate directly with representatives by visiting the “Low-Rise Country” exhibition of houses.
- Polycarbonate - cellular or cast. Experts recommend using the first option, since it is much stronger. Sheets come in matte/transparent, different shades.

- Corrugated sheets/metal tiles – have high strength. Powder coated, UV resistant, long service life.

- Metal profile – hollow, rectangular, square or round. Depending on the size, it is used for rafters and supports.

- Lumber – plywood, boards, beams, OSB. They equip supports, rafters, beams, bars. Plywood/OSB is used for roofing.
Video description
To see the features of a slate canopy with a wooden frame, watch the video:
Ruberoid and soft tiles. The roofing material itself is used quite rarely, mainly acting as waterproofing. Long-lasting and very light soft tiles are much more often used.

- Awning or moisture-resistant fabric. It is used very rarely and acts as a temporary or seasonal option.

The elements are fastened with metal/wood screws (with or without washer) and welding. Overlays, angles, and bolts are also used.
Important nuances of arranging a canopy
In most cases, metal profiles and polycarbonate are used to construct canopies. How to build a canopy from these materials is described below.
Metal profile
By metal profile we mean corrugated sheeting, which comes in several grades:
- “N” – roof, load-bearing;
- “NS” – finishing, roofing;
- “C” – finishing, fences.
For snowy areas and structures with large sheathing pitches, it is better to use “H” with reinforced ribs. In the opposite situation, the NS brand is suitable. It has a thickness of more than 1 mm, a wave of at least 35 mm. It should be noted that the wave can be trapezoidal, rectangular or wavy. For roofing, the first option is better - it is stiffer.

When creating a canopy, it is very important to correctly calculate the weight of the entire structure. Taking this indicator into account, the frame is developed; it is recommended to use lighter materials.
Working with sheets:
- it is forbidden to work in strong winds;
- It is better to use scissors to cut the material;
- you should not install waterproofing if there is no insulation and walls;
- the roof must be level;
- the smaller the wave and slope, the smaller the pitch of the sheathing.
Video description
How to create a semicircular arched canopy is in the following video:
The length of the profile must be secured to the bottom of the roof; an overlap must be made depending on the angle of the slope. In certain cases, mastic is used to seal joints. Fastening with self-tapping screws and seals. It must be attached to the sheathing at the lowest point: the step depends on the windiness of the region. Any scratches must be treated with paint.
Polycarbonate
The most popular option. Below we will talk about how to make a polycarbonate canopy, describing the main points and nuances of the work.
The material is lightweight but durable, has UV protection, does not break under fairly heavy loads or falls, is easy to drill and cut, and is available in several brands and a large selection of colors.

There are several options for polycarbonate:
- profiled - rare in our country;
- cellular/honeycomb – have numerous stiffening ribs, light, durable, can bend, the best option for roofing, comes in different sizes and thicknesses, there is a reinforced version (stronger and thinner);
- monolithic - an alternative to glass, large sheets, mainly used for walls.
Consider the degree of transparency of the material. For gazebos and canopies, it is better to choose darkened ones so that it is not stuffy under them.
When laying sheets, it is important to remember that some brands can be laid with any side facing the sun, while others can only be laid with a certain side. The channels inside the sheets must be directed parallel to the slope. Installation using self-tapping screws with washers for this material and an end profile. The holes for the screws should be slightly larger than the fasteners themselves, do not overtighten them, be sure to step back from the edge, make holes only between the stiffening ribs.
Video description
The following video clearly shows how to install a canopy made of metal profiles and polycarbonate for a house:
Sheets are cut before installation with a knife, hacksaw or cutter (for sheets up to 4 mm), wider grades are cut with a power tool. The ends are covered with punched paper tape, aluminum film and end profile; do not use tape. The frame for this material can be lightweight, in the form of a semi-arch, but first you need to clarify the permissible level of bending of the sheets. The thickness of the sheet affects the sheathing of the structure - the thicker it is, the wider the sheathing. Do not forget that the protective film on top is removed at the end of the work, and on the bottom at the beginning.
Tree
How to build a canopy for a house made of wood with your own hands? In fact, the whole procedure is not much different from other materials. Only in this case other fasteners are used. Wood has a number of important characteristics - the material is very easy to use and process. The design lasts a very long time with proper care, environmentally friendly, accessible and inexpensive material.

Carport with forged elements Source static-eu.insales.ru
Conclusion
After installing the roof, you need to think about creating drain gutters. At the last stage, the site is being developed. The easiest way is to fill the area with gravel, but this is not a very convenient option. It is necessary to remove the top layer of soil, install a curb and then fill in crushed stone. You can also lay tiles or paving stones, fill the area with concrete, or use wood.
Reading time ≈ 13 minutes
We can say that the private sector is a vast field for home-grown craftsmen and designers, so the question of how to make a canopy for a house with your own hands, also quickly and cheaply, is quite relevant and important for many residents. Such a structure not only decorates the home - it protects it from precipitation, therefore, it increases the service life of covered structures, as a rule, a porch (terrace) doors and windows. A visor will also come in handy in hot sunny weather - in the shade you can simply sit down and relax in the fresh air.
Simple wooden shed attached to a house
What is needed for this
Since we are talking about simple and inexpensive canopies, first of all, all the elements from which the protective and decorative structure will be assembled must meet these criteria. But, despite the supposed low cost, you can always make a choice, since different materials can be used for the roof, rafter system (sheathing) and support posts, and their price will remain almost the same. You also need a certain set of tools, without which such an assembly is impossible and on which the quality of construction work also depends.
What materials can be used to build a canopy?

Metal tiles can be of different colors
This list lists the main materials for building sheds, which are relatively inexpensive, and also gives their brief characteristics:
- Metal tiles and corrugated sheets are sheet coverings with a large margin of mechanical strength. Powder painting on metal does not react to ultraviolet radiation (sunlight), therefore, does not lose its original color. The service life here is practically unlimited.
- – it can be cast or cellular, but for canopies it is better to use the first option (my opinion). In terms of mechanical strength, its performance is 200 times higher than that of glass of the same thickness and 100 times higher than that of acrylic. Sheets can be completely transparent, matte or have many other shades according to the RAL table (color table).
- Asbestos-cement slate - the name of the material indicates what it is made of, that is, from asbestos and cement. Sheets can be flat or wavy. The second option implies the presence of 5, 6, 7 and 8 waves (for roofing work it should be the same). In production and operation, corrugated asbestos-cement slate must comply with GOST 30340-95, and flat slate GOST 118124-95.
- Fiber cement slate - sheets consist of cement and mineral fillers, which are reinforced with cellulose fibers (fiber). This is a very durable material that can withstand heavy mechanical loads, such as a blow from a branch. At the household level, it is used very rarely as a roofing material.
- Lumber – timber, boards, timber, moisture-resistant plywood, OSB. For vertical supports, a board of 50×100 mm, 50×70 mm is usually used, or it can be a beam of 100×100 mm. For the Mauerlat (load-bearing beams) and rafter legs, boards of 50×100 mm and 50×70 mm are also suitable. Bars of different sections are often used to create fencing, and plywood and OSB are used as roofing.
- Metal profile – a hollow profile of round, square and rectangular cross-section can be used. For support posts, as a rule, a pipe with a diameter of at least 60 mm, a square with a cross-section of at least 60×60 mm and a rectangle with a cross-section of at least 70×40 mm are used. For rafter legs, a 20x50 mm profile mounted on an edge (50 mm in height and 20 mm in width) is suitable.
- Fasteners - self-tapping screws for wood and metal with and without a press washer, bolts with nuts and washers, steel angles and plates.
What tools may be needed

Electric hand-held circular saw
The following tools may be needed for work:
- A hand-powered circular saw, but you can also use a wood saw.
- Angle grinder (grinder) with cutting disc for metal.
- Electric or cordless drill with a set of drills and attachments.
- Hammer with a set of pobedit drills.
- Electric welding of direct or alternating current.
- Measuring tools – levels of different types of action, plumb bob, tape measure, construction square, chokeline, pencil.
The basic design principle of all awnings

The simplest frame design for a canopy
In this case, we are not talking about free-standing canopies, but about structures that are adjacent to the wall of the house, that is, one edge of the roof is against the wall, and the other is on supporting pillars. Most often, the connection is made to a horizontal beam, which is screwed to the wall with regular or anchor dowels, but in order to attach a canopy to the house, it is not necessary to make holes in the wall. In some cases, vertical posts are installed close to the building and the support beam is fixed to them - if the overhang from the roof is properly installed, this method is almost justified, it eliminates any leakage.

Simple canopy made of frosted polycarbonate
Since we are talking about how to make a canopy for your house with your own hands quickly and cheaply, it is quite natural that it will be a single-pitched straight roof, as in the photo above. But if we talk about canopies as architectural decorations, they are sometimes made rounded, and sometimes even double, in the Chinese style. But in this case it is better to focus on speed and ease of execution.
General stages of construction of canopies. Priority

The principle of assembling a wooden frame adjacent to the house
If we talk about the construction of canopies near a house with wooden frames, then all work can be divided into the following five stages:
- Attaching a load-bearing beam to the wall, which can be a board or even a 50x50 mm block.
- Installation of vertical supports at the required distance from the building, taking into account the already installed load-bearing beam.
- Installing the Mauerlat on support pillars - this beam is mounted so that it is strictly parallel to the first beam, and is also located lower to create a slope.
- Fixing rafter legs or sheathing under the roof. Performed using different methods.
- Attaching the roofing material to the finished frame.
Note. The assembly of a frame from a metal profile differs only in the execution technique. That is, if lumber units are assembled using corners, overlays and self-tapping screws, then electric welding is used for this purpose. But fastening the profile to the wall, both wooden and metal, is carried out in the same way, using ordinary or anchor dowels.
Canopy over the front door
It should also be noted the importance of another type of work, on which the method of installing the canopy frame directly depends - this is the construction of a porch or terrace. The fact is that the base of the support pillars can simply be filled with concrete screed and this is an excellent fastener, but in some cases the pillars have to be mounted on the surface of the porch or terrace, using reinforced steel corners. In this case, the mechanical strength of the fixation is also good, but at the same time the aesthetic indicators are somewhat reduced, although if desired, the corner can be decorated with a wooden or plastic plinth.
Assembling a wooden and metal frame

Attaching a horizontal support beam to a wall
As mentioned in the first step of the instructions above, first of all you need to attach a load-bearing beam to the wall on which the rafter system or the roofing material itself will rest. In some cases, home owners do not want to make holes in the wall for fasteners, citing the fact that the cladding of the house will be damaged, but personally I think this approach is unfounded. Firstly, if a canopy is installed over a terrace or porch, then it will last for a long time, if not forever, and, secondly, if necessary, such holes can be easily sealed with a material identical to the cladding.
The only option when attaching a load-bearing beam directly to the wall is impractical is to decorate the house with siding of any type (metal, vinyl, acrylic), since there is emptiness underneath and the panels themselves are soft. In such a situation, the support beam is mounted on racks that are installed close to the building. But even here you cannot do without fastening to the wall - firstly, you need at least one anchor per pole to maintain a strictly vertical position and at least one anchor per horizontal beam for rigidity. It will not be possible to not attach a wooden frame to the wall at any point - wood is not such a mechanically strong material to make it into a completely autonomous structure on four supports - to avoid play, you will have to install jumpers according to the triangle principle, and this is unnecessary trouble.

One of the types of fasteners for wooden supports
Often or are made by pouring concrete into the formwork, so the vertical posts can either be concreted by pouring their base, or special metal brackets (see photo above) on which the pillars will be held can be concreted. But this is not the only way to install brackets. Firstly, a threaded pin can be screwed into a plastic dowel, which is very easy to install in a concrete screed by drilling a mounting hole under it with a hammer drill. Secondly, it is easy to make such a bracket yourself for any cross-section of the support: to do this, bend a steel strip in the shape of the letter “P”, drill mounting holes on the sides and in the center and attach it to the screed with an anchor dowel.
Note. If you use a homemade bracket, then you will need to drill a hole (sunk hole) under the head of the bolt in the support, and use a chisel to select a shallow groove under the strip so that the base of the post completely sits on the screed.

Perforated reinforced steel angle for fastening
In cases where a wooden support needs to be installed on a plank flooring or on a terrace board (this is WPC - wood-polymer composite), then reinforced steel corners are used as fasteners - they are quite sufficient for the rigidity of the installation. As a rule, corners are screwed along the terrace or porch on two sides of the post, but sometimes, for insurance, such a corner is also screwed on the inside of the post. The distance between the supports should not exceed two meters so that the Mauerlat beam does not bend when there is an excessively large layer of snow.

Ready-made steel supports with flanges for fastening
In the top photo you see ready-made steel supports with flanges for fastening, manufactured at the factory - such profiles are very convenient to use. The flange has four mounting holes through which the stand can be fixed with regular or anchor dowels, placing a washer under the head of the self-tapping screw or anchor bolt so that the head does not fall inside. In some cases, a porch or even a terrace can be made of sheet steel, and then electric welding is used for fastening without any dowels or anchors. The flange is simply welded around the perimeter and this is the most reliable fastening.

Installing the rafter leg on the supporting beam using special steel fasteners
After installing the supports, you can proceed to attaching the front load-bearing beam (mauerlat) and rafter legs, which also act as sheathing for the roofing material. It is most convenient to fix the front beam using steel reinforced angles or even long bolts with nuts and washers, however, this does not matter, the main thing is that the units fit well together and there is no play.

Special fasteners for rafter legs
For perpendicular joining of wooden profiles (rafter legs and load-bearing beam), it is very convenient to use special steel fasteners, like what you see in the top photo. But if suddenly there is no such fastener, then it can be replaced with reinforced corners on both sides of the rafter leg - this is your private property and in such situations no one has the right to regulate anything.

This is what a simple assembled lumber frame will look like
If you used lumber (timber, board) to assemble the frame, then you seem to be dooming your structure to fragility in advance - the wood will quickly rot, and before that it will lose its attractiveness (it will turn black). To get rid of such consequences, supports, beams and sheathing should be treated with an antiseptic, and to maintain their attractiveness, coated with clear or tinted wood varnish. Often the timber is first opened with stain and then topped with colorless varnish.

Shed with steel frame
If you decide to build a simple canopy with a metal frame, then it is assembled in the same way as a wooden one - without bends or decorative overlays. All the same straight lines, only electric welding is used to join the nodes, and sometimes bolts with nuts and washers. But if we are talking about speed, then, of course, it is better to use welding.
Roofing installation

Installation of polycarbonate on the roof
Either cast or cellular polycarbonate is used as roofing. Personally, I prefer the first option, but my opinion cannot be categorical - some people prefer honeycomb sheets, especially since transparency is not needed for the roof, otherwise it will not protect from the sun. In any case, if these are cast plates, then it is better to choose tinted ones (yellow, green, blue, pink) - the sun's rays do not penetrate through them so much.
Polycarbonate canopy for $84
Polycarbonate sheets are attached to the sheathing using self-tapping screws with a press washer, which completely covers the hole, eliminating any leakage. The PC is joined using a special split profile, and at the edges for the cellular version, an end profile is put on, which is best placed with glue.

The principle of installing corrugated sheets
Corrugated sheeting, just like , is laid overlapping and fixed with special self-tapping screws with a press washer. Since the press washer in this case has a rubber gasket, the self-tapping screw can be screwed in not only along the wave crest, as on slate, but also between the waves - the rubber gasket prevents leakage. The screw heads are matched to the color of the roof.

The principle of laying slate
The slate is laid overlapping, starting from the bottom row, it is attached to the sheathing with slate nails through the crest of the wave, but they are not hammered in completely, leaving a 1-1.5 mm gap for thermal deformation. It is strictly forbidden to bend nails from the inside of the slope - due to thermal deformation, this will cause cracking of the slate. If you still want to get rid of the sharp protruding ends, then simply cut them off with a grinder.
Conclusion
We have now figured out how to make a canopy for your house with your own hands, quickly and cheaply. The most expensive option of all those discussed above is a metal tile roof and a metal profile frame, and the cheapest is a slate roof and a lumber frame.