A powerful homemade crossbow. How to make a crossbow with your own hands so that later it will not be unbearably painful
In addition, it will be interesting to shoot from such a weapon yourself. Everything is done quite simply; you can get by with hand tools. The crossbow turned out to be quite powerful, as for target practice. Double limbs are used here, which increases the rigidity of the bow and allows you to throw wooden arrows at high speed. The author uses self-tapping screws as arrowheads, but you can use your imagination and come up with something more interesting.
Materials and tools used
List of materials:
- timber;
- PVC pipe;
- two self-tapping screws;
- strong rope;
- wooden rods for arrows;
- adhesive tape (for feathers).
List of tools:
- hacksaw or pendulum saw;
- jigsaw;
- belt grinder;
- drill;
- marker;
- roulette;
- screwdriver;
- construction hair dryer;
- vice;
- oil for wood processing;
- paint for painting onions (optional).
Crossbow making process:
Step one. Cutting out blanks
First of all, let's cut the wooden beam, it will be used to make the base. We also need to cut the pipe. You should have two parts, long and short. See photos for dimensions.


Step two. Making a bed
We make the bed from a wooden beam. First of all, we will make the necessary markings using a marker. Well, then we cut out the extra parts using a jigsaw; a jigsaw will cope with this task perfectly.


Step three. Let's make a bow
Our bow consists of two parts, which increases its rigidity. Everything is made from PVC pipes that need to be made flat. To do this, we will need a vice with a wooden insert so that there are no marks left on the pipes. We heat the pipe with a hair dryer until it becomes soft, and then squeeze it in a vice. Step by step we heat the areas and compress them. Finally, we form the desired bow profile.


Step four. Bow mount
To attach the bow, look for its center, and then drill two holes, like the author. For fastening we use two self-tapping screws and washers. But don’t fasten the bow tightly yet, it still needs to be modified.


Step five. Finalizing the bow
The essence of the modification is to make grooves at the ends of the arms, to which the bowstring can be tied. We make markings and cut out excess parts using a jigsaw. As for the short arm, you need to make grooves at the ends so that the string does not fly off.


Step six. Installing the bowstring
We use synthetic strong rope as a bowstring. Cut two pieces of the required length and melt the ends using a lighter. Well, then we tie the main string to the ends of the shoulder with a slight tension. As for the additional shoulder, in order to use it, you will need another rope. You can see how everything connects in the photo.


Step seven. Arrangement of the trigger mechanism
The trigger mechanism is of the trigger type. It consists of two parts, one is the trigger, and the second is a part with teeth, one of which holds the bowstring, and the other rests against the trigger. These parts can be cut from plywood using a jigsaw.


Step eight. Making arrows
We make arrows from wooden rods. To stabilize the flight, make feathers for them; the author used adhesive tape for this. Well, you need to install some kind of weight on the end of the arrow; the author put a self-tapping screw there. If desired, you can cut off the head and sharpen the rod.
Evgenia Smirnova
To send light into the depths of the human heart - this is the purpose of the artist
Content
How to make a crossbow - this question worries both hunters and shooting enthusiasts. Shooting from a crossbow, as from a military weapon, is left far behind. Today, crossbow shooting is practiced mainly by professional athletes, as well as by amateurs who want to shoot at targets. Shooting with a crossbow has a number of advantages over shooting with a firearm. Firstly, it is silent shooting, and secondly, accessibility and comparative safety. A crossbow does not require any permission or medical examination to purchase it. You just need to buy a ready-made one (for which you will have to pay several hundred dollars or more), or make a weapon yourself. That is why your favorite useful advice site will tell you today how to make a crossbow yourself.
How to make a mini crossbow - instructions


Types of weapons and ammunition for them

Experts distinguish two types of crossbows - field and match. Ammunition for both types is considered to be feathered arrows. Carbon and duralumin feathered arrows are available on sale. You can learn and compete in shooting using a standard five-color archery target, which is also available for sale. Field crossbow shooters usually compete at distances of 35, 50, 65 meters (outdoors) and 10, 18 meters (indoors). Match shooters usually compete only in special premises - shooting ranges at distances of 10 and 30 meters.
Hunting with a crossbow is an activity for real men
Many owners use their devices for hunting. Hunting with a crossbow is fundamentally different from hunting with a gun - shooting animals from a tower, a helicopter, or driving an animal in a large crowd is not everyone’s cup of tea. Hunting, on the contrary, loves silence and solitude. In some ways, this type of hunting is reminiscent of the famous heroic pastime - hunting a bear with a spear. In fact, to shoot you need to approach the animal at a distance of 50 meters or closer. Not everyone will be able to approach a boar at such a short distance, and approaching it at such a short distance requires special hunting skills. Well, the more valuable the loot!
How to choose

Power
For hunting birds or small animals, a crossbow with a draw power of 50 kg is sufficient. With a pulling power of 50-70 kg, you can hunt large ungulates. For wild boar hunting, crossbows with a power of 80 kg are used.
What ammunition can be used
Hunting large game requires special ammunition. To hunt large prey you need to use special professional arrows made of fiberglass or carbon. These arrows are strong and light enough to be properly centered to ensure a successful hit. There are also sometimes excellent aluminum arrows on sale. But such ammunition is only suitable for hunting small animals or birds. Manufacturers of arrows provide the possibility of turning hunting ammunition into sports ammunition - to do this, you just need to change the arrow tip. The threaded connection allows this to be done very quickly. A hunting arrow weighs from 30 to 35 grams, the length of such an arrow is from 45 to 50 cm. As a rule, the length of the feather of a hunting arrow is longer than that of a sports arrow, because the arrow needs to stabilize faster in flight to assume a firing position.
Despite its age, the crossbow is still able to compete well with some types of weapons. Unlike its ancestor, the bow, this design has an automatic arrow release system, thanks to which the shooter can concentrate on aiming without wasting energy on pulling the bowstring. Given the popularity of this weapon, many craftsmen are interested in how to make a crossbow with their own hands. To do this, you should take into account many nuances, know the design features of a modern crossbow, the types of such weapons, factors influencing the firing range, etc.
Before you make a crossbow with your own hands, you need to understand the features of this weapon. It is also called a crossbow or arrow thrower, which perfectly characterizes the features of its design. In simple terms, this is a bow equipped with a special mechanism for cocking and releasing the bowstring.
There is a full-fledged hammer here - a trigger, through which the shot is fired. Thanks to this innovation, the crossbow is superior to the traditional bow in many respects, namely:
- lethal force;
- shot range;
- shooting accuracy.
However, in most cases, a crossbow is inferior to a bow in terms of rate of fire. To level out this drawback, special shortened arrows or bolts, and sometimes bullets, were used.
When the crossbow was used as a military weapon, there were enlarged prototypes that were installed on special machines. They were called arcbalists. At the moment, crossbows are used mainly in sports and hunting, being compact and easy to use.
Device Features
 To make the stock, it is recommended to use wood material: ash, beech, birch, walnut, rosewood and even oak
 The main part of the crossbow is the stock into which the arrow is placed. It is combined with the trigger mechanism.
A guide groove for bolts is installed in the upper part of the stock. At the end of the stock there is a stirrup and a cross. Wooden or steel shoulders are fixed to the latter.
The traditional trigger mechanism consists of a lever, a washer with a slot for the arrow shank and a retaining spring. Thus, when the trigger is pressed, the bowstring is released from the hook, transferring energy to the arrow.
At the moment, there are several types of trigger mechanisms used in crossbows. The most popular of these is the pistol-type design.
What does a crossbow consist of?
Compared to a traditional bow, several elements have been added to the design of the crossbow. This weapon consists of the following parts:
- bed;
- trigger mechanism;
- bowstring
If we are talking about a block crossbow, then its design also involves the presence of blocks - rollers designed to tension the bowstring.
 On the left is a classic crossbow, on the right is a block model
 Today, there are several types of crossbows. Regarding their purpose, such structures are divided into:
- Sports. The appearance and characteristics of such weapons directly depend on the sporting discipline in which they are used. As a rule, such designs are equipped with special aiming systems and various attachments designed to improve shooting accuracy.
- Hunting. Such crossbows require relative compactness with high power. Therefore, block-type models are most often purchased for hunting.
- Amateur. These are lightweight guns that are designed for target shooting and have relatively little power. Exact copies of antique crossbows are also produced, which, although they are combat prototypes, are most often used to decorate interiors and replenish collections.
Regarding the design, there are:
- Classic models. In this case, energy is accumulated directly in the arcs, after which it is transferred to the bowstring. The operating principle of such crossbows is similar to the simplest bow models.
- Block. This is the most advanced type of this weapon. A special system of blocks in this case contributes to the proper distribution of load between the elements of the system. Thus, the power of such a crossbow increases, and its dimensions decrease.
The design of a block crossbow is particularly complex. Even the banal process of replacing a bowstring in this case requires professional intervention.
Depending on the type of projectile used, crossbows can be:
- Classic. In this case, we are talking about the use of special crossbow arrows or shortened “bolts” that increase the rate of fire of the weapon.
- Schneppers or balestres. A typical projectile in such weapons is a metal ball.
Model manufacturing technology
 To make a bow, a car spring is used, and rollers (blocks) are used as a string (cable) fastening system.
 Making a crossbow with your own hands will be somewhat more difficult than making a bow. The fundamental difference in this case is the presence of a stock and a trigger mechanism. However, if you have skills in working with hand tools, then you should not have any particular difficulties.
Material selection
Before you make a crossbow from wood, you need to learn how to choose and prepare the material correctly.
Wood has the best properties for making a crossbow. This is an indispensable material for creating a stock and bow, since the wood is easy to process, has good flexibility and is very durable. In addition to wood, various composites and spring metal are used in the manufacture of arches today. However, for DIY production, it will be easiest to use wood.
Of course, something more reliable and wear-resistant should be used for the trigger mechanism. That's why it is made of iron.
If you plan to make a crossbow, the tension force of which does not exceed 20 kg, then it is quite possible to use beech or other hard wood to turn the parts of the trigger mechanism.
To make the body of a crossbow, it is best to use the following types of wood:
- poplar;
- ash;
- maple;
- acacia.
The density of these rocks is quite sufficient to withstand significant loads exerted on the stock and bow of a crossbow. Soft types of wood such as pine and linden are absolutely not suitable for the manufacture of these parts.
Preparation of material
 The wooden blank for the crossbow must be dried for a year
 Due to the significant loads placed on the elements of the crossbow, it is not surprising that sooner or later they will fail. To prevent this from happening in the near future, it is necessary to use pre-prepared material in the production of the crossbow.
The wood should be collected wet and dried within a year. To make a bow and stock, you must select branches that meet the following characteristics:
- For a one-piece design of a stock with a butt, you should choose a branch at least a meter long. To make arcs, the length of the branch must be at least 180 cm.
- The diameter of the workpieces must be at least 10 cm.
Advice! Before drying the raw materials, the saw cuts should be protected with paint or varnish. Any glue can also be used for this. This approach is necessary so that the wood dries more slowly and more evenly. This will protect the workpiece from the appearance of internal cracks, which will significantly extend the service life of the crossbow.
After protecting the cut points, you need to do the following:
- The workpiece is sent to a dry place, protected from sunlight.
- It is advisable that the raw materials remain here for at least a year.
- Next, you should clean the workpiece from the bark, after which it should be kept in a dry place for another week.
- Now the log can be sawed in half, after drying for about a week.
Making shoulders
 The simplest thing is to use ready-made bows for sports shooting
 On the workpiece, you should choose the side that is characterized by thinner annual rings. As a rule, this is the northern side, on which the fibers are denser than in other parts. The bow or shoulders are made from this part.
The production of shoulders is carried out as follows:
- First, the middle is outlined, from which you should measure 2 cm in each direction to install the crossbow stock. This part of the bow should have maximum thickness.
- From the middle we begin to gradually cut off excess material, moving towards the edges. The workpiece should be thinned in this way on both sides.
- From time to time it is necessary to check the bending of the bows using a test bowstring. It is a strong rope with many loops. By placing a string on the bow, you can determine the degree of deflection and its uniformity. This way, the places where excess material should be removed are identified. This process continues until the product bends evenly on both sides.
How to handle knots
When preparing material, it is advisable to choose those branches that are as free as possible from knots and other defects. It should be understood that any large knot is a weak point in the structure. However, if you were unable to find a workpiece completely free of defects, it does not matter.
Important! Under no circumstances should you cut off knots before drying the material! Otherwise, the raw material may crack.
The removal of knots must be carried out already in the process of shaping the crossbow's shoulders. A well-sharpened knife is used for this. They should be cut in such a way that a protrusion about 1 mm high remains above the surface of the workpiece. Next, the defect is sanded with sandpaper.
Making a stock
 The bed is made to suit you - for maximum comfort
 After the arms of the weapon are ready, you should proceed to making the stock. To do this, you must follow these instructions:
- Initially, we select the location of the groove along which the arrow will move during the shooting process. This place must be perfectly level. Any notches or irregularities can disrupt the trajectory of the arrow, dampen some of the inertia, or even make the weapon unusable.
- Typically the gutter is about 30 cm long. It should be carefully hollowed out and sanded.
- Behind the chute it is necessary to cut a recess for the trigger mechanism. In the front part, grooves are created for installing the shoulders.
All wood cutting work should be performed with a special carpenter's knife or chisel.
Trigger
To understand how to make a trigger mechanism for a crossbow, you first need to understand the features of its design.
If you do not plan to make a powerful weapon, but want to create a light and compact crossbow, then the arrow release mechanism can be made of wood. Beech or oak wood is used for this. If we are talking about weapons with a tension force of more than 20 kg, then the parts of this mechanism should be made of metal.
The most primitive trigger mechanism is called a “nut”. Its design is extremely simple. This element is a cylinder and consists of the following elements:
- on one side there is a trigger stop;
- at the opposite end there is a bowstring hook.
Powerful crossbows use an improved trigger system. It provides a light trigger pull under high load conditions.
Crossbow assembly
 Advice: don’t worry about making arrows, they are much easier to buy
 All that remains is to connect the manufactured elements together. Initially, it is necessary to install the trigger mechanism in the stock. To do this, a seat of a certain size must be machined into it. Next, the shoulders are installed. They can be either a solid arc or two separate elements. They are attached to the base using a special furniture glue, which will ensure reliable adhesion of the elements.
At the last stage, the bowstring is pulled over the shoulders. A strong nylon rope is most often used as a bowstring. It is attached to the ends of the bow, and the crossbow is ready for its first shot.
Making fiberglass arms
If you want to make a really powerful crossbow, then the arms of this design would be best made from fiberglass. Such a bow will not only be stronger, but also more durable than a wooden one. The manufacturing instructions are extremely simple:
- We take Kevlar or fiberglass, cutting it into strips. To make the shoulders for an average crossbow, about 40 strips are required.
- We glue the resulting elements with epoxy resin, tightly connecting them to each other.
- After gluing, it is necessary to place the resulting workpiece under the press. The best option for this are flat boards, between which the shoulders are placed, clamped with clamps.
- The structure hardens in 24 hours, provided that the workpiece is in a warm room.
- After the shoulders have completely hardened, their protruding edges should be trimmed with a knife and sanded with sandpaper.
Epoxy adhesive should be prepared in such a way that the thickener content in it is minimal. Experts advise using no more than 10% thickener.
To make curly arches, you need to make a special mold for the press. It is made from plywood, which bends after pre-soaking.
How to make a mini crossbow?
 Shooting from a mini crossbow will be quite interesting, because... sharp bamboo skewers can be used as arrows, capable of piercing even cardboard
 To shoot a crossbow, it is not at all necessary to acquire skills in working with wood, purchase the necessary tools and procure raw materials, waiting a year to start work. The current model can be made from ordinary corrugated cardboard. Naturally, such a crossbow will not be suitable for sporting or hunting purposes, but it will be just right for target shooting.
The production of such a prototype involves several stages:
- First we make the shoulders. To do this, you need to cut out several identical blanks from corrugated cardboard, which are fastened together into a single structure. Thus, the necessary rigidity is created, because this part of the crossbow will bear the maximum load.
- Then the trigger and locking mechanism should be cut out of cardboard. They are also made from several layers glued together. To create additional rigidity, it is necessary to strengthen these structures with ice cream sticks.
- The main part of the crossbow is represented by the stock, just like in its combat prototypes. This design consists of two identical parts that are connected to each other by means of jumpers.
- We insert the trigger mechanism inside the stock and glue the main part of the crossbow.
- Now you need to attach the shoulders to the base. This should be done very carefully to avoid distortion, otherwise the accuracy of a shot from such a crossbow will be in question.
- At the last stage it is necessary to tighten the bowstring. For this purpose, stationery rubber bands are used, which are intertwined with each other. The more rubber bands you use, the more powerful your crossbow will be. However, you should not overdo it here - three or four layers will be quite enough.
You can use regular ballpoint pens as arrows for such a crossbow. They are quite heavy for a targeted flight, and the inertia of the rubber band will be more than enough to launch such a projectile.
Video instructions on how to make arrows for a crossbow
Video instructions on how to make a toy crossbow
One of the most popular types of small arms is the crossbow. And although hunting with such a device is prohibited in our country, there are still many who want to acquire such a “toy” in order to shoot at targets. At the moment, you can buy such weapons on many websites or in stores, but such a purchase will be very expensive. It is much more profitable to make a crossbow with your own hands at home, and you will find out what is required for this below.
Preparation
Today there are many varieties of this sporting weapon. First of all, these are classic models familiar to us from historical films and block crossbows - modern weapons equipped with complex mechanisms. The last option will be quite difficult to create at home, so let's focus on the classic one.
What parts does a crossbow consist of:
- Trigger;
- Bowstring;
- Crossbow stock;
- Bolts and arrows.
Making a crossbow at home will be much easier if you immediately stock up on all the necessary materials and tools. For this you will need:
- Well sharpened knife;
- Hammer;
- Drill or brace;
- A regular hacksaw, which can be replaced with a grinder with a wood disc;
- Plane;
- Chisel.
How to make a crossbow with your own hands
In addition to the tools to create this small weapon, you will need a piece of wood measuring 900 mm in length and 30 mm in thickness. In this case it will do:
- ash;
- hazel;
- poplar.
- birch.
First of all, you need to prepare a wooden blank. To do this, cut the branch to the required size and paint over the cuts. This must be done so that the liquid comes out of the wood slowly and evenly. Please note that the wood must lie in a dark place for at least a year, only in this case the weapon will fire with special power. After this, the bark is removed from the workpiece and left to dry for another week. Next, the log is sawn into two parts and the crossbow itself is made from the northern part - the strongest.

Draw the stock of the weapon on the board and cut it out using a hacksaw or grinder, then make a small groove for arrows on the top of the workpiece. On the front side, cut a groove in which you will attach the arc. If knots or chips appear on the stock during the process, remove them with a knife and treat the area with sandpaper.
How to make an arc
For this part you will need a flat board with a length of at least 750 mm, a width of 200 mm, and a thickness of 60 mm. We dry the workpiece well and let it stand for several days, and level it. The width of the part in the middle is 40 cm, and at the edges it narrows to 15 cm.
At a distance of 100 mm from the cut groove for this part, we create a through hole through which we stretch the rope - it will become the main fastener for the crossbow arc. Then we insert the part into the groove and fasten it firmly with a rope, as shown in the bottom figure.

This part plays a fairly significant role in the “lethality” of the weapon, and to create it you will need the following materials:
- nylon threads;
- wooden plank;
- two nails without a head;
- rubber glue.
First of all, you need to make a special machine for weaving this part: take a rope and measure the length of the bowstring. After this, saw off a board with dimensions slightly larger than this parameter. Next, mark the length of the string on the board and drill two holes in these places - this is where you need to insert your nails.
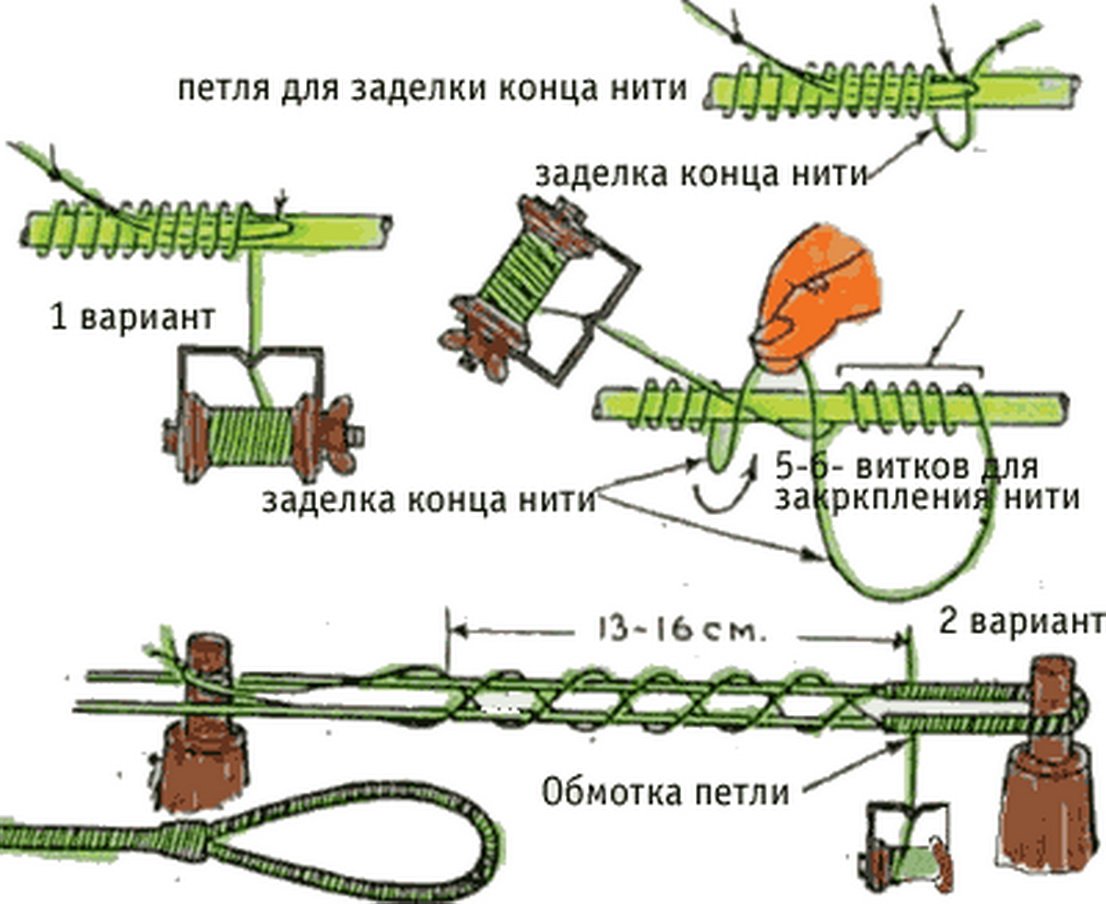
Take the thread, tie it to one of the nails, and leave a margin equal to the length of the bowstring. After this, begin to evenly wrap the threads around the nails (Dacron is best). Continue this process until the base of the bowstring reaches 5mm. To do this you will need to make 5-6 full turns. Try to keep the threads equally tight.
Next, wrap the base near the nails on both sides several times with wrapping material. This will create loops at the ends. You can understand how to do this from the above diagram. Do not forget to wrap the middle of the bowstring, because this part suffers greatly from friction. Tie the cut ends of the threads with a sailor's knot and lubricate them thoroughly with glue so that the entire structure is strong. After which you can pull the bowstring onto the arc and adjust the degree of its tension.

How to make a trigger mechanism
The simplest option would be a pin-type lock; we will choose it for our weapon. Pull the string as far as possible and drill a through hole in this place. Also make a small transverse recess at the top of the crossbow stock. Now secure the lever at the bottom of the part. Make a wooden axle and secure it with wire.
Secure the stock and lever with ropes so that the latter moves with maximum friction. The depth of the “ammunition” groove should be equal to 1/4 of the volume of the arrow, and this recess must be “sawed” from the top of the lock to the front edge of the crossbow.

How to make arrows
In order to get ammunition for your small arms, you don’t have to run to a sports store, because you can easily make it at home. To do this, you will need several ordinary wooden blanks, which need to be well planed and treated with fine sandpaper. It is better to choose light types of wood for arrows; in this case, shooting will be more accurate. As for the tip, if you don’t have special ones, then sharpen the tip of the arrow - with such ammunition it will be quite possible to shoot at targets. You should not drive nails into the head, because this increases the chance that the arrow will split when it hits the target.
Be that as it may, you should remember that in our country, shooting with crossbows is equivalent to using firearms. So if you want to make such a device, then under no circumstances use it for its intended purpose. Treat your crossbow as a beautiful souvenir, and then the law will not have any claims against you.
![]()
What needs to be said in the very first lines of this article: in Russia, the CIS countries and most countries of the world, hunting with a crossbow is illegal, and the crossbows themselves (if their tension exceeds 40 kg) are equated to edged weapons. There is a fine for wearing and using them. Why, then, am I giving recommendations on how to make an objectively dangerous thing that can cause problems for readers? Because the ability to hunt using a wide variety of weapons, including homemade and even illegal ones, may one day be useful to each of us. Few people think about this while store shelves are filled with food products - but we live in too unstable times to say with complete confidence that this will always be the case.
In one of the previous articles, I wrote about hunting: with the help of this seemingly frivolous weapon, it is easy to hunt small fur-bearing animals, birds and reptiles. You can shoot medium-sized game from a crossbow. Of course, we are not talking about toys from legal gun stores: you may have seen these on sale - elegant, light and low-powered. A weak crossbow is intended for sport shooting - you should understand how great the difference is between it and a real combat device. That is why the latter are prohibited. An arrow fired from a powerful combat crossbow pierces a person right through, even if he is wearing a Kevlar body armor.
But until the BP strikes, you and I are peaceful hunters, and we do not think about using lethal weapons against people. Why am I writing now about homemade crossbow for hunting? Why not buy ready-made or order from an experienced craftsman? Because legally they won’t sell you anything worthwhile. And it’s better not to buy illegal weapons at all if you don’t want to get into trouble with the law. Yes, having something killer in your bins and knowing how to use it is useful, but not a single living soul should know that you have it. It’s better not to introduce even your friends and family to this, not to mention complete strangers like sellers and couriers.
 How to make a crossbow at home?
So, how to make a crossbow with your own hands? First of all, decide what kind of power you need from the weapon - its design and materials directly depend on this. For hunting ducks and hares, the simplest device with a wooden arch is suitable. Larger animals already need a metal one. There are also so-called composite arches, which are a combination of several materials (traditionally - wood, antler, veins, but now various types of plastic are more often used). Their technical characteristics are excellent, but it is almost impossible for a non-professional to produce such a part “on the knee” with high quality. In order to avoid injury among readers, I will not even give here a description of the assembly of a composite arc.
My opinion: it is advisable to use a metal arc. The power reserve will not be superfluous - besides, wooden parts fail faster, which also poses a risk of injury to the shooter. Since your goal is to make a fairly powerful crossbow, look for springs from Soviet passenger cars among friends or on the secondary market for auto parts. Humanity has not yet come up with anything better for use as an arc. But if you still couldn’t get this rarity, take any elastic metal strip 2-3 cm wide and 3-4 mm thick.
The stock is most often made of wood (spruce, aspen), less often of metal. The more powerful the crossbow is planned, the more durable and massive this part should be. The designs of the stock may differ, but there must be a groove for the arrow on it, as well as a butt and fastenings for the trigger mechanism, arc and other functional elements.
A non-elastic rope made of synthetic fibers, a steel cable or a guitar string is used as a bowstring. You may be surprised, but it is the first of the three options that demonstrates the best tensile strength. Durable, cheap and accessible - what else is needed?.. But here's what: beeswax impregnation will extend the life of a synthetic bowstring, protecting it from moisture and friction.
The crossbow mechanism, rollers and fastenings are the most interesting. It is difficult to make them “on your knees” if you do not have the skills to work with metal. Below I provide drawings of a homemade simple crossbow (1) and a powerful combat one (2). All parts that you cannot make yourself, order from the workshop, providing drawings of the parts you are interested in.
Drawing of a simple crossbow (1) *click to enlarge*
 Drawings of a combat crossbow(2) *click to enlarge*


How to make arrows for a crossbow?
Bolts - arrows for a crossbow, are easy to make with your own hands. For these purposes, wood is most often used, less often plastic and metal. Why is wood better? A wooden bolt has an optimal weight: a light plastic arrow quickly loses speed, and a piece of steel wire is heavy and will not fly far. The shaft should be planed along the grain for better flexibility, and then dried well. At the end we leave a cut into which the tip will be inserted.
The tip itself must be cut out of a steel sheet (thickness no less than 0.7 mm) with metal scissors and refined with a sharpening stone - smooth and sharpen the edge. We insert the tips into the cut, lubricating it with epoxy. You can also tie it with thread for strength, and apply a layer of epoxy on top.
There are also many options for making bolt feathers, but the best, in my opinion, is bird feathers. Ideally, goose, but even from the tail of a pigeon, which is much easier for a city dweller to find - they lie underfoot. We split the feather in two, cut each half in half and glue it to the arrow. For strength, we wrap it with threads.
Here's what we ended up with:

It is important that all the bolts are the same in weight and length - this will make it easier to shoot your homemade crossbow. But you definitely need to shoot him: the hunt can wait, first you need to master the new weapon well, get a feel for it. Even if you have experience shooting a crossbow, this one will be a little different, more “yours” - like any thing made with your own hands.
There are no similar articles.