Expanded clay concrete proportions for floor screed. Expanded clay floor screed: advantages and pouring technology
Comments:
Expanded clay of fine crushing began to be used in housing construction, namely for floor screeds, relatively recently. The proportions of expanded clay concrete for the floor at the exit are the following values: 20-25 kg of dry expanded clay gravel and 30 kg of a dry mixture of concrete and sand. According to the advice of experts, when pouring the floor with expanded clay concrete, it is better to use it as a base on which the finishing screed will be poured.
Properties of expanded clay screed
The addition of expanded clay concrete to the sand-concrete composition is necessary in cases where the screed is poured with a thickness of more than 3 cm. These are, as a rule, options for major repairs of apartments and residential premises, where do-it-yourself leveling of the floor base is required without the involvement of bulky special equipment. Therefore, it is precisely these proportions that are used in pouring floors in residential buildings with domestic significance. A simplified version of the proportional composition is as follows:
- 2 parts of expanded clay;
- 1 equal part of water and cement;
- 3 parts sand.

Expanded clay itself is a light and porous compact rounds, obtained by melting clay. Expanded clay concrete in the construction industry is produced in the form of gravel, crushed stone and sand.
The latter is already obtained from the crushing of processed expanded clay crushed stone and is used exclusively for filling with the thinnest layer. Nevertheless, expanded clay gravel is the best material for do-it-yourself floor screeds. It is available in grain sizes from 5 to 40 mm and is already adapted for integration with concrete. It is sold packed in plastic bags or in bulk.
Since clay is the basis for the production of expanded clay concrete, it is worth paying attention to the quality and physical properties of expanded clay materials with an eye to the unique qualities of clay.
Thanks to them, the correct floor screed with expanded clay concrete is provided with such advantages:

- resistant to rust, mold and rot;
- fireproof and moisture resistant;
- has high strength and durability;
- retains high heat and sound insulation.
The disadvantages of expanded clay screed include the duration of work, which implies additional manipulations after pouring the screed itself. It is necessary to grind the concrete base to give it an exceptionally flat surface. In addition, the floor acquires additional centimeters in thickness. However, these factors do not bother many at all, and this material continues to be used more and more successfully.
Back to index
The preparatory stage of the screed
Proper pouring of floors is divided into two stages: thorough mixing of the mixture and screed. The required tools for this are as follows:

- capacity for the preparation of expanded clay composition;
- construction mixer;
- rule - a ruler for alignment with a triangular section shape;
- polyethylene and adhesive tape or liquid mastic for waterproofing;
- level;
- self-tapping screws in the form of beacons;
- metal slats or profiles;
- cement milk.
To prepare the mixture, you will need a construction mixer and a large metal container that can accommodate the given proportions of the expanded clay concrete mixture, for example, a construction bath. Granules are poured into it and filled with water above the upper level on the finger. The porous structure of expanded clay concrete will allow you to quickly absorb the right amount of water for the granules to acquire adhesive qualities. Then everything is mixed with a mixer.
The sand-concrete mixture is added sequentially during the mixing process. It completely envelops the expanded clay concrete granules, as if absorbing them into itself. It is necessary to stop adding the cement mixture when the gravel changes its original color to the shade of cement. You should get a cement mixture with gravel rounds of a characteristic gray color. Expanded clay concrete retains its viscous properties for a short time, so it is necessary to fill the floor with it immediately after the batch has been made. The screed is made in stages.

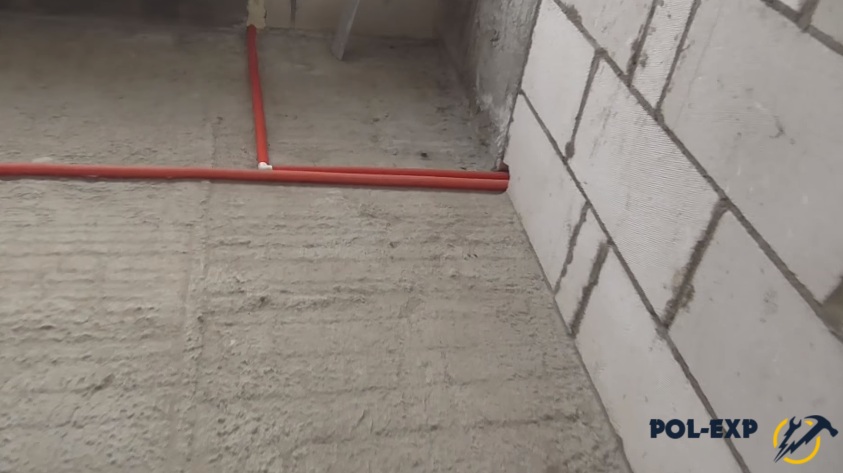
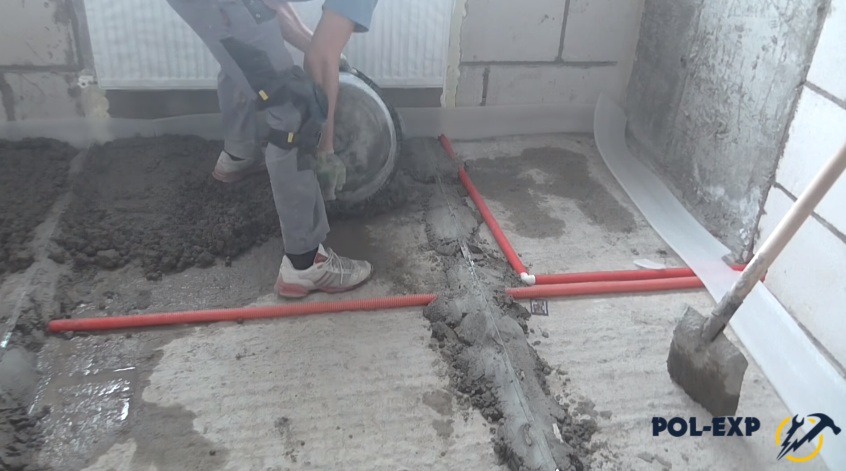
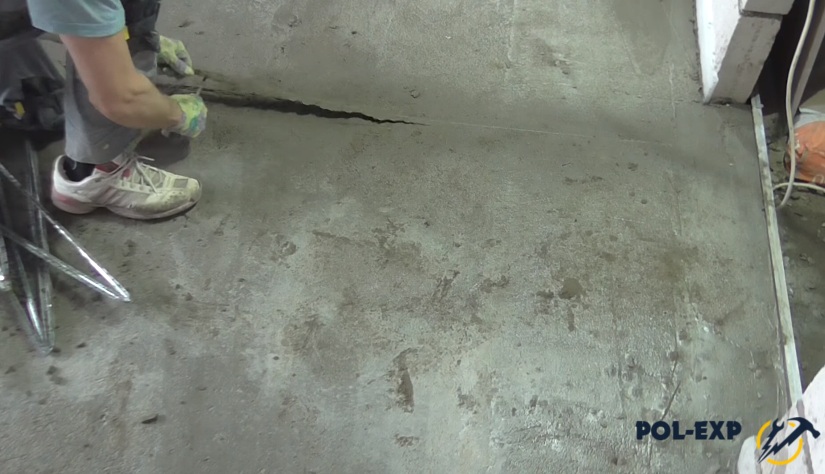
The working surface is cleaned of debris and dust, recesses and cracks are sealed. The wires located on the floor are removed into the corrugation. Waterproofing in the form of a polyethylene film is covered on the base and fixed with adhesive tape or poured in liquid form.
To backfill expanded clay concrete, you must first set the beacons. A water or laser level at the required height, as a rule, not lower than the expanded clay layer equal to 3 cm, marks for the line are left. In the corners of the room, the lines must be connected. Self-tapping beacons are placed along the lines 50-60 cm apart and fixed with cement. A metal rail is applied all the way to two self-tapping screws located along the wall. Thus, at least 3 beacons must be installed in the room: in the center of the room and along two opposite walls. In this form, the base of the floor is left for a day.
Back to index
Screed and pouring of expanded clay concrete
Expanded clay is poured between the lighthouses after they have completely solidified in cement. The backfill layer is maintained somewhat below the upper levels of the lighthouses. The mixture is leveled by the rule, which is laid on two beacons parallel to each other and stretched along so that the entire layer below is leveled. The laid expanded clay concrete is poured with cement milk and lightly compacted to fix the solidity of the layer for subsequent finishing pouring.

Filling is carried out using a cement-sand mortar the very next day. You need to start with a pair of neighboring lighthouses. Alignment occurs when the angle of the direction of the rule changes. First towards you, then away from you, left and right. The thickness of the finishing layer must be observed no more than 3 cm.
A day later, it is necessary to eliminate the beacons, and pour cement into the formed cavities from under them. After an hour, pour the screed with cement water and rub it with a plaster trowel.
Many owners of private houses and apartments on the ground floor additionally want to insulate the floor base, which is located above the cold basement. Expanded clay concrete screed, which is also a good soundproofing material, helps to effectively solve this problem.
Advantages and disadvantages
Advantages of expanded clay concrete:
- lightweight and refractory building material;
- has increased heat-insulating and sound-absorbing properties;
- characterized by a long operating period.
Expanded clay mixture is much lighter than standard concrete mortar, it is easier to work with it. But this building material is more fragile in its structure, so it is used to equip the floor screed in rooms with minimal loads on the base during operation.
Expanded clay concrete is not recommended to be poured in industrial premises in which heavy technical equipment is installed. The material can be used for flooring of residential premises, outbuildings in the country, garages or public buildings.
The main disadvantage of expanded clay concrete is that its structure includes light granules, which float up after pouring the screed. As a result, bulges are formed on the surface, which have to be subsequently polished, or it is required to additionally pour a concrete screed.
Preparation of expanded clay concrete mortar
Materials for the manufacture of expanded clay concrete:
- fine-grained sand without clay;
- granulated expanded clay M600 (700), fraction - 5-20 mm, specific density - 600 (700) kg / m³;
- cement M400 (500).
On the left - expanded clay in bulk with a fraction of up to 5 mm, on the right - expanded clay with a fraction of 5-10 mm.
The ratio of the components of the solution
The ratio of the components of the working composition may vary depending on what tasks need to be solved with its help:
- To perform a screed with a thin layer without shrinkage of the solution, it is necessary to use expanded clay with a fraction of not more than 5 mm.
- To reduce the mass of the floor screed, it is necessary to abandon expanded clay with a fraction of 5-10 mm, since the mixture will sag after drying. Therefore, it is not recommended to carry out any work on the floor until the hydration process is completed.
- The strength of the floor screed is achieved using expanded clay of all fractions - 5-40 mm (granules of various sizes are taken in equal proportions). In this case, the amount of cement decreases. Expanded clay base in this case is denser, respectively, of greater mass.
Theoretical proportion of expanded clay mixture:
- 4 parts - expanded clay;
- 1 part - cement;
- 3 parts - sand.
Material calculation
When calculating the number of components for the preparation of the solution, the cubic capacity of the required floor screed is taken:
V = S x H;
V is the volume of the solution;
S is the area of the room;
H is the height of the screed.
If the base is uneven, the height of the screed is measured at several points and an average value is calculated.
The number of components necessary for the preparation of the solution is calculated by the volume and density of the resulting layer of expanded clay concrete.
To calculate the required amount of each of the components of the solution for pouring the sexual base, the volume of the composition is multiplied with the mass of the ingredient used. The resulting value is divided by the weight of the package (bag), and the required number of bags of building materials is obtained.
A lightweight expanded clay concrete layer is poured with a solution without sand, but using M500 cement. Quantity of materials for preparation of 1 m³ solution:
- portland cement - 250-375 kg;
- expanded clay - 720-1080 kg;
- water - 100-225 liters.
Expanded clay concrete screed has a low flow class - P1. This makes it difficult to fill the floor. To increase the mobility of the working mass, plasticizers of the SDO category are added to it. But there is a budget option - liquid soap (50-100 ml per bucket of solution).
Technological features
The process of preparing expanded clay mixture differs in some features. And its final characteristics will depend on the proportion of the constituent components. When using different volumes of water, you can prepare a liquid, semi-dry or dry solution.
wet method
The advantage of a liquid mortar is self-leveling. In this case, all expanded clay granules float and the heat-insulating layer is located in the upper part of the floor screed.
The disadvantage of the wet pouring method is the need to perform an additional concrete screed under the base finish. This requires additional time and increases the cost of work.
The wet method is suitable only for warming the floors of attics, outbuildings. Concrete mortar, which includes expanded clay, is recommended for use for reinforced concrete blocks.

Various types of floor screeds with expanded clay: mechanized, semi-dry, lightweight, floating.
Semi-dry method
The consistency of the working mixture makes it possible to distribute expanded clay evenly throughout the entire volume of the screed. The technique can be applied to pour bases from any material.
Disadvantages of a semi-dry solution:
- pouring requires great physical effort from the workers;
- the need to use beacons for the quality of work;
- the finished surface needs to be sanded additionally.
Dry screed
This technology does not involve mixing the solution. Dry expanded clay is laid directly on the floor base, and a standard cement mortar is poured on top of it with a thin layer.
The advantage of this technique is the speed of construction work, saving materials. The disadvantage is weak strength characteristics.
Today, ready-made dry mixes can be purchased on the construction market, in which the proportions of the necessary components are maintained. This greatly simplifies the preparation of solutions for arranging the pouring of sexual bases.
Step-by-step instructions for laying a wet screed

Before pouring the screed, the floor must be cleaned of dirt and cement influx.
The sequence of filling the floor base:
- ground preparation;
- waterproofing;
- installation of beacons;
- installation of a damper tape;
- solution preparation;
- screed filling.
Not only the service life of the latter, but also the operational period of the floor covering depends on the quality of the preparation of the base for the arrangement of the screed.
Preparatory activities include the following:
- If the work will be carried out on a concrete base, it must be cleaned of dirt, construction debris, old paint, oil stains, etc. In the presence of cracks, they must be repaired with a cement-sand mortar. If waterproofing is provided, a primer is applied to the concrete surface.
- When working with a wooden base, the quality of fastening the boards to the logs is checked. Rotten boards are removed and new ones are installed. To prevent the solution from leaking between the boards through cracks or holes from knots, they are clogged with sawdust mixed with oil paint. For this purpose, you can purchase a special putty for parquet boards at a hardware store.
- If the screed needs to be made directly on the ground, it is required to completely remove the vegetation and level the area. Expanded clay and sand are poured over the soil base. This pillow is spilled with water and carefully rammed.

As a waterproofing, you can use a polyethylene film.
After preparing the base, it is waterproofed, which can be done in two ways:
- over the floor screed;
- between the floor and the screed.
If the waterproofing is arranged under the floor screed, bitumen, polyethylene, impregnating waterproofing or roll materials can be used as a waterproofing material.
Beacons are installed for pouring expanded clay concrete mixture. First, a horizontal line is drawn on the walls from the base 1.4-1.6 m in height. For this, a building (laser) level is used.
A damper tape is fixed along the entire perimeter along the horizon line (if its width is not enough, it is glued in 2 rows). The width of the tape must be at least 1 cm greater than the thickness of the floor screed. For its fastening, you can use a construction stapler or adhesive double-sided tape.
Necessary tools and materials
To make a claydite-concrete screed with your own hands, you will need the following tool:
- rules;
- buckets;
- concrete mixer;
- grinding equipment.
Grinding equipment and a concrete mixer can be rented if one-time construction work is expected.

The distance between adjacent beacons should be no more than 1.5 m.
To prepare the base you will need:
- special cord for construction work;
- yardstick;
- building level (hydraulic or laser);
- level;
- trowel;
- screwdriver, linear profiles and perforator for beacons on self-tapping screws.
Solution preparation
Expanded clay granules have hydrophobic qualities. So that they do not draw water from the solution, expanded clay is pre-soaked with water. It must absorb enough moisture. If this procedure is skipped, the hydration of the mixture will not be completed, the expanded clay concrete screed will not turn out to be a monolith, but in pieces.
When expanded clay picks up moisture, it can be sent to a concrete mixer, adding all the other components of the solution and liquid soap. Water is poured gradually, as the solution is mixed, until a homogeneous mass is obtained.
With a properly selected proportion of the components of the solution, the surfaces of the granules should not have brown spots.
Filling the screed
Expanded clay mortar sets faster than standard cement-sand mortar. Therefore, the finished mixture must be consumed immediately.
Filling is carried out from the far corner of the room along the beacons of one row, the solution is leveled by the building rule. The rest of the rows are filled in succession. Finishing work near the door.
So that the flooded screed does not crack, it must be moistened for a week.
How much dries
The expanded clay concrete layer gains full strength in 28 days. Accordingly, only after a month you can proceed to the finish coating of the base. On this type of screed, you can lay any type of floor.
After complete drying, the expanded clay granules rise to the surface, so it will need to be sanded before laying the parquet. Possible subsidence of the solution, as a result of which beacons will begin to appear on the surface. In such a situation, grinding will not be possible, you will have to fill in an additional thin layer of self-leveling compound, which will take another week to dry.
The floor screed is a rough surface that allows you to hide protruding structural elements, floor unevenness, as well as various communication networks. It also works as sound, heat and condensation protection. The most popular type is expanded clay concrete. It is notable for its special efficiency and some features due to which it has become widely known.
Expanded clay concrete is made on the basis of high-strength granules. They allow you to create a cellular structure, which in turn:
- Increases the level of thermal insulation of the floor.
- Protects against ambient and impact noise.
- Evens out differences in the base of more than 10 cm without a significant increase in the load on the supporting structures of the house (however, a thick layer is difficult to compact).
- Hide the laid engineering networks, as well as the underfloor heating system. At the same time, the latter works most effectively in expanded clay concrete screed. This is due to the fact that it completely eliminates possible heat loss.
- Provides a durable layer regardless of room configuration.
Due to its low weight, the screed is practical in houses with a wooden base or an old, weakened ceiling. The load from it is much lower than with the classic wet cement-sand mixture. It is durable, as it effectively resists wear and tear under heavy loads.
With temperature fluctuations, it provides excellent frost resistance up to 50 cycles without loss of bearing capacity and formation of cracks. It is worth noting the excellent resistance to fungal microorganisms, rot, mold, as well as chemical reagents. In direct contact with fire, it does not support combustion and does not ignite. Such a floor can be made absolutely for any finishing material.

There are also disadvantages:
1. It becomes necessary to grind the surface or apply a finishing layer, since after pouring the solution, expanded clay granules float up, creating a kind of roughness.
2. A significant thickness is required (more than 6-7 mm), which affects the volume of the room. Therefore, for houses with a low ceiling, a DSP with a thickness of 2-3 mm would be preferable.
3. Requires significant labor costs for the device of a large layer.
Proportions for making
To find out the scale of work, it is necessary to know not only the area of the room, but also the thickness of the layer being poured. The resulting volume will show how much of the clay component is required, from which you should start further. To obtain different material densities of 1000-1700 kg/m3 (for flooring, it is recommended to choose the highest value to ensure good performance), components are used in a certain ratio.
| Density, kg/m3 | Weight per 1 m3 of solution, kg | ||
| Sand | Cement M400 | Expanded clay M700 | |
| 1500 | 430 | 440 | 560 |
| 1600 | 640 | 405 | 505 |
| 1700 | 820 | 390 | 440 |

In order to moisten the expanded clay well at the above proportions for the screed, add 150-200 liters of clean water per 1 m3. If this volume was not enough and the solution is not moist enough, then the amount can be increased to 250-300 liters. Builders prefer to focus on a simplified ratio of materials for the M100. This option is no less effective:
- 1 part cement;
- 3 hours of sand;
- 4 hours of medium fraction granules;
- 1 hour of water.
Such proportions resemble sand cement, so for simplicity, you can buy a dry mix and add the missing components. If a very strong and durable screed is required, then the ratio changes somewhat.
| Claydite concrete grade | Sand | Cement | Expanded clay |
| M150 | 3,5 | 1 | 5,6 |
| M200 | 2,5 | 4,8 | |
| M300 | 1,8 | 3,6 | |
| M400 | 1,2 | 2,7 |

When working with M500 Portland cement, when laying the screed in rooms with low operating loads, it is recommended to adhere to the following proportions:
- Cement - 295 kg.
- Sand of a large fraction - 1180 kg.
- Granules - 1300 kg.
- Water - 205 liters.
Lightweight expanded clay screeds with a density of up to 300 kg / m3 are made without the addition of sand. In this case, it is sufficient to use cement (260-370 kg), aggregate (710-1100 kg) and water (100-230 kg).

The first step is to choose a suitable large filler. Expanded clay is a fusible clay, which is processed by the thermal method. There are several varieties:
- gravel - particles have an exceptionally round or oval shape;
- crushed stone - coarse grains with fuzzy edges;
- sand is a secondary material of a fine fraction obtained in the process of processing expanded clay.
In the manufacture of screeds, gravel no more than 20 mm is used. Coarse crushed stone up to 40 mm is more practical for semi-dry or dry type. Sand is used to build a layer up to 3 mm, as it provides high strength and heat capacity due to the sufficient density of the solution. Before making the granules, they are soaked with water to prevent particles from floating up. Hydrophilic properties allow you to quickly absorb moisture, as a result of which the backfill will have an increased mass.
First, sand and cement are introduced into the learned aggregate with regular mixing until the expanded clay acquires a cement uniform shade. It is most effective to use a concrete mixer for such purposes, since manually this process is quite laborious. But if you have to interfere with a shovel, then it is recommended to do the batch in full.
Particular attention should be paid to the choice of brand of cement. To make the screed durable and resistant to external influences, you need a brand higher than M400. When making quarry sand, it must be washed from foreign impurities and sifted from debris. By adding special plasticizers, it is possible to provide high heat-insulating and frost-resistant properties. Their introduction is carried out according to the manufacturer's recommendations, but they are replaced with washing powder or liquid soap.
Pure water is introduced into the solution in an amount of up to 300 liters per 1 m3, although it varies due to the different moisture content of the components. The main goal is to achieve the right consistency so that the mixture is easily smoothed by the building rule and not too thick. However, high humidity will cause the granules to float, which will significantly affect the smoothness of the resulting screed.
| Articles |
The need to make an insulated screed on the ground floor above the basement, or in a private house on the ground, is encountered very often. In order to subsequently warm the floor, it is necessary to create a monolithic base with insulation. The optimal solution is an expanded clay concrete screed, the main filler of which is expanded clay granules (foamed and fired clay) of various fractions or expanded clay sand.
Considering that clay is a natural building material, modern processing technologies have only improved its unique properties, due to which it has chemical resistance (not combustible, not subject to rotting or corrosion). And flowability makes it possible to even out even very large differences on horizontal planes when installing screeds.
This is an environmentally friendly building material that has increased heat and sound insulation properties, as well as exceptional durability. Therefore, the screed device using expanded clay provides a warm and durable base for any floor covering.
Relative disadvantages include brittleness, the need for additional surface treatment of expanded clay concrete and a significant thickening of the screed layer.
Do-it-yourself pouring instructions (wet method)
 Let us dwell on how to independently make a floor screed from expanded clay concrete.
For laying, it is necessary to mix expanded clay with water in a suitable container (old bathtub), and the granules must be completely under water. After complete absorption, sand concrete is carefully introduced, continuously mixing. Since it is difficult to indicate the exact proportions for mixing, they are mixed until the granules become similar in color to cement. The consumption of materials depends on the area to be covered and the thickness of the screed.
Without fail, waterproofing is laid under the poured solution, otherwise the water will quickly leave the solution, and the mass will not gain the necessary strength. From above, the floor can also be covered with a film to preserve moisture for a longer period. The mixture hardens for 2-3 days, the surface is not very smooth, it needs to be sanded a little before the finishing screed.
Semi-dry screed
The technology for performing a semi-dry screed provides for the preparation of the base. The concrete is cleaned, all the irregularities are sealed with a mortar, I make a waterproofing layer (you can smear the concrete with bituminous mastic, or lay a film with an overlap on the walls by 15 cm. All wires are pulled into boxes or into a corrugated tube and placed under expanded clay. A damper tape is glued around the perimeter.
The next step is to determine the level and set the beacons (attached to the cement mortar). The distance between them is half a meter. Expanded clay begins to fall asleep from the farthest corner, gradually moving towards the doors. The top of the layer should not reach the edge of the lighthouse by about 2 centimeters, periodically trim the surface with the rule. The backfill is spilled with “cement milk” and rammed so that the insulation balls grab together and do not float up later.
It is necessary to lay the cement-sand mixture in a day, pour it in sections, trying to level it with the rule to an ideal state. Do not allow puddles to remain on the screed. After a day, we remove the beacons and seal the cavities with a solution, then spray with water and wipe the entire surface of the screed. Small irregularities are removed with the addition of a solution. It takes four weeks to completely dry, but you can walk on the floor after 2-3 days, and lay the floor covering after 2 weeks without weighting.
Dry screed device with expanded clay
The fastest and cheapest warm base device is done using the dry method. It differs in that it is possible to lay the flooring and put furniture immediately after completion of work. The stages of work on this technology are the same as in semi-dry, with the exception of the last one. The laid layer of expanded clay is immediately covered with sheets of plywood or drywall. Drywall is laid in two layers with a spacing of seams, gluing the joints and fastening with self-tapping screws.

Calculation of proportions and cost
 If you decide to use expanded clay concrete, then the proportions for the screed will depend on how it is laid - wet or dry.
Depending on the ratio in the mixture of various components, it is possible to obtain expanded clay concrete of different grades. For example, a cement / sand / expanded clay mixture in a ratio of 1: 3.5: 5.7 (kg) will give the M150 expanded clay concrete grade. Accordingly, the ratio is 1: 1.9: 3.7 (kg) - M300, and 1: 1.2: 2.7 - M400.
To install a square meter of a minimum screed of 3 cm, it takes about a third of a 50-kilogram bag of cement, a bag of sand (50 kg), and to fill 4 square meters, you need 1 bag (50 kg) of expanded clay.
The cost of the screed depends on the thickness of the layers (expanded clay and DSP), the area to be poured, the presence or absence of reinforcement. But on average, a floor screed with expanded clay on its own will be from 400 to 700 rubles per square meter. At the same time, the minimum price for a Knauf dry screed (turnkey) is 1,600 rubles per 1 m2.
The price of expanded clay in Moscow and the region is almost the same and is about 1500 per cubic meter of expanded clay of running fractions packaged in bags (1m3 = 21 bags).
| Articles |
Expanded clay concrete screed is one of the few bases with universal properties, used in buildings and structures for various purposes.
| Advantages | Flaws |
|---|---|
| Sufficient mechanical strength for all types of floor finishes. Taking into account their characteristics, it is possible to adjust the properties of expanded clay concrete screed by changing the proportion of components. | A rather large height reduces the volume of the premises. |
| Low thermal conductivity. Such screeds can be used both in underfloor heating systems and for conventional coatings. In all cases, a noticeable effect of lowering heat losses is achieved. Thermal conductivity indicators are regulated by the percentage of expanded clay and the height of the screed. | During the preparation of expanded clay concrete screed, bulk materials and water must be used, as a result of which a rather large amount of construction waste is formed. |
| High fire safety. Such screeds are considered a reliable barrier to open fire and are allowed by state regulatory organizations and use without restrictions. | The work is done by hand, requires considerable physical effort. |
| Environmental friendliness. Expanded clay is a specially processed clay, a completely safe material for human health. | Solidification requires at least 2-3 days, which creates difficulties for the rhythm of construction work. |
| Low cost. Among all floor insulation technologies, expanded clay concrete screed is the cheapest. |
Proportions and preparation of the solution
The process of preparing the material has its own characteristics, and the proportions have a great influence on the final properties. Depending on the amount of water, the solution can be liquid, semi-dry or dry.
liquid solution. There is so much water that light expanded clay floats, after hardening, the heat-insulating material is concentrated in the upper part of the screed. Advantages - the screed is self-levelling. Disadvantages - for finishing floor coverings, it is imperative to make a cement-sand screed, which increases the time for construction work and increases their cost. Another drawback - a large amount of water significantly narrows the scope. Liquid claydite-concrete screeds are recommended for insulating attic spaces and various outbuildings. It is desirable that the floor slabs be reinforced concrete.

semi-dry solution. The most commonly used material, the consistency of the solution allows you to evenly distribute lightweight expanded clay throughout the volume. Such a screed of universal application, can be made on all types of ceilings and under all floors. The disadvantage is that it requires great physical effort, the installation of beacons, and finishing grout.


Dry screed. Feature - expanded clay is not mixed with a cement-sand mixture, but is laid dry on the base. A thin ordinary screed is made from above. Advantages - speed of production. Disadvantages - relatively low parameters of physical strength.

Currently, there are ready-made dry cement-sand mixtures in the implementation, it is much more convenient to use them than to buy the ingredients separately. They are somewhat more expensive, but if you take into account all the losses on travel and transport, then there is no benefit in self-cooking. Savings of ready-made mixtures are also achieved due to the fact that it is impossible to accurately calculate the required amount of sand and cement, there will always be surpluses. And this is a direct loss of financial resources. The use of dry mixes eliminates the occurrence of large unproductive losses of materials.

How to prepare a solution
It is recommended to add 2–2.5 parts of expanded clay to one part of dry mixes. If you want to prepare the solution yourself, then it is recommended to add three parts of sand and four expanded clay to a part of cement. The amount of water, as we have already mentioned, depends on what kind of solution is being prepared.
You can mix the composition manually and with an electric concrete mixer.

There is no point in using a mixer for several reasons. First, it can only prepare a small amount of solution. Small portions greatly complicate the styling process. Secondly, each portion of the solution will have different proportions, which has a negative impact on the quality of the screed. Thirdly, the mixer cannot evenly distribute light expanded clay balls over the volume, most of them constantly end up in the upper part of the container.

The percentage of ingredients can be adjusted depending on the desired final screed. If it is necessary to increase its strength, then the percentage of cement should increase and vice versa. To reduce thermal conductivity, more expanded clay should be given, but it should not be abused. Otherwise, the strength of the base will sharply decrease. You can prepare the solution indoors or outdoors, a specific decision is made taking into account the characteristics of the building and the capabilities of developers.


Practical recommendation. If you plan to prepare a solution using ready-made dry mixes, then this is best done indoors. Factory dry mixes cannot be stored outdoors, they react extremely negatively to direct contact with water.
Preparation of beacons for expanded clay concrete screed
A very important point, the quality of the screed largely depends on the accuracy of the preparation of the beacons. It is better to make beacons under the laser level, if it is not there, then you can use the water level. Work in this case will take more time, but almost eliminate the possibility of error. Why? The water level is set on the wall for each mark separately, if there was an error on the first, then at the expense of the rest it is leveled. The laser level works differently, it gives marks immediately around the entire perimeter of the room. Initially, an incorrectly set device becomes the reason that the entire screed will not be horizontal, but with a slope. Keep this in mind, correcting a mistake later is long, difficult and expensive.

How to expose beacons under the screed?
Step 1. Clean the room from construction debris, inspect the base. If there are large gaps on it, then they will have to be sealed, and work should be continued only after the repair solutions have hardened.
Step 2 Cover the ceiling with plastic wrap or other waterproof material. If the screed is made in non-residential premises on a concrete floor, then waterproofing is not necessary.

Step 3 Set the laser level. We have already said that this operation must be approached very carefully, all actions must be performed in strict accordance with the instructions of the device manufacturer.

Step 4 Check the distances from the floor surface to the laser lines. The minimum thickness of the expanded clay concrete screed is approximately 5 cm. If it is made thinner, then the strength will not meet current standards. The maximum thickness of the screed depends on the parameters of the room and the planned heat saving indicators. The thicker the expanded clay screed, the better the body is preserved in the room. It is recommended to cut down small protrusions on the floor surface. This is much more profitable than, due to such problems, significantly increasing the thickness of the screed.
Practical advice. The process of installing beacons will be much faster if you do not constantly check the distance between the guides and the laser beam with a tape measure or a simple template, but make an appropriate mark on the rule. Thus, you will simultaneously set the metal profile to the level of the horizon and adjust the thickness of the expanded clay concrete screed. This device allows you to set beacons without a bubble level, all the necessary functions are performed by a laser beam.
Step 5 Decide on the specific location of the beacons. The distance between the lines should be 15–20 cm less than the length of the rule. There is a gap of 30-40 cm between the extreme beacons and the walls of the room. The lines should be directed to the exit from the room. The distance between the stops for metal profiles is approximately 20–40 cm, specific values \u200b\u200bdepend on the parameters of the elements. One main condition must be met: the profiles should not sag under the rule during the alignment of the screed, and during this process quite large forces can act on them.


Step 6 Prepare metal slats, if necessary, cut off the missing pieces. Make a solution for fixing beacons. To speed up hardening, increase the amount of cement, the solution for lighthouses can be prepared in a ratio of 1: 2. There is another way to speed up the hardening of the solution for rails. After placing the beacons, carefully sprinkle the surface of the mounds with dry cement, it will quickly absorb moisture. Remove wet cement with a trowel or staple and repeat the operation. Due to such actions, the manufacture of the screed can be started 15–20 minutes after the installation of the beacons.

To speed up the work, you can first prepare linings from various available materials for the rails. It is advisable to use pieces of bricks or pebbles of the appropriate size. It is not recommended to use pieces of gypsum boards due to the very low indicators of physical strength and moisture resistance.

Step 7 Put the pads in place, throw some mortar on them and lay a metal rail on top. Pay attention to the previously made markup beacons.

Step 8 Place a metal rail on a hill, and a rule with marks made on top.
Step 9 Gently press the metal profile until it is in the desired position. Constantly monitor the position of the laser beam on the rule by marks. Hold the tool horizontally and, with a little effort, press the beacons to the desired level. If during operation the profile is too drowned, then it should be lifted, put an additional portion of the solution at the bottom and re-set.
Step 10 Use a spatula or trowel to remove excess mortar from the surface of the planks. By the same algorithm, set all the remaining beacons. If you have the slightest suspicion of correctness, check the position of the rails again. For a guarantee, it is recommended to put the rule on adjacent rails, the laser beam must be located exactly on the marks previously made on it.
This completes the work with the lighthouses, after a short pause, you can begin to manufacture the expanded clay concrete screed.

Filling the screed
For example, we take a classic screed - expanded clay is evenly distributed throughout the volume of the solution.
Practical advice. When purchasing expanded clay, pay attention to its quality.
What are the signs of bad material?
- The balls are too different in size and have unequal weight. This indicates that the recommended technology was grossly violated during the production of the material. The large weight of the balls indicates that there are no air pores inside them, the thermal conductivity does not correspond to the normalized parameters.
- There are open pores on the surface. Very unpleasant marriage, do not buy such material. The fact is that water gets into these pores, it conducts heat well, and dries for a long time in an enclosed space. Such a screed in terms of its performance will never meet expectations.

To prevent cracking of the screed along the perimeter of the walls, put a damper tape about five millimeters thick.

Step 1. Calculate the approximate amount of materials. This is easy to do, knowing the area of \u200b\u200bthe room and the average thickness of the screed. You do not need special accuracy, up to a kilogram you still will not be able to determine the amount of materials. Buy them with a small margin, the surplus will always be useful in the future at a construction site.

Step 2 Prepare the mass. We have already mentioned that it is better to mix with a concrete mixer or a shovel in a large container. If you do not have either the first or the second, then prepare the solution in a bucket using an electric drill with a large whisk.

But be prepared for difficulties, the process is not so simple. Carefully monitor the overheating of the drill motor, while mixing a thick mass, it works with critically large loads. As soon as the body of the tool is heated, immediately stop mixing, cool the stator and rotor windings. Overheating of their insulation causes a short circuit, or at best significantly reduces the service life. After each overheating, the insulating properties of the special lacquer decrease, the situation repeats progressively until a short circuit occurs.
Important. There is a common misconception among inexperienced builders that electrical tools need to be turned off for cooling purposes. This is not true. Of course, in this state they will cool down, but this will take a very long time. Professionals always cool electric tools plugged in, just remove the load. All engines have an efficient air cooling system with built-in fans. Without load, no thermal energy is released, and a powerful air jet quickly removes excess heat.
Cement does not need to be taken from the bag with a shovel, it is a long time, the material will inevitably wake up a little. Experienced builders advise doing it differently.
- The sealed bag should be placed on a piece of pipe or a strong rail.
- Use a utility knife to cut through the top of the bag.
- Using a pipe, lift it and put the two halves in a vertical position.
- Use a pipe to break the uncut part of the package.
Now you can effortlessly lift half of the bag of cement and pour it into a container for preparing the solution.

Do not forget that water is always poured first, then sand should be added, mixed a little, and only after that cement and expanded clay are poured out. Water is added in such a way that the expanded clay balls do not float, but are distributed by weight.
Step 3 Step by step, throw the finished solution on the floor, level it a little and level the plane with the rule. You will have to work in an uncomfortable position, use knee pads to make it easier. Don't throw too much mortar at once, you should be able to reach the extreme point easily as a rule.

Practical advice. It is difficult to level the claydite-concrete screed with the rule, the balls are hooked by the lower plane and leave deep grooves on the surface.
There are two ways to solve this problem.
- The rule is to keep it not at right angles to the guide rails, but to tilt it. During alignment, it must be pulled towards you and at the same time intensively moved left and right. Due to such movements, expanded clay balls are recessed into the solution, the surface remains flat as a rule.
- On the surface, make a finishing screed with a cement-sand mortar.
Make a specific decision depending on the type of finish flooring chosen. For attic spaces, there is no need to level anything. If you later cover the screed with mineral wool, and lay the floor along the logs, then in this case the surface of the screed may have small indentations or protrusions. The screed will have to be fixed on laminate floors, parquet and all types of soft flooring.

To improve adhesion between a thin cement-sand screed and a hardened expanded clay screed, the latter should be moistened with plenty of water before work. The fact is that concrete quickly absorbs moisture, an insufficient amount of it will not allow the upper screed to gain the desired strength. Professionals advise pouring dry cement over a richly wetted screed and mixing it well with a broom with a liquid. This technique perfectly replaces modern primers.


The quality of the screed will improve significantly if the surface is leveled not after the claydite concrete has hardened, but immediately after it has been leveled. The new solution will tighten all the recesses and grooves, the material consumption will be significantly reduced, and the work will be accelerated. In addition, this technology ensures complete solidity of the screed layers, despite the fact that it is made with two different mixtures.

Final leveling of claydite-concrete screed
If you have little practical experience in the production of this kind of work, then the next day you will have to correct the shortcomings of the screed.
Important. Be sure to check if the material holds the weight of a person. If not, then you need to wait another day.
The surface should be leveled with a rule and a grater. The metal rails of the beacons can be pulled out or left in the mass, make your own decision, the quality of the screed hardly changes.
Step 1. Remove the metal strips from the solution. He has not yet gained maximum strength, the elements are removed without difficulty.
Step 2 Firmly press the rule to the surface and scrape off the bumps with back and forth movements. Make sure there are no indentations. As soon as tool marks appear on most of the surface, the base is considered level. Work as a rule not only parallel to the lighthouses, but also diagonally.

Step 3 Remove the dry mortar, moisten the surface, level the screed with a grater. If the recesses are too large, then they should be filled with mass. Never use an old mass for leveling, cement has already lost its ability to gain strength, it is useless to dilute it with water. Check the condition of the screed with a level or a rule; you do not need to achieve ideal indicators. The maximum allowable height difference for the most capricious coatings is 2 mm per linear meter, such parameters are easily achieved after several passes with a float. Start grouting from the far corner of the room and gradually move towards the exit.


This work is completed. Further arrangement of the floor can only be started after the screed has gained at least 50% of the maximum strength, the cement mortar gains such parameters in 10-14 days, the specific time depends on the microclimate in the room. If it is very warm and dry in it, then the screed should be watered every day. Keep in mind that the hardening of concrete is not due to the evaporation of water, on the contrary, it is needed for the optimal course of chemical reactions, as a result of which their solution turns into solid concrete.

Expanded clay prices in screed bags
expanded clay in bags
Video - Leveling the floor with expanded clay concrete screed