DIY crib: master class with drawings and photos. Do-it-yourself children's bed, features and subtleties of manufacturing Do-it-yourself crib house diagram
The house is an interesting design solution when arranging a children's room. Such a colorful and bright design can be easily and simply built with your own hands if you stock up on a detailed plan - diagram, consumables and tools.
Of course, such a product can also be purchased ready-made in a store. But it will be highly expensive. In this article we will take a closer look at how to make a stylish, functional and practical bed house for your child.
The advantages of self-production also include the ability to build a product in any proportions, using different colors, and suitable sizes.
You can make a bed house for a child with your own hands in different designs. It can be single or design. Products for boys can be painted blue and thick curtains hung on them.
And cribs for girls can be equipped with a canopy made of airy tulle, decorated with flags, ruffles or balls.
Before deciding on the type of design, you need to choose the shape of the product, its dimensions and design. For very young children, it is worth choosing low single-tier structures. If there are two children in the family, it is recommended to make a bunk bed - a house with a ladder.
Any house bed design will consist of the following elements:
- rectangular bottom base;
- vertical supports;
- wall-ribs;
- roofs.

Important: any children's furniture should be practical, durable and safe. Safety lies not only in the choice of environmentally friendly and natural materials, but also in the stability of the product, the absence of sharp corners, and the presence of sides.
Materials for children's furniture
The choice of materials for making a house bed depends on your personal wishes, the shape and design of the product, and the features of the children's room.
You can make such furniture from:


Advice: to save on making a bed house, you should make the product in the form of a tent. The walls and roof of this design are made of a frame, and a canopy made of organza, tulle or chiffon is fixed on top.
Drawing
Making a house bed for children is a responsible process. Here you should carefully think through everything down to the smallest detail and make a good drawing of the future product. On this drawing you must enter quantity of all individual elements of the product, their sizes, mounting options.
Attention: the size of the frame is adjusted strictly to the dimensions of the mattress. Before starting to make a bed, it is recommended to purchase a mattress in advance.

The size of the bed will directly depend on the age of the children:
- for preschoolers product dimensions will be: 1300 by 750 by 1400 mm;
- for schoolchildren— 1600 by 900 by 1700 mm.
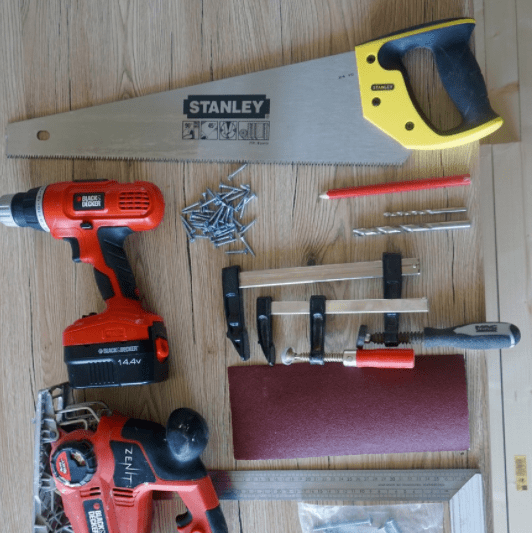
Tools
For high-quality and efficient assembly of the product, you will need to prepare materials and tools in advance. From tools The following will be useful in the workflow:

From materials you will need:
- for vertical supports;
- plywood;
- slats;
- self-tapping screws;
- sandpaper;
- tassels;
- paints and varnishes;
- stain.
How to make and assemble from timber with your own hands?
The sequence of manufacturing parts and assembling the structure is as follows:

When making and assembling a house bed recommended:
- screw in the screws slowly and carefully to prevent cracking of the wood;
- use a vice when drilling holes;
- use modern drills;
- clean lumber with sandpaper.
Finishing furniture for a boy or girl
 After making all the components of the house bed and assembling them, you can begin finishing. Products carefully cleaned with a grinder and must be treated with antiseptic compounds.
A simplified version involves opening the wood with stain and varnishing it. But since this bed is intended for small children, its design should be made bright and interesting. Decorating the bed depends on the overall interior of the room and the personal preferences of the children. For boys, blue, gray or blue colors are used, for girls - pink and pastel colors.
Advice: You can decorate the house bed with your own hands with garlands in the form of stars or balls, or hang a canopy.
 Depending on the personal wishes and preferences of the children, the bed house can be made open or closed. In the first version, the design will be an imitation of walls and roof.
Such products look light and do not clutter up free space.
And the second are more functional products, which have a roof, fencing, walls and even lighting. This type of crib can become not only a great place to sleep, but also a whole playground.
Use your imagination, make your children real works of art in their room with the help of original bed decoration. You can build a bed house on your own:
- stylized as a princess castle;
- for exciting sea adventures;
- in the form of a fortress for young boys.
Photo
The result can impress not only children, but also their parents:


Useful video
The entire manufacturing process can be seen in the following video:
Conclusion
In conclusion, it is worth noting that by making a house bed with your own hands, you guarantee your little ones a comfortable and cozy sleep in a soft and beautiful place, give them the opportunity to feel like princes and princesses and simply decorate the interior of the children's room, adding a truly fairy-tale atmosphere to it.
In contact with
A costly event for parents. To cut costs and furnish the children's space with furniture, you don't have to buy it. One of the available options is a crib; you can make one even if you have no skills.
Before you start making a crib, you need to make a calculation taking into account its design and prepare the necessary materials. A bed made to individual measurements will not let you down in use.
When taking measurements, accuracy must be observed.
Design calculation and drawing

Selection of materials for assembly
When choosing materials, it is better to give preference to natural materials; solid wood and plywood are ideal for this purpose. The use of natural materials will save the child from toxic effects. You should purchase the necessary fittings, fastenings and other materials taking into account the design of the bed.
Use only well-dried wood, without visible damage or knots.
Necessary materials

The most expensive part of the cost will be on the mattress. There is no need to save money on buying a mattress, from
its quality depends on the health of the child.
An orthopedic mattress guarantees a comfortable sleep and eliminates the problems of incorrect body position during sleep.
Where to start assembling a crib

When assembling, the screws must be tightened so that they do not stick out.
Assembling linen boxes
Once the base is prepared, you can begin making the cabinets. Typically, the crib has 1-2 cabinets with a pull-out mechanism. The base is made of solid wood, and the bottom is made of plywood.
If the child is small, you can make an educational mat for him yourself.
- The cut material is sanded and assembled according to the drawing;
- Equip the cabinets with a retractable mechanism, it is attached with self-tapping screws;
- To make the cabinets easy to open, you need to attach handles.
The back or head of the crib
 Depending on the type of crib, it can be decorated with additional elements - a backrest or headboard. The wooden back will prevent the child from touching the wall while sleeping and will protect the wallpaper.
While the headboard will allow you to comfortably position the pillow. Combined models provide for the placement of a backrest and headboard.
Depending on the type of crib, it can be decorated with additional elements - a backrest or headboard. The wooden back will prevent the child from touching the wall while sleeping and will protect the wallpaper.
While the headboard will allow you to comfortably position the pillow. Combined models provide for the placement of a backrest and headboard.
- According to the drawing, it is necessary to cut the solid wood according to the shape of the intended backrest. Standard back height: 70-90 cm;
- Before fastening the back or headboard, do not forget to sand everything with sandpaper;
- Instead of self-tapping screws, it is better to use long bolts as fastening materials.
It is better to leave the parts of the headboard, footboard and backrest wooden; in this form the crib can be washed.
Finishing work
The moment the crib is assembled with your own hands, you can begin decorating it. You don't need any special tricks for this. Natural wood is absolutely harmless to the health of the child. To ensure that its surface is well preserved and has a smooth surface, the wooden parts must be coated with a non-toxic varnish. If the design includes bright colors for the crib, it can be painted with acrylic paint.
You cannot paint the crib in a residential, unventilated area where there are children.
DIY bed making video
Detailed video material will allow you to make a crib from wood and then paint it with acrylic paint. The author of the video explains all the working aspects, from cutting parts to assembly.
Types of children's beds
Choosing a children's bed in favor of a special design poses a difficult task for parents. Different bed models are classified according to functionality and dimensions: 
- cradle cot for newborn children, size 90 x 45 cm;
- standard playpen size 120 x 60 cm;
- cot for preschoolers with drawers measuring 140 x 70 cm;
- transformable bed size after transformation 190 x 80 cm;
- bunk bed with drawers and ladder;
- non-standard cribs in the form of a sports facility.
 Cradles and cots in the form of a playpen are designed for children from birth to three years. Using the diagrams presented on the Internet, you can make any model or in accordance with your own design. A crib painted white can be decorated using decoupage techniques and a removable canopy made of harmoniously selected fabric.
A crib for children from 3 years to primary school age will provide comfort during sleep and rest. Spacious cabinets with pull-out mechanisms allow you to store  Kids' things. Thanks to its simple design, it can be made in a few days. The presented model does not require additional decor. Unpainted wood looks natural and natural. Bright pillows and soft toys will help add bright colors.
A transforming bed will help out in situations where you need to save space. A transforming version of a sleeping place for a child can be bought in a store or created with your own hands according to drawings. Bunk beds also allow you to save space in a children's room.
The top tier of the crib must be equipped with protective railings.
Beds of unusual shapes
 Children are especially delighted with cribs of unusual shapes.
It is a mistake to think that you cannot make an amazing sleeping place yourself. Using the drawings, you can make cribs of a wide variety of shapes. Men who love working with wood can try their hand at making a machine bed.
Children are especially delighted with cribs of unusual shapes.
It is a mistake to think that you cannot make an amazing sleeping place yourself. Using the drawings, you can make cribs of a wide variety of shapes. Men who love working with wood can try their hand at making a machine bed.
 By building a bed in the shape of a sports facility, you can combine play and sleeping space into one. Active children will appreciate a crib with a slide or a fairytale house. After studying the complex design, you can make such a model yourself. To complement the sleeping area, use additional drawers and compartments for storing children's things.
What material is best to make a bed from?
The undoubted leader is natural wood of valuable species.
- The most common and affordable material is solid pine;
- Using alder will allow you to get a bed of noble colors;
- A beech crib will last for many years, it will not creak, crack or become loose;
- The beautiful structure of ash will give the piece of furniture a natural shine;
- Using solid oak will allow you to get an exquisite crib in which you can raise several generations of children.
A homemade bed with your own hands is a practical solution for arranging a nursery. The design of the presented models is quite simple, so a novice craftsman can make it. Using the instructions, drawings and detailed video material, it is quite possible to make a bed for a child.
The Scandinavian style for children's rooms is gaining more and more popularity, and a do-it-yourself bed-house is a real manifestation of parental care, skill and imagination. An original bed design, made taking into account the size of the room and the age of the child, is beautiful, safe and economical. Adults can be confident in the reliability of the bed’s design, and children can have a place to rest, just like the heroes of fairy tales.
There are a lot of options for how to make a bed-house. In terms of construction work, everything is becoming more standard; it is important to draw up a diagram of the proposed product, preparing the necessary materials.
Tools
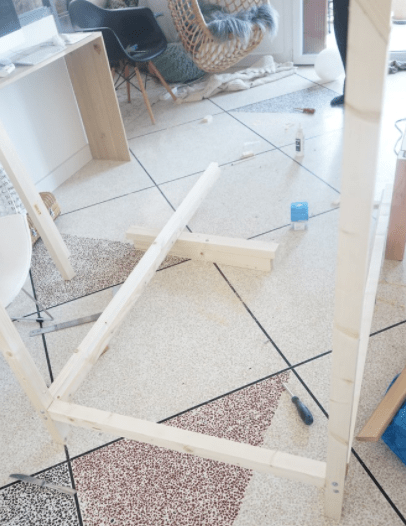
House walls
First of all, drawings are made for the bed-house using a simple pencil and a square. To build the walls of the described bed, four wooden beams are taken, each of which is 1 m 20 cm. These will be the supporting parts for the vertical structure of the house bed. To add aesthetics to a gable roof, the edges of all supports are sawn off from above to form an angle of 45 degrees.

Marking

Details of the walls of the house

The edges of the supports are sawn off at an angle of 45 degrees.
Roof
This part of the bed-house will also require four bars and the same steps, including finishing the edges at an angle of 45 degrees. All processed bars are assembled, the upper ridge is attached using wood glue. The parts can also be secured with a self-tapping screw, which should be screwed in at a distance of 3 mm from the border of the junction of two wooden parts. We advise you to follow some rules when working:
- It is recommended to clean all cuts with sandpaper;
- the self-tapping screw must be screwed in slowly so as not to delaminate the wood;
- When drilling, it is recommended to use a vice to secure the product;
- Optimal modern drills and a slow process are the key to quality work.
When two slats are fixed to the two supports of the future bed, the end result is the frame of the house. Repeating the procedure will lead to the appearance of two equal frames - the end walls of the bed.


Gluing parts

Connecting parts

End frame attachment
To complete the manufacture of the end frame of the bed, an 8.2 cm block is screwed at the bottom to support the vertical posts and stabilize the entire structure. For bed assembly, an eccentric tie of the side components is preferable. It is very important to make an accurate design for the desired hit. Self-tapping screws will help make the task easier. The structure is also attached to simplify assembly and save time with flat corners - squares with a side of 3 cm. All accessories for the procedure are available at a hardware store.
When making this tie, drill holes in the crossbar with a 10mm drill bit. They should be located on its midline, not through and have a depth of 12.5 cm. The diagram shows how to fix their outer edges 3.5 cm from the edge of the crossbar.
A 6mm drill bit helps create the hole on the side. It is fixed exactly in the middle and falls into a pre-prepared recess. The eccentric then firmly secures the required appearance of the screw. It is also possible to use wooden parts on long self-tapping screws with pre-gluing. We should not forget about stabilizing the connection using corner brackets.

Attaching the end crossbar


Finished end frame
Assembling the basis of the structure
Two thick bars are prepared as the sides of the bed. The inner side of the beam accommodates thin strips using self-tapping screws and involves screwing in the screws at an equal distance from each other. These parts will support the frame of the future bed of the house, which will make it possible to secure the slatted bed bottom.
For accurate work, it is important to make a template measuring 6 cm with holes for self-tapping screws - 2.5 cm. Use a pencil to mark the positions of the holes on all racks so that the upper edges completely coincide with the crossbar. A 6 mm drill is an assistant in organizing through holes in the marks. The procedure is fourfold: in this way, all the posts are connected to the sides of the bed.
Next, prepare the hole for the eccentric on the longitudinal post inside. Long self-tapping screws are screwed in from the outside, which should smoothly connect the side components of the bed and the vertical support with possible gluing of the joining area. The eccentric is inserted into the holes from below and the bolts are then tightened. Repeat the procedure to connect both frames to the sides of the bed.
After fastening the sides of the product to the ends of the house bed, the frame is supposed to be fixed, thanks to the three longitudinal components of the roof. Three beams according to the size of the sides are attached using an eccentric or self-tapping screws and glue. When choosing the latter, the bed-house must be strengthened with corner fasteners.

For assembly you will need two thick timbers

Thin strips will support the frame


The frame is assembled using an eccentric tie

Connection of side supports with crossbars
Slatted bottom
The slats are screwed to flat strips, which in turn are secured to the frame sides. It is important to carry out the correct tightening to hide the screws. The interplank interval is on average 7 cm, 13 parts go to the bottom. The remaining slats will be suitable for the safety side, assembled using corner brackets, but this is not necessary.
These slats can be borrowed from other sleeping places. There are new types of bed slats on sale. There are also ready-made models that are inserted directly into the bed frame. This option is suitable for standard size beds.

Fastening the slats

Decoration
A home-made bed-house has an undeniable advantage - it includes original proportions, colors and sizes. For the boys' version, you can use a sea-colored canvas or thick curtains to organize a military headquarters, and for girls - decor with flags and a canopy made of organza or tulle.
For children, parents always try to choose the best, including furniture, but looking at the completely non-childish prices for wooden beds, or for car beds, boats, etc. You will inevitably wonder whether it is worth buying such a thing for several years... Maybe not, but you can make it yourself. A do-it-yourself children's bed can be assembled from several boards and bars in a few days. No particularly complex work or special tools are required. Mostly you need hands and desire.
Wooden bed
This is a regular bed without any tricks. In the presented version, it is suitable for middle school age and teenagers, but later it can be completed for children from 3 years old (second photo report). Assembled from wooden parts (boards and bars). The project can be used as a basis, then adding design ideas.
You can argue about the color, but as a base it’s an excellent option
Materials and tools
No special tools are required for manufacturing. All that is needed:

The materials needed are:
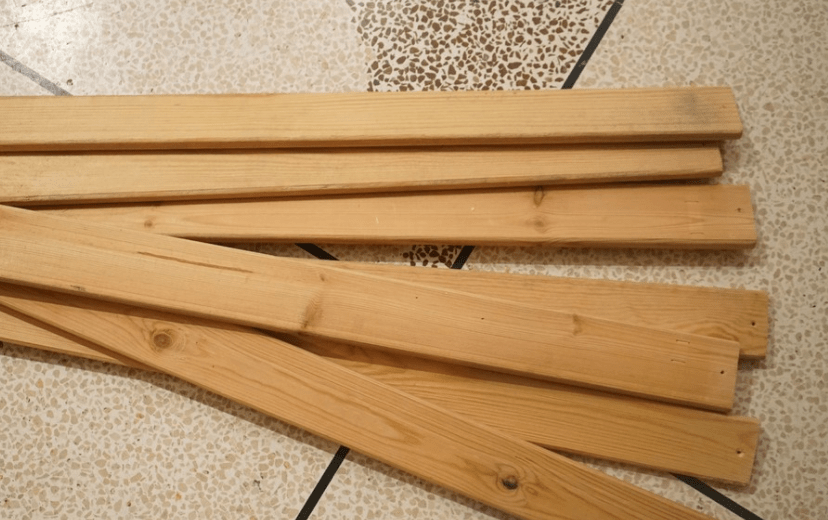
- timber - 50*100 mm;
- board 25*100 mm and 25*75 mm;
- wood glue;
- wood putty;
- sandpaper.
Calculate the number of boards based on the planned dimensions. Requirements for wood are low humidity (not higher than 16%) and the absence of knots or a small number of them.
Making legs
A DIY children's bed begins with making the legs. We cut blanks from 50*100 mm timber - longer for the headboard, shorter for the footboard. You need 4 pieces of each length. We glue the blanks in pairs. We take one, coat it with wood glue, lay the second one, check whether they are aligned evenly, and twist it with self-tapping screws. In principle, you can use 100*100 mm timber and not bother with glue, but the price for it is very high.

We recess the screw heads into the wood, then seal them with wood putty. After drying, sand until smooth (with medium or fine sandpaper).

We also use sandpaper to bring the joint to perfect condition - everything should be even and smooth.
For the backs you will need boards with a groove 25 mm wide. If you have a router, you can make it yourself or turn it in a carpentry shop. You can also buy dowels ready-made; select a drill according to their diameter.
We drill holes for dowels at the ends of the planks with grooves. Determine exactly their distance from the edge - they must be strictly at the same level on all planks.
Also, the holes should be the same depth - half the length of this piece of wood. In order to be able to navigate when drilling, a marker is attached to the drill - a strip of masking tape. It is used to control the depth of the hole.

Assembling the headboard and footboard
From a 25*50 mm board, planks of the same length are cut to fill the headboard and footboard. They are inserted into a groove coated with glue in advance.
We also drill a hole in the leg for dowels. First, we find the middle and draw a line along it (with a pencil). Place the assembled back, align it along the top edge, align the dowels on a line and mark the places where you need to drill holes for them (two at the top, two at the bottom). Pour a little glue into the holes and place the back. It must be planted tightly, without gaps. You can tap with your fist or mallet (do not damage the wood).

We repeat the same operation with the other leg. The not very beautiful joint at the top can be covered with a board, placing it on screws and covering the holes. As a result, this is what happens.

One important point regarding gluing parts. While the glue has not hardened, the joints are movable and the parts may become warped. Therefore, having set the angles to 90°, the part is fixed (with clamps or some other way) and left until the glue dries. The work continues after drying, and, as a rule, it begins with sanding the joint that has just been glued.
Making the base for the mattress
We take two boards 50*100 mm long, equal to the length of the mattress (or a couple of centimeters longer to make tucking more convenient). We install a 25*50 mm plank along the edge using glue and screws. It is 10 cm shorter in length - leave 5 cm on each edge. When screwing the bar, we make sure that the edges are aligned accurately. We drill a hole for each self-tapping screw - close to the edge so that the wood does not burst. In addition, we make a hole of a larger diameter along the cap - they should be hidden.

Since the adhesive joint in this case is firmly bonded, you don’t have to wait for the glue to dry.
From a 25*100 mm board we cut slats to fit the width of the mattress (you can again add 1-2 cm). They are attached to the just made planks with an emphasis. The installation step is 10 cm, for each plank there are 2 screws on each side. A hole is pre-drilled for each self-tapping screw (the diameter of the drill is 1-2 cm less than the diameter of the self-tapping screw), the head should go into the wood.

The holes for fasteners are covered with putty and sanded after drying. Cutouts are made in the outer planks for installing legs.

DIY children's bed: assembly
We finally seal all chips and defects on the visible parts of the bed with putty, and after drying, sand it until smooth. Then we prime and paint it in the chosen color. After painting, all that remains is to connect the backrests and the base for the mattress and we can consider that the children's bed with their own hands is ready.
You can connect the parts using special fittings - staples and curtains, or simply - by nailing a corner or a block on which to rest the assembled mattress shield.


DIY children's bed assembled
Video on the topic
One of the main advantages of making furniture for your home by hand is the ability to make it the right size from a material of the right quality and color. Everything is limited only by the imagination of the creator and the area of the children's room.
For example, for a boy’s room, you can make a do-it-yourself bed house in marine colors. As a result, the child will receive not only a wonderful place to relax, but also a real military headquarters. The girl will be pleased with the decor in the form of multi-colored flags, a delicate tulle canopy and other cute little things.
Preparation and manufacturing process
Children's rooms, especially those with a Scandinavian style design, very often include a bed in the form of a frame or frame house as a mandatory element. In a workshop or store, such interior elements are quite expensive. However, you can make such a bed with your own hands., even with a very modest budget.
Equipment and materials
To make a children's bed-house with your own hands, drawings are easy to make. All you need is the dimensions of the future structure and a couple of blanks.

You can purchase the material at a hardware store. The timber from which the structure of the bed house is made is also sold there. To make a children's bed for a mattress that is 165 centimeters long and 80 centimeters wide, you will need:
- Wooden beams in the amount of two pieces 40 by 70 with a length of 1660 millimeters.
- Four wooden beams 40 by 70, 1200 millimeters long.
- Two flat slats 10 by 70 by 1660 millimeters.
Step-by-step instruction
The implementation of this bed idea can cost about fifty euros. You can cut costs and use parts and the bottom from an old bed with slats.
Making the base
 First you need to make a base of four beams, each 1200 millimeters long. This structure is the vertical support of the bed. After installation and fastening, a small piece is sawn off at the top of each support beam at an angle of 45 degrees. This is necessary for the further formation of a beautiful roof with two slopes.
The cutting line must first be marked with a pencil using a square or rulers. Here the wood posts are marked and cut down using a regular hacksaw. But in specialized construction stores you can purchase a device for cutting at one angle or another.
Roof assembly
To make the roof, four wooden beams with a length of 730 millimeters are used. After fixing them, you should perform the same procedure as with the base boards - file their edges where they meet the roof at an angle of forty-five degrees.
Important! You should immediately pay attention to the resulting cuts. To prevent the child from getting injured, it is necessary to treat the cut areas with a piece of sandpaper. The structure of the house itself is assembled from cut 1200 mm vertical supports. All this is attached to the roof ridge, made of 730 mm beams. The upper part of the ridge is attached to the general structure of the future bed using pre-prepared wood glue.

The joints of all parts of the roof and vertical supports must be additionally glued, preferably two or three times. After this, the entire upper part should be seated on 40 mm self-tapping screws. Bolts and screws must be screwed in at a distance of up to 4 millimeters from the junction lines of the two parts of the roof. This must be done without pressing too hard, since the wood tends to delaminate.
A little tip: when you drill the entire structure, use a vice. You do not need to drill very quickly; use only drills made of high-quality material suitable for wood. After screwing two roof strips to the supports, the frame of the future house is obtained.
Gradually our creation takes on its final shape. The procedure is repeated with the remaining parts. As a result, we get two identical frame structures - these are the end walls of the bed house.
Frame attachment

To completely complete the end frame composition, you need to screw an 820 mm block downwards. This baluster is a transverse support, supporting the mass of the vertical posts of the structure. This measure keeps the entire bed in balance.
The distance from the transverse beam of the bed to the floor of the room is 150 millimeters, since the project implies the presence of legs for the bed. But this does not mean that you are obliged to repeat everything thoroughly. The bed may have no legs. In this case, the cross beam will need to be screwed flush to the bottom edge of the vertical supports, without indentations.
Please note that an eccentric tie was used to assemble the side parts of the crib. It is also important to note that for such fastening techniques, your calculations must be very accurate. The result will be hitting the appropriate point. If such gluing turns out to be too difficult for you, then it would be better to use self-tapping screws. Then you need to additionally buy flat corners measuring thirty by thirty millimeters. This approach significantly speeds up the process and simplifies the assembly itself.
If a design with corners is easier and faster to assemble, why do some people still stop at gluing? The answer is simple - iron corners look less stylish and aesthetically pleasing. The eccentric adhesive liquid firmly and reliably holds all parts together, their connection is hardly noticeable.
 Related materials and items for the screeding process can be purchased at specialized stores for repairs and construction. For such a hidden installation, you need to drill holes in the bottom beam of the bed using the previously specified 11 mm drill bit. The hole should be located clearly along the middle line on the crossbar. Please note that the hole is through. Its depth reaches 130 millimeters.
The hole is separated from the edge of the crossbar block by about 40 millimeters. Here it is worth paying attention to the size of the bolts and screws used. The next step is to drill a neat hole from the side, right in the middle of the beam, with a six-millimeter drill. It should fit clearly into the recess we made earlier. A screw must fit into the resulting opening, then the entire structure is secured with an eccentric.
Another good tip. You can attach all the wooden parts of the bed to long self-tapping screws, having previously treated them with an adhesive. Please note that the connection must be balanced using corner-type brackets.
Assembling the base of the house
 To assemble this part, we will need several thick beams with a section of 40 by 70 by 1660. They will meet the characteristics of the sides of the crib. From the inside, thin strips (10 by 70 by 1660) are screwed to the wood blocks using self-tapping screws.
Be sure to keep an eye on so that the screws are always at an equal distance from each other. These plates serve as support for the installed frame that supports the bottom of the bed house. We have already assembled the frame frame using a gluing liquid - screed. At this stage, it is critically important to accurately measure and adjust everything, and to avoid mistakes in your own calculations.
Make a template 6 centimeters long from a piece of wooden block in advance. Several holes are made in it for self-tapping screws. They are located at a fixed distance of 25 millimeters from each other. With its help, the proposed holes are measured on all other future racks.

Using a wooden template and a pencil, mark the location for the holes. It is important to draw marks on both sides of the bars on all four crib posts. It is important to accurately place the upper end of the template at the level of the upper edge of the crossbar.
After finishing the basting, take a 6 mm drill and make through holes in the designated places. This procedure is performed only four times - the vertical posts are tightly and securely connected to the sides of the bed.
On the inside of the longitudinal post you need to mark a place for the future hole into which the eccentric is placed. It is made with a 10 mm drill. The outer side is processed, after which longer screws are screwed into it - up to 10 centimeters.
It is important to take into account that the bolts on the self-tapping screws should fit smoothly into the prepared holes, connecting the verticals with the side parts of the bed. You can also additionally glue the structure.
Particular attention should be paid, of course, to the joints. After all the operations performed, adhesive liquid is poured into the holes in the lower tier, and then the bolts are tightened. You need to carry out a similar operation with all parts of the frame structure, then connect it all to the sides of the bed-house.
Attaching the general frame
 The sides of the bed house are already securely screwed to the ends. Now comes the strengthening of the overall structure. This is done using four bars. For this we will use parts 1660 millimeters long.
It is imperative to take into account that the length of the beams must exactly match the length of the sides of the crib. All components are secured in the same way as in the previous stages - using an adhesive mixture and self-tapping screws. Do not forget also about additional strengthening of the composition with the help of corner fasteners.
Making rack bottom
 In this case, the crib contains slats from an old slatted bed. If you do not want to use the old bottom or do not have one, then a hardware store can offer you an excellent alternative - specialized slats. These beds will fit standard mattresses.
The slats are fixed directly on flat strips; on the sides they are attached to the four sides of the frame base. You need to screw all the parts together so tightly that parts of the screws do not stick out from your product. You can also leave a small gap between each plank - in this case it was 8 centimeters. For the bottom of a standard mattress, it was necessary to screw 14 slats.
Tip: from the pieces left after cutting the slats, you can make a wonderful side. For small children this is a mandatory safety element. It is assembled using one or more brackets secured at each corner. That's all, work on the crib house is finished. The time required was about noon.