How to build an indoor pool. How to build a pool in the country with your own hands - a complete step-by-step instruction
For most city dwellers, the dacha has become a place of relaxed rest. A pool built with your own hands will definitely find its fans.
Before proceeding with the construction of such a large object, it is better to first build a small body of water, such as a fountain or pond.
There are many technologies and ways to build a pool with your own hands. Let's consider several options.
Do-it-yourself monolithic pool. Photo step by step
To build a pool with your own hands, you must complete a series of successive steps. The main steps are:
- creation of a plan and design drawing;
- organization of drainage and laying of thermal insulation;
- installation of reinforcement;
- installation and wiring of communications;
- pouring concrete mortar;
- sealing, waterproofing and finishing.
How to build a monolithic pool with your own hands?
Get a quality result will help instructions for the construction of the pool in the country. The first stage of work does not depend on which pool is to be built. It can be very small or very large, but in any case, you first need to choose a seat. To do this, they take a detailed site plan and select options that are suitable for a number of criteria.

It is not desirable that large trees grow nearby. If the space is open and not shaded, then the water will warm up faster. Tree roots can damage the bowl, and falling leaves in the water can become nasty debris.
When planning a pit for a pool, it should be noted that the depth of the reservoir for adults
the first person should be one and a half meters, with a smaller one it is not comfortable to swim. Additionally, it is required to lay half a meter on the drainage layer and concrete walls.

Before digging a pit, you need to determine the location communications and make a plan for their distribution. Next, proceed to the excavation of the soil. The walls of the pit are made with a slope of five degrees. This will protect against soil shedding.


Consider next how to build a pool. The next step is laying waterproofing. First, a pillow is made of a fifteen-centimeter layer of sand and the same layer of rubble. Next, two layers are laid roofing felt. Its edges should rise above the surface of the pit by no less than twenty centimeters.

do-it-yourself swimming pool in the country. Photo step by step
Further, when arranging the pool with your own hands in the country, it is performed reinforcement. For this, a frame is created from A3 reinforcement. Material with a diameter of twelve millimeters is used. After reinforcement is carried out concreting. Ideally, the bowl is poured simultaneously, in one step. However, this is difficult to do, especially if a non-professional does the pool with his own hands.

instructions for building a swimming pool in the country. Photo
Usually the work is carried out in several stages. First, the bottom is concreted, making a slope of two degrees towards the drain, then they are taken for the walls.

In order for the resulting screed to be of the best quality, it is required to use vibrocompactors. While the concrete at the bottom hardens, communications can be laid.

When the concrete at the bottom hardens, the walls are concreted. For this, it is set formwork. The thickness of the resulting wall should be at least forty centimeters. With staged concreting, reinforcement is also performed in two approaches. After the formwork is installed, a frame is made, which is connected to the horizontal elements. Concrete is poured, compacted with vibrocompactors. When it hardens, you can begin to finish the surface of the bowl.


swimming pool in the country with their own hands. Video
Do-it-yourself multi-level pool in the country house. Step-by-step instruction
Detailed step-by-step instructions for building a pool are presented in twenty photographs. This is a detailed answer on how to build a pool yourself and at no extra cost. It does not have a filter, drain and other communications. Water is poured into the bowl, and after a while it is pumped out by a submersible pump and replaced with a new one.
First, a place was chosen and a plan drawn up. Then the pit is dug. Since it is stepped, the size of each step was verified. Concreting was carried out as they were excavated, and so on to the very bottom of the pool. A test flood with water shows if there are leaks. If they are absent, then the water is pumped out and the concrete surface is painted in a pretty color.


how to build a pool with your own hands in the country. Photo


do-it-yourself pool construction blog 2016. Photo


This option for arranging a pool with your own hands in the country does not require laying sewers for waste disposal. There is no need to install cleaning devices. All this makes such a pool cheaper and easier to maintain.
Do-it-yourself polypropylene pool
Pools are built from different materials, one of the possible options is polypropylene. It is reliable, durable, frost-resistant and does not require regular maintenance.

do-it-yourself polypropylene pool. step by step photos
After choosing a place, space markup for the pit. It is better to make it about a meter larger so that you can easily move around the bowl when connecting pipes and other communications. A height mark is fixed where the side should be. Deeper than the pool bowl will be, you also need to dig about half a meter. Below will be laid geotextile, and on it a layer of rubble thirty centimeters thick. The remaining twenty centimeters - reinforced concrete.
The pit can be dug manually or with an excavator. The soil is removed or distributed over the site.

The surfaces of the pit are leveled at elevations, geotextiles and crushed stone are laid, which are carefully compacted. For reinforcement, a mesh of twentieth reinforcement is knitted. The sides of the cells are twenty-five centimeters. So that the reinforcement does not lie on the rubble, they put it under bricks.


How to build a polypropylene pool with your own hands. Photo
If a large amount of concrete is required, then it is better to order it ready-made, in a mixer. This will allow the base plate to be poured in one go. Before pouring concrete, beacons are installed from round metal pipes, which will become the basis of the finishing floor. The concrete base is poured over the size of the bowl by half a meter on all sides.


While the base plate hardens, the components of the bowl are made of polypropylene. Such work will require welding extruder, equipped with nozzles for performing different seams. Polypropylene sheets are used four meters by one and a half with a thickness of five and eight millimeters. Five-millimeter propylene is needed to assemble the Roman staircase, because. it bends more easily.


do-it-yourself pool made of polypropylene in the country. Photo
The seams on the outside are welded using shoe designed for 90 degree seams. The seams of the inner side are welded with an oval bar using hot air gun.
The bottom is welded directly in the pit. First, a seam is made with a manual extruder on the reverse side, and then on the other side with a hot air gun and an oval bar.

Before laying a polypropylene sheet for the bottom, the concrete base is covered with geotextile with high density. Then a layer of extruded polystyrene foam. Before making a pool with your own hands from polypropylene, you should familiarize yourself with the welding technology recommended by the material manufacturer.

After connecting the polypropylene sheets for the bottom, markings are made on it for attaching the walls. The presence of markings allows you to make a container of exact dimensions with given radii. A welded wall is installed, a connection is made from the inside with a hot air gun. However, it is not basic, but is required only so that the structure does not move while the extruder is welding from the outside.


After installing the walls, the Roman staircase is fastened.


When the bottom, walls and stairs are assembled into a single structure, do-it-yourself pool construction continues with fastening stiffeners. They are welded with a welding rod using a hot air gun. The distance between the stiffeners is about sixty centimeters. For them, polypropylene is used, having a thickness of eight millimeters. Holes are pre-drilled in the slats to mount fittings with a diameter of 12 mm. Holes are made with a distance of half a meter. There is no need to put ribs in rounded places, since the rigidity of polypropylene is maximum there. The walls of the bowl are insulated with foam, which is placed between the stiffeners.


Four are installed in the pool bowl nozzles, skimmer and bottom drain. Under the drain, a hole should be provided in advance. If you forget about it, then the drain is placed in the wall, but in this case you will need a submersible pump to remove all the water from the bowl completely. All holes in polypropylene sheets can be drilled with a tool intended for wood.


The nozzles are tied with pipes made of PVC. They are glued together using special glue. The bonding process is easy. The pipe is sanded for the gluing length and the inner side of the connecting element (coupling, corner). The end of the pipe is chamfered at an angle of approximately forty-five degrees. Glue is applied to the pipe and to the connecting element with a brush. The pipe is inserted until it stops. The adhesive hardens in about four minutes.


It is put on installed pipes warming material. When pouring concrete, it can be torn off, so the surface is additionally wrapped with tape.


step-by-step instructions for building a pool. Photo


Correct connection will help to ensure the same water pressure in all nozzles. First, they are combined in pairs, and then a trunk is introduced in the center of the pair connection.
Filtration plants, heat exchanger and other devices are best installed in the basement. Pipes are laid in trenches and insulated.


To prevent concrete from pressing too hard on the walls of the pool, the formwork is installed from the outside and inside. The inner formwork is fixed relative to the surface of the earth and the sides. The procedure for pouring concrete is as follows. A formwork 30 cm high is placed, 30 cm of water is collected in the pool and a layer of concrete of the same thickness is poured. A day later, the pool is recruited by another 30 cm, the formwork is transferred and the next layer of concrete is poured.


The manufacture of the pool with their own hands is completed with finishing processes. 


What can be a country pool?
The design of the country pool can be almost anything. A general idea can be given by photos of pools in the country.

Every summer resident dreams of the early onset of summer, imagines himself on vacation on sunny hot days. In order to refresh yourself comfortably in cool water on vacation, you need to take care of building or buying a bath in advance. Many owners refuse this idea, considering it too costly and time consuming. In fact, making a small pool in the country with your own hands is within the power of any novice builder. You just need to study different manufacturing methods, choose the appropriate option and follow the instructions step by step.
What improvised materials can be used to build a country pool
You can, of course, buy ready-made from expensive materials and invite a team of installation specialists, but often a modest budget does not allow you to deploy a large-scale construction site. Many summer residents give up, and the reservoir remains a pipe dream for them. But a diligent owner will definitely find improvised and inexpensive materials, and independently make a durable and beautiful pool that will last more than one year and become a real decoration of the site.
As you make your way around your property, don't miss the following useful materials and things:

How to make a pool in the country with your own hands - step by step instructions with photos
It is very important to choose a suitable place on the site for the installation of the pool.

The choice of location has been made, now it is necessary to draw a sketch with dimensions and mark the dimensions of the structure with pegs in place, prepare the necessary tools.
For a pool of any type, it is necessary to make a platform so that the bowl stands evenly and firmly all season.
Foundation preparation steps:
- Remove the top loose layer of soil with grass, eliminate potholes, bumps, remove stones, debris, uproot protruding roots. If a decision is made to deepen the bowl, then dig a pit with a margin of space for the outer skin of the sides.
- Align the surface with a level strictly horizontally, pour a small layer of crushed stone, carefully tamp.
- If possible, line the pool with geotextiles that will protect the pool from insects and weeds from growing under it, as well as strengthen and level the base.
- Pour a sand cushion 10 cm thick, lay insulation or a special polypropylene substrate under the bottom.
Making a pool from pallets
This design can be built in less than a day and it will cost quite a bit.
To work, you will need the following tools and materials:
- old wooden pallets, at least 9 pieces, depending on the size of the structure. They are made in standard dimensions 80x120 cm;
- level;
- roulette;
- pegs and cord for marking;
- jigsaw;
- planer for processing boards;
- boards;
- nails;
- hammer;
- screwdriver;
- self-tapping screws,
- tie-down straps for fastening pallets into a single frame;
- film for lining the bowl inside;
- construction stapler;
- siding or trim boards;
- felt;
- scotch;
- antiseptic impregnation;
- paint and varnish.
Installation steps:
- Prepare a site or dig a pit if you want to deepen the pool. Lay out with foam or other insulation so that the water warms up faster. Spread a tarp or underlay on top.
- Treat all wooden elements with antiseptic and antifungal impregnation to prevent rotting and destruction of wood.

Spread the substrate on the site and start sequentially mounting the pallets
- Arrange the pallets vertically, forming a round shape, with the boarding inward, and knock them down with boards at the top, bottom, and middle to form a single frame structure. Strengthen it with tie-down straps, clamps or other improvised materials.

For reliability, fix the pallet structure with boards and special belts.
- Sheathe the structure from the inside with siding, upholster with boards, fill it with sand, line the inside with a waterproofing film.

Prepare the inside of the pool
- Then put felt or old blankets and towels on the bottom and sides for softness, secure them with tape or a construction stapler.

Lay out old blankets and towels for softness
- Cover the top of the side and the bottom of the pool with the finishing layer of the film, straighten it. Blue material will look great. Nail the sides of the boards on top, securing and removing all protruding edges and edges. Now you can draw water and check the bowl for leaks.

Lay a film in the pool, and sheathe it with a finishing material from the outside
Tire pool
First you need to find a larger tire, for example, a BelAZ tire has a diameter of more than 300 cm and a width of more than 95 cm and prepare the necessary tools and building materials:
- hacksaw or sharp knife;
- level;
- a bag of cement M-300;
- water;
- sand;
- crushed stone;
- liquid soap;
- paint and any decor elements;
- a container for mixing the solution, a drill with a mixer nozzle;
- owl shovel.
Stages of work:

The properties of rubber will allow you to enjoy such a work for more than one year, without fear of leakage and destruction.
Film pool
This method is the fastest - it allows you to create a budget version of the bath in two hours, which can be arranged right in the garden. It should be noted that such an express bowl will serve until the first puncture of the film.
Step by step instructions for making:

If necessary, such a reservoir is quickly removed until the next hot season.
Swimming pool made of plastic pipes
There are ready-made prefabricated models of pools on sale, the frame of which is made of PVC pipes, and the bowl is made of thick soft material or also plastic. Such a design can be made on its own from the pipes remaining from the repair or purchased. They are inexpensive and are sold at any hardware store.
For work you will need:
- PVC fabric, which does not let water through and is used for the manufacture of awnings and inflatable boats, it is very durable and is sold in various densities, an excellent solution for a homemade pool;
- shovel;
- sand;
- crushed stone;
- roulette;
- level;
- marker;
- an iron for soldering pipes or a building hair dryer with a special nozzle for welding the film;
- insulation;
- geotextile.
Assembly takes place in several stages:

The bath is usually made small or medium in size, it can be dismantled in the fall and hidden in the pantry until next summer.
Care rules
In order for a homemade pool to serve for several years, it needs proper care.

Having your own pool on the site is not a luxury item, it is quite affordable for an ordinary summer resident and can be made independently without significant financial costs. Thanks to the use of simple structures and improvised inexpensive materials, as well as simple rules for the care and purification of water, the pool will become an ornament to the dacha and will serve for more than one season for a comfortable stay.
It is difficult to find the owner of a country house, who at least once did not think about building a pool or a font in the house. This desire is understandable. Bribes the opportunity to swim regardless of the season and weather conditions, always be in good shape and incomparable pleasure from taking water procedures.
Many novice developers believe that making them is not very difficult. Enough desire, free funds, and the dream came true. Many of the pitfalls and features lurking in the "wet" area, equipped inside the house, are overlooked. This is exactly what we will talk about in today's material, from which you will learn:
- How does a pool in a private house differ from an ordinary font;
- Is it worth it to build a "wet" zone in the house;
- What nuances should be learned before starting the construction of a pool in the house;
- How to build a swimming pool in the house;
- How much will it cost to build a "wet zone" inside the cottage.
Pool and font: similarities and differences.
If you look at the results of our survey, you can see that the majority of FORUMHOUSE users were in favor of the "wet" zone.

But, before moving on to the features of arranging a font or pool in a private house, you need to understand these concepts, because. already at this initial stage, confusion arises, because often a font is called a pool, and vice versa.
A swimming pool is a complex engineering and hydraulic structure that includes a bowl, filtration equipment designed for water treatment, pumping equipment necessary for recycling (changing and, if necessary, draining water), and a water heating system.

A classic font is a relatively small container (sometimes mobile, made of wood) filled with cold water, designed for contrasting water procedures. Traditionally, a font is an attribute of a bath, and a small pool is a sauna. In the font there is a more frequent change of water.

The indoor pool is primarily intended for entertainment, swimming, and equipped with attractions - waterfalls, geysers, hydromassage, countercurrent (artificial current) - it becomes a center of attraction for the whole family.

Few people can afford to make a full-fledged swimming pool for several people “in three lanes of 25 meters” in the house. Therefore, developers choose a different type of pool: a health-improving, small one (sometimes also called a font), equipped with SPA equipment with a volume of water in the bowl of 1-3 m3.
The second option - sanitary facilities, with a volume of 3 to 8 m3, as well as the first type of home "reservoir", are used as an addition to the sauna, hammam or bath complex.

To swim, they build a larger structure - 15-50 m3, 1.5 meters deep (which is enough for swimming). Accordingly, the requirements for such structures, as well as their price, increase in direct proportion to their size.

But even if you want to build a relatively small pool in the house, with a bowl size of 3x5 meters, you should prepare for the costs in advance. Therefore, before proceeding with its construction and making a conscious decision, it is necessary to understand what requirements are imposed on the room inside which the “wet” zone is located.
Wet zone construction: pros and cons
The advantages are obvious - the pool is in the house itself, you can use it whenever you want. It is this, as follows from the comments of our users, that becomes the main driver of the desire to build it.

Lutsenko FORUMHOUSE user
For me, it will be a place of cultural relaxation, where you can splash around and sing karaoke.

Barnauleichik FORUMHOUSE user
I planned to build a big house for the whole family, as they say, "for centuries." Pool in the cottage I want 5 meters in length. I equip it with a countercurrent and I will "swim" against the current.
The participants of our portal are echoed by the user with the nickname Sintetik, who decided to build a house measuring 11x16 meters with a swimming pool and sauna. In his opinion, the main idea of such construction is to get all the water activities without leaving the building.
The advantages are obvious, but there is a second side to this issue. Minuses become real "underwater reefs" on which the desire to build a "wet zone" can break.
First, here are the results of our second survey:

As you can see, most of the users of our portal made a choice in favor of the option of accommodation on the site, in an extension to the house. This is due to the fact that the pool in the house is not just a large “bathroom” filled with water, but, as mentioned above, it is a real water complex equipped with expensive engineering equipment. Special requirements are imposed on its design, premises and building, which should be known in advance.
How to build a swimming pool at home
Already from the name "wet" zone it is clear that this room must meet a number of specific characteristics. These are reliable waterproofing, the use of waterproof materials and compounds for finishing the “wet” zone, summing up all the necessary communications, and a well-designed ventilation system.
In addition, a pool or a font in the house is always an additional and big weight. A stone bowl, the construction of which took tens of cubic meters of concrete, plus the water in it, exerts a significant load on the underlying structures or soil layers.

There are projects of private houses where the pool is located in the basement, on the first floor, or is located on the second floor (in this case, an additional load is placed on the ceilings and walls).
Based on this, we remember this rule - the pool is designed together with the house. The main mistake is to build a building, and then think about how to place a pool in it, or try to place a large font in the basement. The base plate in this case may simply not withstand the load and crack.
The pool and the house should be two independent structures. The pool bowl must not be connected to the walls of the house, the ceilings of the building or walls must not be supported on the bowl.

rex@ FORUMHOUSE user
The principle of construction is as follows - first we make a general project and coordinate it with the organization that will build your pool. According to technology, a bowl is first built, and then a building is erected around it. The depth of the foundation of the building in the place where it runs next to the pool is determined by the authors of the project.

Timidzhar FORUMHOUSE user
The foundation of the house should not be connected to the foundation of the pool.
Particular attention during construction should be paid to the strength and tightness of the bowl, as well as reliable waterproofing of the "wet" zone. Reinforcement, concrete grade, additives that give the mixture increased water resistance, waterproofing, additional equipment that is planned to be equipped with an individual pool, the availability of all necessary utilities - all this is taken into account in advance, and not after.

The waterproofing of the bowl must be continuous over the entire surface. When casting a bowl from concrete (if this construction option is chosen), it is undesirable to make cold seams - in the future they may become a possible place for leakage. From here - the walls of the bowl are poured in one go.
In addition, if it is planned to build a pool in a house, it is necessary to find out whether the soil can withstand the total mass of the building and the bowl filled with water, or the soil may eventually give uneven sedimentation, which will lead to an emergency: the walls of the building or the bowl will crack, and the water from it will begin to flow outward, washing away the foundation. In this case, expensive repairs will be required.
It is impossible to understand how to build a pool at home without solving a number of engineering and design problems. Moreover, building a bowl is not always one of the most difficult tasks.
How to build a swimming pool at home - problems and solutions
The organization of a room for a pool or a font and the availability of free space are one of the main factors influencing the final decision of their construction. Those. - an additional room is added to the area of residential and non-residential premises of the house, where a pool or font will be placed.
Considering that people do not swim in the pool every day, we come to the conclusion that a room will appear in the cottage, which will actually stand idle for a large amount of time. And the cottage itself will have to be built with an increased area, and all its engineering systems will be designed and tied to the maintenance of the pool.

Full-fledged indoor pools are built in cottages ranging from 300-400 sq. m or more.
But even having made a decision to build a huge house (which still needs to be maintained and heated), one must ask the opinion of the household - how often they will use the pool, and whether it will eventually turn into an expensive and useless toy that requires constant investment.
Many developers miss such an important point in arranging a “wet” zone as ventilation. In one of our previous articles, we already talked about, but we repeat - a large amount of water that is constantly in the house is a source of high humidity.

From 1 sq. m of the pool per day evaporates approximately 0.25 (the figure is given for reference) liters of liquid. Without the installation of supply and exhaust ventilation (which is calculated in relation to the area of the water mirror in the pool or font and the temperature of the water and air in the room), the pool in the house will turn into a constant headache.
In the absence of ventilation, the evaporated water will condense and fall out in the form of droplets on the surfaces of the "wet" zone. Over time, this will lead to deterioration of the finish, dampness, the appearance of fungi and an unpleasant odor.

And this is just one of many factors that complicate the arrangement of the “wet” zone of the house. Let's add the need to install engineering and filtration equipment, water heating, arranging indoor mortgages for additional communications.

You also need to think in advance where to drain the water. A septic tank or storm drain may not be able to handle a large volume discharge. That is, all systems in the house and the pool area must be calculated with a margin for its long-term operation. Do not forget to add on the costs of laying additional routes for electrical cables in the “wet” room, installing another electrical panel, the cost of purchasing moisture-proof switches and switches, pumps and electricity costs. After all, for the functioning of the pool, it is necessary to equip it with appropriate equipment operating from the mains. We calculate whether the allocated power is enough for the normal operation of the “wet” zone in the house. For guidance, let's resort to the following approximate numbers given by a user with the nickname Besrom:
- Filtration system - 0.55 kW;
- Illumination two LED lamps for 12 volts - 100 W;
- Control system, valve - 0.50 kW;
- Countercurrent - 3.5 kW;
- Waterfall - 2 kW.
Moreover, it is best to use a three-phase network of 380V. Not surprisingly, the monetary component becomes a decisive factor in answering the question "to be or not to be in the house" wet "zone."
Make a pool in the house: the cost of construction and maintenance

nah nah FORUMHOUSE user
I conceived the construction of a pool 15x5x3 meters. So I thought about how much it would cost me to maintain it for 1 year and 10 years, taking into account all the necessary planned activities and overhauls.
The "wet" zone in the house can become a significant expense item, because the pool or font must be filled with water, maintain its constant level (water constantly evaporates; to reduce the level of evaporation, the pool is covered with a special blanket or blinds). It’s not enough to understand how to make a pool in a country house, and what budget to lay down for construction - you still have to spend money on “chemistry” to disinfect water and, most importantly, maintain acceptable conditions and positive temperatures in winter. Those. water will have to be heated, and the heating system of the house may not be able to cope with this. Given that the climate in our country is harsh, and the heating season, depending on the region of residence, will last 6-8 months, the pleasure of water procedures can cost a pretty penny. 
rex@ FORUMHOUSE user, Moscow.
In my experience I will say build a building with a bathhouse, a shower room, a bathroom and a relaxation room with a pool of 3x6 meters cost 1.7 million rubles. Swimming pool with a concrete bowl and all heated equipment, countercurrent, waterfall - 1.2 million rubles.
According to user Step48, owning a house with a wet area is like owning a car. The more complex and expensive the car, the more expensive its maintenance. So it is here: you need to spend money on water treatment, water heating, maintenance (not everything can be done by hand), control the operation of equipment, perform scheduled maintenance, etc.

Sintetik FORUMHOUSE user
I built a pool in my house with my own hands. Bowl 3x4x1.5 meters. It took about 10 cubic meters of concrete. Construction cost 100 thousand rubles. Equipment + another 400 thousand rubles. Mosaic decoration - 200 thousand rubles. Total already 700 thousand rubles.
Based on these figures, the construction of a home "wet" area with a pool measuring 15x5x3 will cost 10 times more, because. a heavy bowl will pull a serious foundation behind it; it is necessary to make engineering equipment, pumps, etc. In fact, in terms of costs and further maintenance, this is not the construction of a room for a “wet” zone, but the construction of a second house, not even a house, but a full-fledged house.
Summarizing
Undoubtedly, having a swimming pool in a private house is both prestigious and useful, but only if there are sufficient funds for its construction and, importantly, constant operation and maintenance. In other cases, you need to think ten times before deciding to build it. Therefore, when arranging a “wet” zone or a room for taking water procedures, first of all, one must be guided by common sense and, as an option, build a small pool or font. Moreover, our portal has accumulated extensive experience in the construction of such home structures.
Titled "Fairy Tale".
When I thought about how to make a pool in the country, I saw that Internet resources mostly show expensive objects that are not always liftable even for a person with an average income. The fact is that the proposed models have built-in heating, skimmer or overflow filtration, various lights, and so on, which is much more expensive than the bowl itself.
Let's look at a budget option that almost every summer resident can do if he understands what concrete mortar is. And for a more detailed understanding of the process, we will show you the video in this article.
budget pool
Note. Below we will consider how to make a pool in the country house using the excavated method, since there is also a composite and frame method. But the second and third options are usually sold ready-made, they are more convenient to install, but their price will turn out to be higher than what we will offer you now.
Preparatory work

- The very first stage of construction can be called the determination of the required dimensions of the bowl and its shape.. And if the average depth varies between 120 cm and 160 cm, then no instruction affects the section of the perimeter. It all depends on the size of the site and the number of people who can simultaneously be in the pool.
- If everything is clear with the dimensions, then it should be noted that home-made pools in the country should be located in such a way that there are no trees nearby and it’s not even about the root system that can damage the concrete bowl. The problem is that the trees create a shadow over the water, making it cooler (we will not have heating) and, besides, falling leaves are garbage that you do not need at all.
- If yours, then you should choose the highest place so that when it rains, water does not flow into the pool bowl.
- When choosing any bowl shape, you will have to install wooden formwork with your own hands, but for rounded shapes it is somewhat more difficult to do, although it is quite realistic. So the easiest way to do this is in a pit with straight edges at any number of angles.
Installation work

After marking, we begin the device of the pool in the country with digging a foundation pit, only you will need to make it about 40-50 cm deeper and just as wide in each direction - this will be a place for pouring concrete.
But if you want to make a double formwork, then you will have to leave such a distance at each wall so that you can install an external shield. But you are unlikely to like this option - it is more expensive, and there are more labor costs, and the end result is almost the same.
When the pit is ready, you can start backfilling the sand-gravel cushion and installing waterproofing from a dense cellophane film. This film is best laid under the pillow, more precisely, in its composition - first pour, level and tamp a layer of sand 2-3 cm high and put cellophane on it with a twist on the walls. This inversion should be at least 30-40 cm above the bottom of the pool.
On top of the film, pour another layer of sand of the same height - it will serve to ensure that the pebbles do not damage the cut-off waterproofing. Then lay a layer of crushed stone with a thickness of 5-7 cm on the sand (the larger the fraction, the thicker the layer).
On the pillow, before pouring concrete, lay a plaster mesh, but you can also make a crate of wire rod with a section of 6-8 mm with a cell of 200 × 200 mm or 150 × 150 mm.

Now you need to prepare concrete and for such a structure we will fit M300 or M350 (corresponding classification B22.5 and B25) - you can see the proportions in the table above. The screed layer must be made from 70 mm (more possible) in order to completely eliminate the possibility of cracking.
During pouring, you will need to slightly raise the plaster mesh or steel crate so that it turns out approximately in the middle of the concrete layer, make the level itself with a slight slope, using beacons for this.
While the concrete is hardening, do not waste time - dig a trench for laying pipes for the drain and pumping water and you can lay the pipes right away (32 mm polyethylene brazed pipes will do here). Try to keep the pumping pipe as close to the floor as possible at the deepest point of the pool and install a filter on it, only so that it can be changed later.

About a week later, when it will be possible to walk freely on the floor, the installation of a pool in the country house involves the installation of formwork for pouring walls, with the preliminary installation of cut-off waterproofing. Shields can be made from edged boards, tightly fitting it at the joints so that there are no scars on the monolith, which then have to be removed.
But it will be even more convenient to make such shields from thick plywood or OSB, fixing them with timber and slats so that the sheet does not bend.
Recommendation. If you are planning to build a pool in the country in rounded shapes, then you will have to make the shields from plywood or OSB. You can easily bend such sheets to a certain extent and fix them with a beam and slats.

It is possible that you and your neighbors have country houses made of block containers that are mounted on a column base, but you could still see how the strip foundation is poured and how a metal frame is made for it, such as in the upper image.
To do this, you will need reinforcement (preferably with a variable profile) section 10-12 mm and steel knitting wire. Knit the structure in such a way that all parts of the metal are immersed in the solution by at least 50 mm - this prevents rusting.
Now you just have to install the frame and fill the formwork with concrete, only if you don’t have a vibrator, be sure to tamp the solution with some sort of rail - this way you will remove possible voids and increase the density of the mixture. It will be much better if the walls of the pool are a few centimeters above the ground and such a “base” can be made later, but it’s better right away, making the inner formwork a little higher, and installing a side of timber from the outside.
Advice. There will be a cold seam between the floor and the wall, through which water can seep. To prevent this from happening, use special termination tools, for example, KT Tron-2.

We learned how to build a pool in the country, but around it it is desirable to concrete a platform on which you can lie or change clothes. Such a construction should be rigid and easy to clean, so you can tile it, as in the photo above.
Conclusion
In conclusion, it should be said that if your site is not electrified, then you have a way out, this is renting a diesel generator for a summer residence or buying it. And for additional water purification, you can use ultraviolet disinfection lamps ().
Which of the owners of summer cottages or country cottages does not dream of their own pool on the site? And do not think that this is an extremely expensive and requiring great effort in the construction and operation of the structure. With minimal skills in building materials and some expenses, you can build an inexpensive pool.
In this article, we will tell you how to make a pool in the country with your own hands from various materials (concrete, frame, film), and also demonstrate videos and photos.
Pools may vary. For some, an inflatable tank, installed in a suitable place and filled with water from a hose, will be enough. If you want to build a solid stationary reservoir that can serve for many years, you will have to work.
First of all, you need to choose a suitable place. It should be removed from beds and trees. The less debris will fall into the water, the less maintenance effort will be required. In addition, it is necessary to think about the supply of water and its discharge. It is better to choose a simple shape of the pool, without sharp corners: in the form of an oval, circle, square or rectangle.
The easiest and cheapest way to build a pool is to cover the recess in the ground with a special film. However, this structure cannot be called reliable and durable. More often, owners prefer to build pools of concrete or polymer materials.
A fairly simple structure, quite suitable for self-construction, is considered a frame pool. Its feature is the design, which consists of a frame "skeleton" of metal pipes. The bowl is lined with three layers of PVC film. Inside it has a special nylon mesh, which gives the material additional tensile strength. The metal frame holds the water pressure.
It is placed with some recess in the ground or simply on the surface. The area for the pool must be prepared: remove all vegetation, and level the bottom of the shallow pit and fill it with sand or gravel. In some cases, even a concrete pad is poured.
Then the entire surface is lined with a heat and water insulator. Penofol or folitep is best suited here. These are modern heat-insulating materials made of polyethylene foam covered with aluminum foil. The mats are laid end-to-end and the seams are glued with construction tape.
After that, the pool itself is assembled according to the instructions attached to the kit. The only tool required for the job is a screwdriver.
Concrete
When erecting a concrete pool, work also begins with digging a foundation pit. In this case, the entire bowl is sunk into the ground. When calculating the dimensions of the pit, do not forget to add about 0.4 m to the wall thickness. The shape of the pit should repeat the outlines of the pool itself. The optimal depth can be considered 1.4 m. To make the recess as reliable as possible, its walls must be given a slight slope to the outer sides, about 5 °.

The finished pit of the desired shape must be carefully leveled, the soil compacted and a sand cushion about 30 cm thick laid on the bottom. Then the pool is waterproofed, everything is covered with a waterproofing agent (roofing material with bituminous mastic) in several layers and formwork is installed. Liquid concrete is poured into the gap between the wooden shields and the earthen wall. Additionally, the walls are reinforced with a double metal mesh. It simultaneously counteracts the pressure of the water in the pool and the pressure of the soil.

Note! Concrete grade - not less than M350.
The bottom of the future pool is also reinforced with a mesh and poured with a concrete layer of at least 20 cm. When the solution hardens, the formwork is removed and the entire surface is rubbed with "cement milk" - a liquid solution of cement and water without adding sand. This process is also called ironing. It allows you to remove microcracks on a frozen surface and prevent their occurrence in the future.

At the final stage, the walls and floor of the pool bowl are finished with a decorative coating. Usually it is ceramic tiles. However, you must first install a ladder, nozzles, waterfalls and underwater lights, equipment that facilitates the care of the pool.
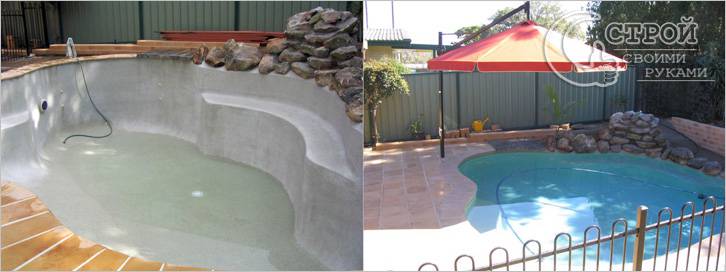
We offer you to see a photo report of the construction of a concrete pool:


Film pool

Due to its versatility, PVC film has been widely used for arranging swimming pools. It is used:
- to create a pool in the ground;
- for arrangement of frame pools;
- for sealing the concrete base of the pool bowl;
- as a repair kit for an old pool.
Note! PVC film has a thickness of 0.5–2 mm. The thinnest is suitable only for small pools with a minimum load. It is best to use a film no thinner than 1.5 mm with a reinforcing layer of fabric.
Pool in the ground

If you want to make a pool quickly and relatively inexpensively, then in this case you can dig a pit with sloping walls, which will be the base of the pool. Carefully remove the roots of the plants and tamp the soil. Make sure that there are no sharp stones anywhere, because they can damage the canvas.
The entire bottom of the pool is covered with sifted sand, with a layer of at least 3 cm and leveled. As a heat-insulating material, you can lay a layer of mineral wool, but it is better to spread roofing material, as it is not afraid of moisture. Spread a non-woven fabric over this cake and only then a film. After that, you can weld the seams.
Note! Before you start welding the seams, you need to practice on scraps of material so as not to spoil the canvas intended for sealing the pool.
In order to fix the edges of the web, you can use a special mounting bracket to which the film is welded. A simpler option is to drop the edges of the film. In this case, often a decorative stone edging is made around the pool.
concrete pool

We will not dwell on the creation of the structure of the pool itself - it should be a reinforced container. The main advantage of using PVC film is that no waterproofing is required. If the surface is not perfectly smooth, then it will be correct to use a substrate, which can be used as geotextile or the same roofing material. Actions with a film are similar when arranging a pool in the ground.
It remains to choose the method of fixing the film on the edges of the pool (it is better if it is a special mounting bracket) and you can use the product.
Repair of an old pool

It is no secret that the capital pool can lose its tightness over time or even crack. If the crack is constantly expanding, then no sealing, even applying liquid rubber, will help. In this case, it is possible, as well as for a concrete pool, to use a PVC film, having previously sealed the cracks and leveled the base.
Polypropylene
A polypropylene pool also requires a foundation pit and pouring a concrete bowl. The polymer allows you to solve the main problem in the construction of pools - to ensure reliable waterproofing. Polypropylene is an extremely durable material and is able to take any shape. Pools from it are made in two ways:
- a ready-made bowl of the desired size and shape is bought;
- sheet polypropylene is bought and a bowl is made from it.
Note! The cost of both methods is about the same.
Welding of sheets is carried out using a thermal welding machine - an extruder.

After mounting the polypropylene bowl and installing all communications, concrete is again poured from above and decorative material is laid.
It is polypropylene pools that are most suitable for installation in a summer cottage. They are not afraid of temperature changes and the vagaries of the weather.
Video
The full range of works on the installation of a polypropylene pool is presented below:
See how PVC pool film is welded:
Photo
Below in the photo you can see the various options for the construction and design of the pool:


